Intel Ups The Dev Board Ante With The Quark D2000

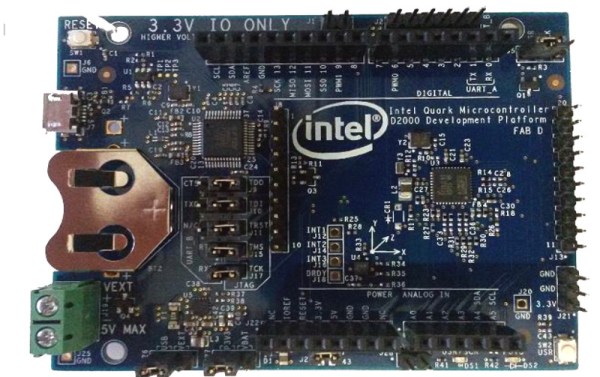
Intel have a developer board that is new to the market, based on their Quark (formerly “Mint Valley”) D2000 low-power x86 microcontroller. This is a micropower 32-bit processor running at 32MHz, and with 32kB of Flash and 8kB of RAM. It’s roughly equivalent to a Pentium-class processor without the x87 FPU, and it has the usual impressive array of built-in microcontroller peripherals and I/O choices.

The board has an Arduino-compatible shield footprint, an FTDI chip for USB connectivity, a compass, acceleration, and temperature sensor chip, and a coin cell holder with micropower switching regulator. Intel provide their own System Studio For Microcontrollers dev environment, based around the familiar Eclipse IDE.

Best of all is the price, under $15 from an assortment of the usual large electronics wholesalers.

This board joins a throng of others in the low-cost microcontroller development board space, each of which will have attributes that its manufacturers will hope make it stand out. Facing such competition the Intel board will have to be something rather special to achieve that aim, so why should it excite your interest? We would point to the low price, the x86 code if that is your flavour of choice, and the relatively tiny power consumption.

Stepping back from the dev board for a moment, consider this processor as an illustration of technological progress in semiconductor fabrication. Over twenty years ago this chip’s Pentium ancestor ran on 5 volts and got so hot you could fry an egg on it, here is a Pentium that can run on a few milliwatts from a coin cell. Fortunately you won’t be running Windows 95 on it though.

We’re sure we’ll see plenty of projects here in the future using the Quark. Intel’s previous effort in this space, the Edison, has made several appearances. We’ve covered its launch in 2014, looked at someone running Doom on it, and examined its use with audio effects.

Thanks [Nolan M] for the tip.

Microchip Unveils Online MPLAB IDE And $10 Board

Today, Microchip released a few interesting tools for embedded development. The first is a free online IDE called MPLAB Xpress, the second is a $10 dev board with a built-in programmer. This pair is aimed at getting people up and running quickly with PIC development. They gave us an account before release, and sent over a sample board. Let’s take a look!

Continue reading “Microchip Unveils Online MPLAB IDE And $10 Board”

Introducing The BeagleBone Blue

The BeagleBone is a board that doesn’t get a lot of attention in a world of $5 Raspberry Pis, $8 single board computers based on router chipsets, and a dizzying array of Kickstarter projects promising Android and Linux on tiny credit card-sized single board computers. That doesn’t mean the BeagleBone still isn’t evolving, as evidenced by the recent announcement of the BeagleBone Blue.

The BeagleBone Blue is the latest board in the BeagleBone family, introduced last week at CES. The Blue is the result of a collaboration between UCSD Engineering and TI, and with that comes a BeagleBone built for one specific purpose: robotics and autonomous vehicles. With a suite of sensors very useful for robotics and a supported software stack ideal for robots and drones, the BeagleBone Blue is the perfect board for all kinds of robots.

On board the BeagleBone Blue is a 2 cell LiPo charger with cell balancing and a 6-16 V charger input. The board also comes with eight 6V servo outputs, four DC motor outputs and inputs for four quadrature encoders. Sensors include a nine axis IMU and barometer. Unlike all previous BeagleBones, the BeagleBone Blue also comes with wireless networking: 802.11bgn, Bluetooth 4.0 and BLE. USB 2.0 client and host ports are also included.

Like all of the recent BeagleBoards, including the recently released BeagleBone Green, the Blue uses the same AM3358 1 GHz ARM Cortex 8 CPU, features 512 MB of DDR3 RAM, 4GB of on board Flash, and features the main selling point of the BeagleBoard, two 32-bit programmable real-time units (PRUs) running at 200 MHz. The PRUs are what give the BeagleBone the ability to blink pins and control peripherals faster than any other single board Linux computer, and are extremely useful in robotics, the Blue’s target use.

Right now, the BeagleBone Blue isn’t available, although we do know you’ll be able to buy one this summer. Information on pricing and availability – as well as a few demos – will come in February.

3D Printed Vice Holds Dev Boards Beside Breadboard

The Stickvise has been a staple of the Hackaday community for a while now. If you need something held for soldering there’s no better low-cost helping hand. But if you’re just using a breadboard and a dev board of some sort, there’s another vice on the horizon that uses similar spring clamping to hold everything in place while you build something awesome.

BreadboardVise1-cropped
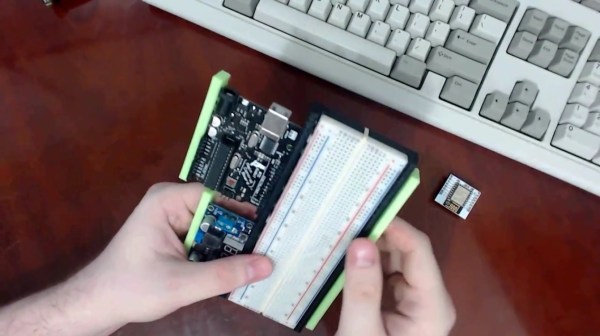
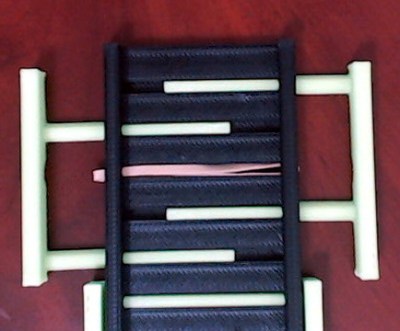
While [Pat]’s inspiration came from the aforementioned Stickvise, the new 3d-printed vice is just what you’ll need before you’re ready to do the soldering. The vice is spring-loaded using rubber bands. The base is sized to fit a standard breadboard in the center with clamping arms on either side to hold dev boards such as an Arduino. This innovative yet simple de”vice” grips boards well enough that you won’t be chasing them around your desk, knocking wires out of place, anymore.

There are some nuances to this board, so be sure to check out the video below to see it in action. As we mentioned, it uses rubber bands instead of springs to keep it simple, and it has some shapes that are easily 3d printed such as the triangular rails. If you want to 3d print your own, the files you’ll need are available on the project’s site. If you want to get even simpler, we’ve seen a few other vices around here as well.

The Stickvise is available for sale in the Hackaday Store.

Continue reading “3D Printed Vice Holds Dev Boards Beside Breadboard”

Review: Microchip Curiosity Is A Gorgeous New 8-bit Dev Board

Microchip has unveiled a new dev board called the Curiosity Development Board. I had my first look at this at Bay Area Maker Faire back in May but was asked not to publicize the hardware since it wasn’t officially released yet. Yesterday I got my hands on one of the first “pilot program” demo units and spent some time working with it.

I requested a sample board out of my own curiosity. As you may know, Microchip is one of the sponsors of the 2015 Hackaday Prize, but that partnership does not include this review. However, since we do have this relationship we asked if they would throw in a few extra boards that we could give away and they obliged. More about that at the end of the post.

Continue reading “Review: Microchip Curiosity Is A Gorgeous New 8-bit Dev Board”

Update: Battlezone On Vector Display Step-by-Step

When we ran the story of Battlezone played on tube displays earlier this week there were immediately questions about recreating the hack. At the time the software wasn’t available, and there is also a bit of hardware hacking necessary to get the audio working. You asked and [Eric] from Tubetime delivered. He’s posted a pair of articles that show how to get an STM32F4 Discovery board to play the classic game, along with instructions to build the firmware.

The hardware hack in this case is untangling the pinout used on the discovery board. It seems that one of the lines needed to get sound working for this hack is tied to one of the two DACs. If you read the original coverage you’ll remember that both of the DACs are used to drive X and Y on the vector display. The image above shows a cut trace on the bottom of the board. You’ll then need to route that signal to an alternate pin by soldering a jumper wire from the chip to a resistor on the board.

This (as well as one other alteration that bridges two of the chip pins) is a great example of work you should be unafraid to do on your own dev boards. We’ve had to do it with the Launchpad boards to get at the functionality we needed. We’d like to hear your own epic stories of abusing dev boards to do your bidding. Let us know in the comments.

A Dev Board For The ESP Lua Interpreter

From the great minds behind the NodeMCU Lua interpreter for the ESP8266 comes a proper dev board for the WiFi platform of 2015. They are calling it, the NodeMCU-devkit, and it’s a reasonable, cheap, and breadboardable breakout board for the ESP8266.

The version of ESP8266 used in this project is the ESP-12, the newer, fancier model with RF shielding, a questionable FCC logo, and every single one of the GPIOs exposed on castellated connectors. The rest of the board is a USB to serial converter (the CH340G – probably the cheapest USB to serial chip out there), a few passives, and a USB micro connector. It’s simple, cheap, and open source. You can’t do better than that.

This dev board is explicitly designed to work with the NodeMCU firmware, a Lua-based firmware for the ESP. Already we’ve seen some projects make the Hackaday front page with this firmware. Sure, it’s just a garage door opener, but that’s extremely impressive for a chip that’s only a few months old.

Thanks [Baboon] for the tip.