Hackaday, we have a problem. 3D printing is changing the world but it’s still too expensive to be embraced as a truly transformative technology.
With each passing year, the 3D printing industry grows by leaps and bounds. Food safe PLA is now the norm, with dissolvable and other exotic filaments becoming more mainstream. New filaments are making it possible to print objects that were not possible before. New CAD software is popping up like dandelions, with each iteration giving novice users a friendly and more intuitive interface to design 3D models. As time marches on, and we look into its future, a vision of the 3D printing world is evident – its only going to get bigger.
 Imagine a future where a 3D printer is as common as an ink jet printer in homes all across the world. A future where you could buy filament from the supermarket down the street, and pick up a new printer from any hardware store. A future where dishwashers, refrigerators and bicycles come with .stl files that allow you to print upgrades or spare parts. A future where companies compete to give the market easy-to-use printers at the cheapest price.
Is this future possible? Not until the technology changes. It’s too expensive, and that’s the problem you’re going to solve. How can you make a 3D printer cheaper? A cheap printer could change the game and make our future a reality.
Where do we need cost savings?
To get you going, here are some parts of common 3D Printers which think need to find cost-saving solutions.
XYZ AND HOT END MOTORS
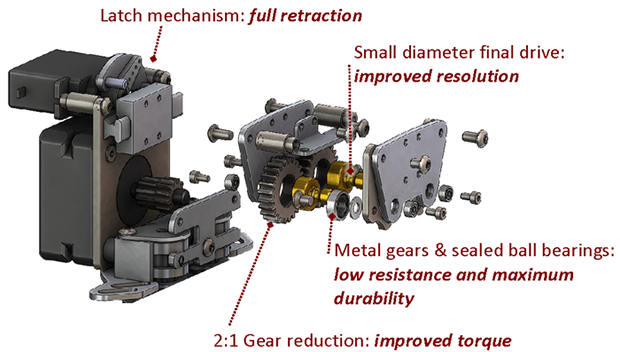
Stepper motors are going to run you about $15 each. Is it possible to use cheaper DC motors with some type of position tracking while keeping the cost down?
HARDWARE
Threaded rod is probably the cheapest way to move your XYZ axis. What about couplings and guide rods? Check out how this guy made a CNC out of parts from his local hardware store.
ELECTRONICS
No arduino with Easysteppers here – too expensive. We’ve just seen a super cheap controller a few days ago. If we use something other than NEMA steppers, it will radically change the typical electronic controller for our super cheap 3d printer.
EXTRUDER
What is the cheapest way to melt and extrude plastic? What about using thermistors in place of thermocouples? Let’s think out of the box with this, and see if we can get away from the typical stepper motor based extruder. Remember, everything is low cost. If we have to sacrifice some resolution, that is OK.
So there you go. Let’s hear your input on the issue. We need to make 3D printers a lot more affordable and we want to hear any ideas you have on the topic in the comments below. Do you think this is in our future and why?