The wood router is a versatile power tool which can be picked up at a low price. Nicer router setups are mounted underneath a table, with the cutting head poking through. This makes it easier and safer to work with the tool.
[Paul] combined his interest in electronics and woodworking by making a router table with automated controls [translation]. The neat part of this build is the automated height control, which ensures accurate cutting depth.
The router is mounted to a threaded rod, which allows it to be moved up and down by a motor. A low cost L298 motor driver provides the power to the motor, which is controlled by an Arduino Uno. A VCNL4020 based sensor board is used to measure distance and accurately set the router height. This tiny proximity sensor looks like a nifty chip, providing distance measurements up to 200 mm and an ambient light sensor in one package.
The routing table has an LCD display and buttons, allowing the user to dial in their desired height. The entire thing was built using recycled bits and well under $100 in new parts.
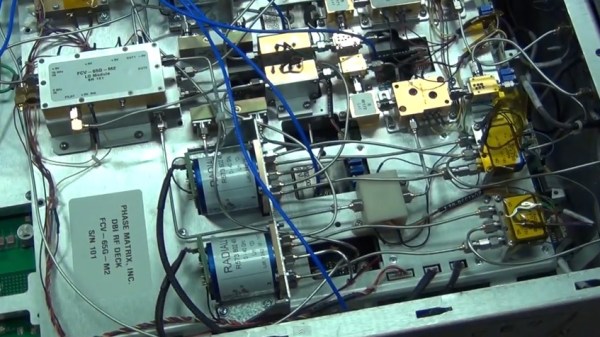
The Labmaster 10-100zi Oscilloscope is one of the fastest scopes in the world, coming in at a blistering speed of 100GHz with up to 240 Giga samples per second in real time. The scope is made by Teledyne LeCroy, and uses a frequency interleaving technology perfected by LeCroy, which allows it to provide a single 100GHz channel, or two 33GHz channels and a single 65GHz channel. The price tag? One million dollars.
[Shahriar] takes us inside the Teledyne Lecroy factory in Chestnut Ridge, NY where these scope are manufactured, and gives us the grand tour. First, an engineer describes the interleaving frequency technique that allows the lightning fast sample rates. Then they actually tear the million dollar scope down for our viewing pleasure. And if you still want more, they put it back together and run some tests to push the scope to its far reaching limits. Lastly, [Shahriar] takes us on a tour of the plant where the scopes are built.
It’s a lengthy video, so grab your favorite beverage and tuck in! It’s shocking how fast technology progresses. Just about 18 months ago [Shahriar] took us through the then reigning champion of scopes the Agilent DSA-X 96204Q which capturered 160GS/s at 62GHz.
Quick, you need 1000 pieces of wire of the same length, what do you do? The disappointing answer is to put on the miniseries masterpiece Frank Herbert’s Dune and get to work snipping those bits by hand. We usually clamp a scrap piece of molding protruding perpendicular to the bench to use as a length guide in these cases.
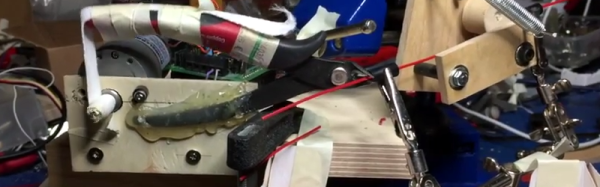
The more exciting answer is to build a robot to do it for you. There’s no way you can build the robot faster than you could cut the wire… unless you have admirable rapid prototyping skills like [Eberhard]. He strapped together a barebones machine from two motors, and one switch in no time. Pretty amazing!
Wire coming off the spool feeds through two guides held by a third-hand. The outfeed length depends entirely on timing; two slices of wine cork drive the wire which passes through the open jaws of a wire snip. Those snips are hot-glued in place, with a motor winding up a strip connected to the other handle in order to make the cut. The only feedback is a limit switch when the snip is fully open.
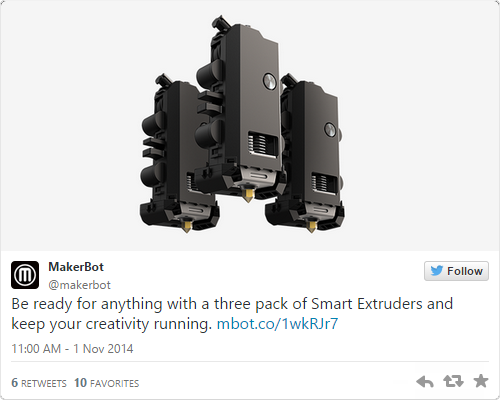
A direct link to Makerbot’s 3-pack of Smart Extruders is very hard to find
It’s been a little over a year since Makerbot introduced their new line of printers, and since then there have been grumblings about the quality of the Smart Extruder that each one of these printers comes with. While there is no 3D printer extruder that will not eventually clog, wear down, or otherwise break, there are reports of the Makerbot Smart Extruder failing in only hundreds or even tens of hours of use. Considering that a single large print can take a dozen or so hours to complete, you can easily see the why the Smart Extruder is so despised and why even the availability of a three-pack of Smart Extruders is a joke in the 3D printing community.
Of course a cheap shot at Makerbot that plays right into your preconceived ideas and prejudices is far too easy. We’re here to solve problems, not just state them, so here’s what we’re working with: to quantify the long-term reliability of 3D printers we need a way to measure the mean time before failure of extruders. This is already a solved problem; it’s just not implemented.
On aircraft and some very expensive engines that power things like buildings and ships, there’s one gauge, tucked away in the control panel, that keeps track of how long the engine has been running. It’s called a hobbs meter, and the idea behind it is extremely simple – when there is power going to the Hobbs meter, it counts out hours on a small clockwork display. The resolution of the display is only tenths of an hour, usually, but that’s good enough for scheduling maintenance and to be mentioned in NTSB accident reports.
Spend enough time with a 3D printer, and you’ll quickly realize the ‘estimated print time’ is merely a ballpark, and with failed prints the ‘total print time for this object’ isn’t exactly a perfect measure of how many hours you’ve been using your extruder. Only by directly measuring how many hours are logged on a hot end or how many kilometers of filament have been sent through an extruder will you ever get an accurate idea of how long an extruder has been running, and how reliable a printer is.
Hobbs meters are available from Mouser, but you’ll be overpaying there. The better option is from a vendor in a different niche; $30 for a meter that can connect directly to the extruder heater. If enough people add this and keep proper logs, there’s a slight chance of improving the state of 3D printers with real data and not the prejudices of people trying to justify their own designs and purchases.
But perhaps that’s too hard; adding a $30 item to a printer’s BOM just for the sake of data is a bit much. Luckily, there’s an even simpler solution that won’t cost a dime. Just measure the time a heater has been on in the firmware, or save the total length of extruded filament in a microcontroller’s EEPROM. Every printer firmware out there, from Marlin to Repetier to Sprinter has in it a way to calculate both the length of time a heater has been on or how much filament has been pushed through a nozzle.
However, this is 3D printing we’re dealing with. An organized community is not a luxury we currently enjoy, and for this to work several things are needed. The first is somewhere to upload failure statistics. This would be a web site, naturally, with the ability to input the printer make, extruder and hot end model, and the time since last clogged nozzle. The website itself is just a database, some JavaScript, a bit of CSS, and some hosting costs; not hard until you consider tens of thousands of operators would have to know about this website and contribute.
Secondly, if we’re not going with mechanical Hobbs meters there would need to be a ‘total time heater on’ or ‘total length of extruded filament’ variable in the various firmwares. There would hopefully be standardized Gcodes or Mcodes to read and reset this variable.
Will this happen? Of course not. Organization isn’t a strong suit of the RepRap project, and any company that implements Hobbs meter functionality will probably lock that up in proprietary obfuscation. However, Makerbot isn’t dumb, and given they’re selling three-packs of extruders, I would bet they have some data on the MTBF of their extruders. A community-based measurement of the most common cause of broken printers is certainly possible, but like all problems it’s one of organization, not technology.
3D Printering is a semi-weekly column that digs deep into all things related to 3D Printing. If you have questions or ideas for future installments please sending us your thoughts.
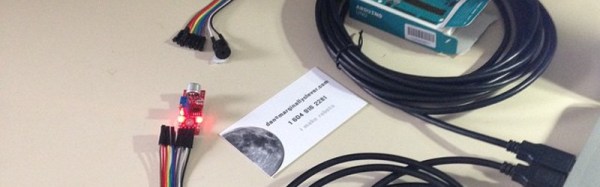
[Matt]’s 2008 Subaru’s stereo wasn’t really cutting the mustard for him anymore. He wanted to do something, something a little more custom than just an aftermarket stereo. After giving it some thought he decided he would try to mount an Android tablet in his car’s dash to act as a media player.
The HTC Evo View tablet appeared to be a great size to fit in the space left over from the stock radio, and it did fit nicely but there was a problem, the AC vent was in the way of the headphone and USB jacks! This was only a minor inconvenience for [Matt]. Instead of butchering the AC vents he decided to disassemble the tablet and see what the other options were. Luckily for him, both the USB and headphone jacks were on their own PCB boards. A quick slot cut in the rear tablet case allowed both connectors to now face towards the front of the car into the gaping crevasse the stock stereo once filled. Since the manipulated tablet case was facing inside the dash it wouldn’t create any unsightliness for the passengers.
With those connections out of the way it was time to focus on mounting the tablet in the dash. The stock trim panel that housed the old radio and two AC vents was modified with a hand-made fiberglass bezel to fit the tablet screen and make it look like the car came that way. The bezel was sanded smooth and painted to match the rest of the interior.
Originally, [Matt] had to turn the tablet both on and off when starting and stopping the car. He then stumbled upon a product called the IOIO. The IOIO allows an Android device to interact with the inputs and outputs; both digital and analog, I2C, SPI and UART. It even has a voltage regulator that can take the car’s 12v supply and knock it down to 5 for the tablet. [Matt] also connected the IOIO to the car’s ‘ignition on’ circuit to turn the unit on and off with the car.
[Matt] plans on doing more with the IOIO’s capabilities in the future, but until then, he still has a pretty nice looking and unique car stereo.
Morse code used to be widely used around the globe. Before voice transmissions were possible over radio, Morse code was all the rage. Nowadays, it’s been replaced with more sophisticated technologies that allow us to transmit voice, or data much faster and more efficiently. You don’t even need to know Morse code to get an amateur radio license any more. That doesn’t mean that Morse code is dead, though. There are still plenty of hobbyists out there practicing for the fun of it.
[Dan] decided to take a shortcut and use some modern technology to make it easier to translate Morse code back into readable text. His project log is a good example of the natural progression we all make when we are learning something new. He started out with an Arduino and a simple microphone. He wrote a basic sketch to read the input from the microphone and output the perceived volume over a Serial monitor as a series of asterisks. The more asterisks, the louder the signal. He calibrated the system so that a quiet room would read zero.
He found that while this worked, the Arduino was so fast that it detected very short pulses that the human ear could not detect. This would throw off his readings and needed to be smoothed out. If you are familiar with button debouncing then you get the idea. He ended up just averaging a few samples at a time, which worked out nicely.
The next iteration of the software added the ability to detect each legitimate beep from the Morse code signal. He cleared away anything too short. The result was a series of long and short chains of asterisks, representing long or short beeps. The third iteration translated these chains into dots and dashes. This version could also detect longer pauses between words to make things more readable.
Finally, [Dan] added a sort of lookup table to translate the dots and dashes back into ASCII characters. Now he can rest easy while the Arduino does all of the hard work. If you’re wondering why anyone would want to learn Morse code these days, it’s still a very simple way for humans to communicate long distances without the aid of a computer.
Whether you’ve been following Retrotechtacular for a while or have firsthand experience with the U.S. Army, you know that when they want to teach something to a someone, they’ll get the job done in spades with a side of style. The era between WWII and the Vietnam War was a golden age of clear, simple instruction that saw the Army use memorable material to teach a wide array of topics. And speaking of golden ages, the Army found success with comic book-style instructional magazines drawn chiefly by [Will Eisner] of Spirit fame.
The first of these rags was called Army Motors, which premiered in 1940.It introduced several memorable characters such as a Beetle Bailey-esque bumbling soldier named Private Joe Dope, and no-nonsense gal mechanic Connie Rodd, a sharp cookie who’s as brainy as she is buxom. Educational and entertaining in equal parts, the magazine was pretty well received.
Its successor, known simply as P.S. started its run around the beginning of the Korean War in June 1951. These magazines were intended as a postscript to the various equipment maintenance manuals that soldiers used. They offered all kinds of preventive maintenance procedures as well as protips for Army life. The eye-catching depictions of Connie Rodd demanded soldiers’ attention while the anthropomorphic equipment illustrations encouraged them to listen to what their equipment told them.
Additional artists including [Joe Kubert] and [Dan Spiegle] were brought in to produce P.S. on a monthly basis. As the years marched on, the magazine’s character base expanded to include representatives of other military branches solving specialized problems. The bumbling idiot types were 86’d pretty early on, but cheesecake was served well into the 1970s.
Did we mention that they’re still making P.S.? Here’s the February 2015 issue and a friendly PDF warning.


 The first of these rags was called


