Our first 3D printers only printed ABS and PLA plastic. Yeah, we heard about PVA for support structures, but no one could get them to stick. There was also polycarbonate, but you had to have an all metal hot end with a fan to print that stuff. Now there’s a lot of variety out there: flexible, wood and stone, nylon, PETG, and more.
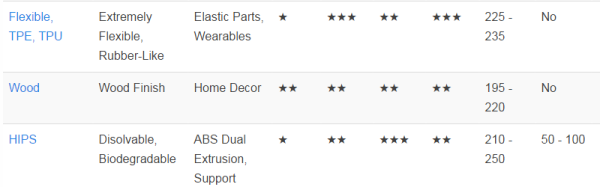
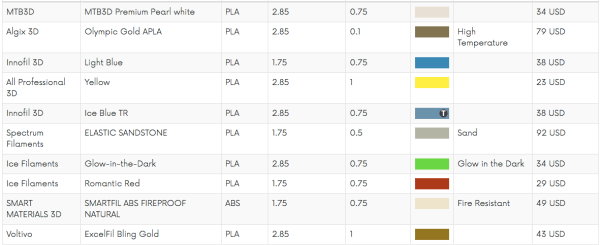
If you are still printing with just the old standards, you might enjoy [all3dp’s] comparison chart of 30 different filament types–that’s enough for one day a month–well at least for four months. It is too many for February, and a day short for the rest of the months. In addition to a table, there’s a short write-up about each type of plastic, its characteristics, and its technical data. There’s even magnetic PLA (see video below) which, in addition to being magnetic, will actually rust in water which might be good for some artistic prints.
Let’s face it. Printing in plastic is old hat. It is fun. It is useful. But it isn’t really all that exotic anymore. The real dream is to print using metal. There are printers that handle metal in different ways, but they aren’t usually practical for the conventional hacker. Even a “cheap” metal printer costs over $100,000. But there are ways you can almost get there with a pretty garden-variety printer.
There’s no shortage of people mixing things into PLA filament. If you have a metal hot end and don’t mind wearing out nozzles, you can get PLA filament with various percentages of metal powder in it. You can get filament that is 50% to 85% metal and produce things that almost seem like they are made from metals.
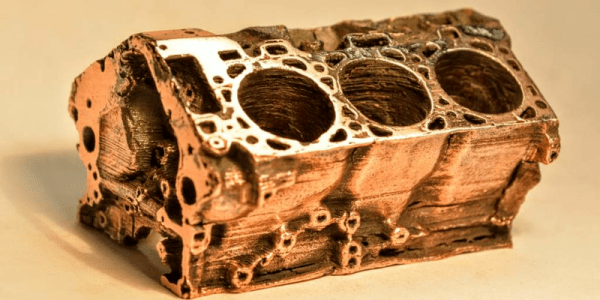
[Beau Jackson] recently had a chance to experiment with a metal-bearing filament that has a unique twist. Virtual Foundry’s Filamet has about 10% PLA. The remaining material is copper. Not only do you have to print the material hot, but you have to print it slow (it is much denser than standard PLA). If it were just nearly 90% metal, that would be impressive, but nothing too exciting. The real interesting part is what you can do after the print is complete. (If you don’t want to read, you can always skip to the videos, below.)
Is it possible to recycle failed 3D prints? As it turns out, it is — as long as your definition of “recycle” is somewhat flexible. After all, the world only needs so many coasters.
To be fair, [Devin]’s experiment is more about the upcycling side of the recycling equation, but it was certainly worth undertaking. 3D printing has hardly been reduced to practice, and anyone who spends any time printing knows that it’s easy to mess up. [Devin]’s process starts when the colorful contents of a bin full of failed prints are crushed with a hammer. Spread out onto a properly prepared (and never to be used again for cookies) baking sheet and cooked in the oven at low heat, the plastic chunks slowly melt into a thin, even sheet.
[Devin]’s goal was to cast them into a usable object, so he tried to make a bowl. He tried reheating discs of the material using an inverted metal bowl as a form but he found that the plastic didn’t soften evenly, resulting in Dali-esque bowls with thin spots and holes. He then flipped the bowl and tried to let the material sag into the form; that worked a little better but it still wasn’t the win he was looking for.
In the end, all [Devin] really ended up with is some objets d’art and a couple of leaky bowls. What else could he have done with the plastic? Would he have been better off vacuum forming the bowls or perhaps even pressure forming them? Or does the upcycling make no sense when you can theoretically make your own filament? Let us know in the comments how you would improve this process.
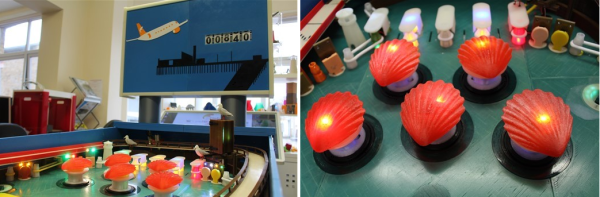
The bumper design is particularly interesting. The magic happens with two rings of conductive filament. the bottom one is stationary while the top one is a multi material print with a flexible filament. When the ball runs into the bumper the top filament flexes and the lower rings contact. Awesome. Who wants to copy this over to a joystick or bump sensor for a robot first? Send us a tip!
The whole document can be read as a primer on pinball design. [Tony] starts by describing the history of pinball from the French courts to the modern day. He then works up from the play styles, rules, and common elements to the rationale for his design. It’s fascinating.
Then his guide gets to the technical details. The whole machine was designed in OpenSCAD. It took over 8.5 km of eighty different filaments fed through 1200+ hours of 3D printing time (not including failed prints) to complete. The electronics were hand laid out in a notebook, based around custom boards, parts, and two Arduinos that handle all the solenoids, scoring, and actuators. The theme is based around a favorite bowling alley and other landmarks.
It’s a labor of love for sure, and an inspiring build. You can catch a video of it in operation after the break.
We’re not sure what a typical weekend at [Walter]’s house is like, but we can probably safely assume that any activity taking place is at minimum accompanied by the hum of a 3D printer somewhere in the background.
Those of us who 3D print have had our experiences with bad rolls of filament. Anything from filament that warps when it shouldn’t to actual wood splinters mixed in somewhere in the manufacturing process clogging up our nozzles. There are lots of workarounds, but the best one is to not buy bad filament in the first place. To this end [Walter] has spent many hours cataloging the results of the different filaments that have made it through his shop.
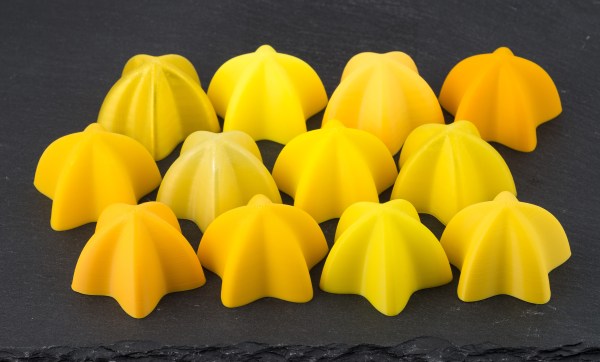
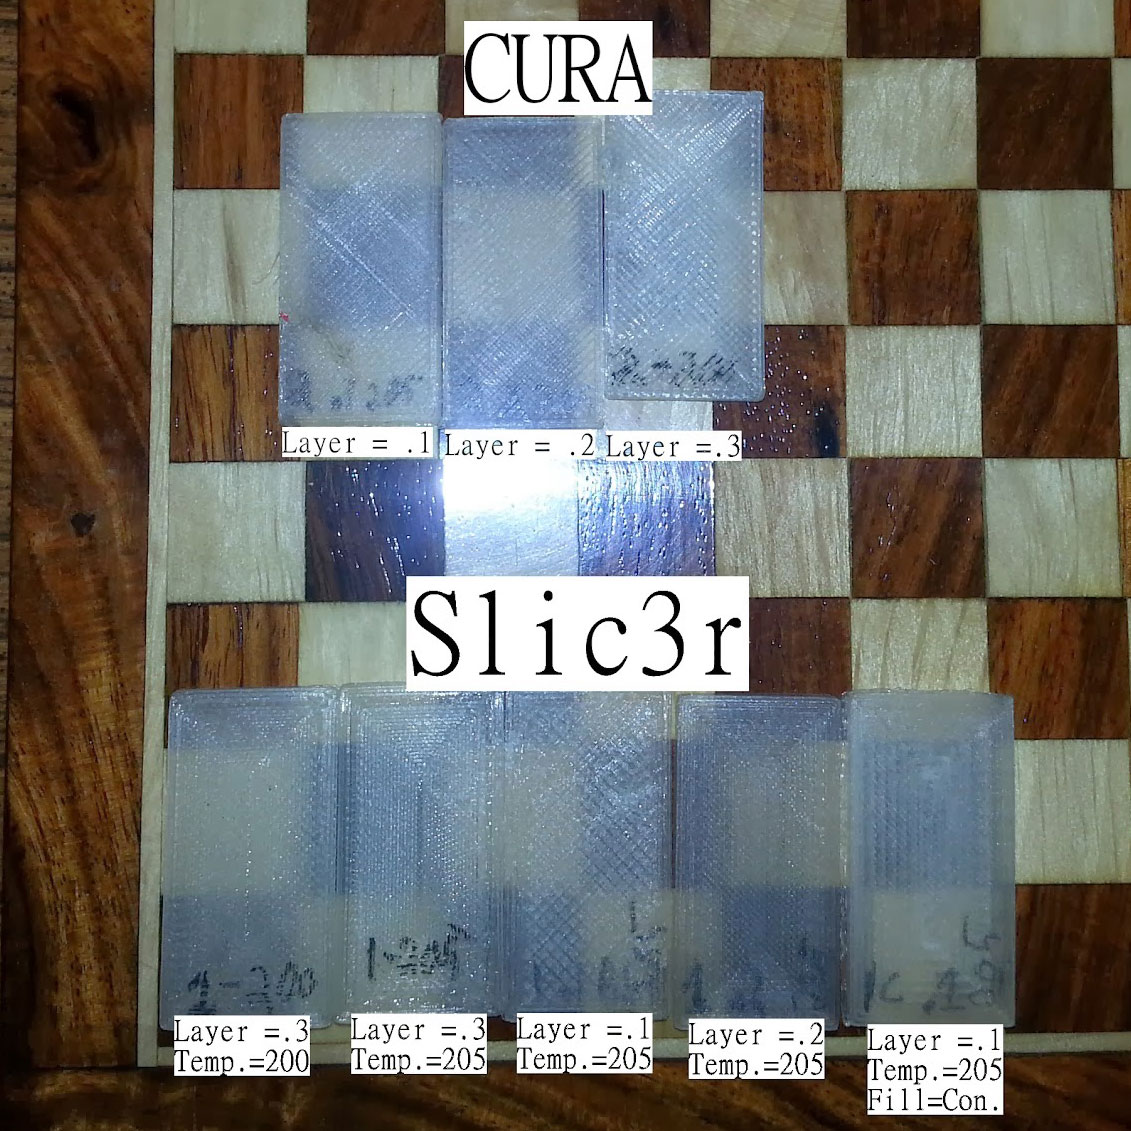
We really enjoyed his comparison of twleve different yellow filaments printed side by side with the same settings on the same printer. You can really see the difference high dimensional tolerance, the right colorant mix, and good virgin plastic stock makes to the quality of the final print. Also, how transparent different brands of transparent actually are as well as the weight of spools from different brands (So you can weigh your spool to see how much is left).
The part we really liked was his list every filament he’s experienced in: PLA, ABS, PETG, Flexible, Nylon, Metal, Wood, and Other. This was a massive effort, and while his review is naturally subjective, it’s still nice to have someone else’s experience to rely on when figuring out where to spend your next thirty dollars.
We were trolling around Hackaday.io, and we stumbled on [Barb]’s video series called (naturally enough) “Barb Makes Things“. The plot of her videos is simple — Barb points a time-lapse camera at her desk and makes stuff. Neat stuff.
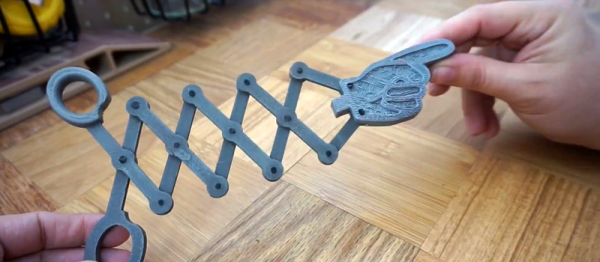
Two particularly neat projects caught our attention: a mechanical pointy-finger thing and the useful 3D-printing-filament rivets that she used to make it. (Both of which are embedded below.) The finger is neat because the scissor-like extension mechanism is straight out of Wile E. Coyote’s lab.
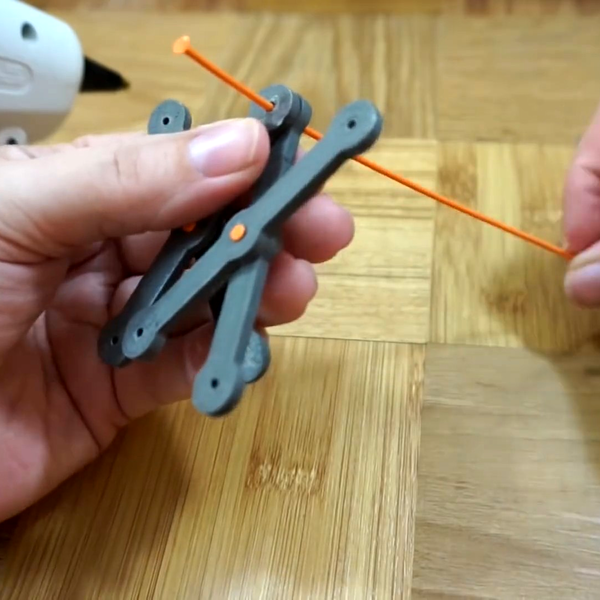
But the real winners are the rivets that hold it together. [Barb] takes a strand of filament, and using something hot like the side of a hot-glue gun, melts and squashes the end into a mushroom rivet-head. Run the filament through your pieces, mushroom the other end, and you’re set. It’s so obvious after seeing the video that we just had to share. (Indeed, a lot of cheap plastic toys are assembled using this technique.) It’s quick, removable, and seems to make a very low-friction pivot, which is something that printed pins-into-holes tends not to. Great idea!
With more and more previously industrial processes coming online in the home shop, people are finding that getting the information that was previously provided by the manufacturer of a hundred thousand dollar machine for their three hundred dollar Shenzen special is not easy.
Some early work from UFID shows how even different Slic3rs can change the expected material properties of a filament.
A common example is this, a hacker purchased themselves a brand new 3D printer off amazon for a price too good to be true. After a week of tinkering with it, a small fire, and a few replacement parts later, they get it to work. After they’ve burned through, perhaps literally, the few hundred grams of filament that came with the printer at the setting recommended by the manufacturer, they do a small blanket order of the different filaments out there. Now comes the trouble, each printer is a little different and each filament has different properties. Most people find that the second spool of filament they feed into their printer doesn’t work at all. What’s the quickest way to get the right temperature, cooling, and feed settings for your printer configuration?
This isn’t a problem for the expensive machines. Epilog, a manufacturer of laser cutters, provides a grid of settings for each material you’re likely to cut, tuned to the different properties of each model of laser cutter they sell. Same goes for the expensive industrial 3D printers, each (very expensive) spool of material has the setting sitting in a chip in the casing. When the spool is slotted in the machine, it reads the settings and adjusts accordingly. All the work of tuning was done in a lab somewhere and the print is, theoretically, guaranteed.
Your Oshpark order would get delayed, your Lulzbot support case would be dropped, Teensies would ship late, and the Amp Hour would just be the EEVBlog Podcast if this bar burnt down, but it was a great event!
While we were at the Bay Area Makerfaire 2016, we had a chance to talk to [Gauthier de Valensart] and buy him a beer at the Hackaday Meet-up. [Gauthier] is from Belgium where he is the founder of a start-up with one of those fancy new TLDs: filaments.directory. The goal of filaments.directory is to create a database of 3D printer materials and link that up with a user’s 3D printer settings. The eventual goal being, much like the industrial printers, a user would be able to simply scan a barcode, or wave the spool over an RFID reader to input the needed settings into his slicing software or printer.
This sounded familiar to me, not the least because I had started work on it as an extension for repables.com when that was a larger focus in my life. In fact, I remember, while I was kicking the idea around to people at MRRF, that they kept telling me someone else was working on a similar project. I wanted to introduce [Gauthier] to the person who was working on the project back then. Since I was at a bar full of people in the industry, I sort of helplessly rotated in my spot trying to find someone who might remember. I spied [whosawhatsis], a common attendee of MRRF, and asked him. Okay, that was easy, [whosawhatsis] informed us that is was his project… introduction complete. Goes to show you what a good networking event buying a bunch of nerds beer can be.
They got a pretty okay logo while they were at it.
The project was called, “Universal Filament Identification System,” and it proposed to, “… eliminate the guess-work,” by, “…developing a method for tagging, tracking, and identifying filament for 3d printing in machine-readable formats…” The project appears to be mostly dead now and its domain is a placeholder. I think it suffered from the standard open source feature creep, but the idea is sound.
Which gets us to the questions. There are a lot of difficulties with creating such a system. The first being the data collection. Who should be responsible for measuring the filaments, the materials for laser cutting, or any other process that needs tuned settings? The ideal track, of course, would be for the manufacturers to hold themselves accountable and report on the settings for their filaments. However, many filament manufacturers rely on the ignorance of users to sell dodgy products, it’s only in the interest of a few top-quality ones to do so. If the users do so, then how will the information provided be vetted? You definitely don’t want someone’s ignorance about a faulty thermistor to encourage you to run PLA at 280C.
More and more difficulties arise. How should the information be transferred, etc. What properties should even be recorded? UFID was going as far as to use a color sensor to keep track of colors between batches from 3D printer manufacturers. In the end it’s about creating standards in a standard-less industry by using crowdsourcing. Either way, take a look at what [Gauthier]’s doing (and send him some feedback), read the backlogs of UFID, think about how annoying it was to get the right settings for a laser cutter the last time you used one, and let us know your thoughts in the comments.