Custom Fume Hood For Safe Electroless Plating

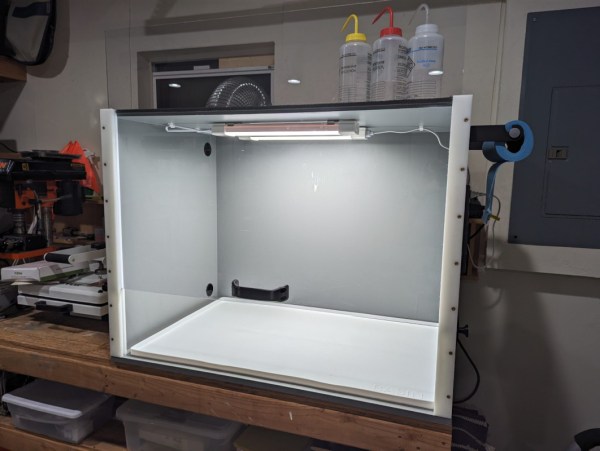
There are plenty of chemical processes that happen commonly around the house that, if we’re really following safety protocols to the letter, should be done in a fume hood. Most of us will have had that experience with soldering various electronics, especially if we’re not exactly sure where the solder came from or how old it is. For [John]’s electroless plating process, though, he definitely can’t straddle that line and went about building a fume hood to vent some of the more harmful gasses out of a window.

This fume hood is pretty straightforward and doesn’t have a few of the bells and whistles found in commercial offerings, but this process doesn’t really require things like scrubbing or filtering the exhaust air so he opted to omit these pricier and more elaborate options. What it does have, though, is an adjustable-height sash, a small form factor that allows it to easily move around his shop, and a waterproof, spill-collecting area in the bottom. The enclosure is built with plywood, allowing for openings for an air inlet, the exhaust ducting, and a cable pass-through, and then finished with a heavy-duty paint. He also included built-in lighting and when complete, looks indistinguishable from something we might buy from a lab equipment supplier.

While [John] does admit that the exhaust fan isn’t anything special and might need to be replaced more often than if he had gone with one that was corrosion-resistant, he’s decided that the cost of this maintenance doesn’t outweigh the cost of a specialized fan. He also notes it’s not fire- or bomb-proof, but nothing he’s doing is prone to thermal anomalies of that sort. For fume hoods of all sorts, we might also recommend adding some automation to them so they are used any time they’re needed.

Continue reading “Custom Fume Hood For Safe Electroless Plating”

Kirby Sucks, Literally

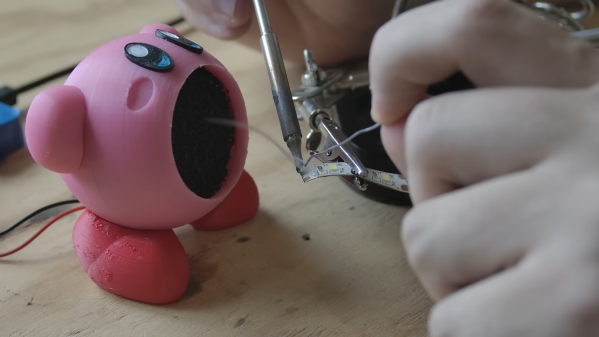
What’s common between one of the most legendary video game characters of all time and a fume extractor ? They both suck. [Chris Borge] is not an electronics hobbyist and only does some occasional soldering. This made his regular fume extractor bulky and inconvenient to position where needed. What could serve him better would be a small extractor that could be attached to a clip or an arm on his helping hand accessory. Being unable to find an off-the-shelf product or a suitable 3d printed design that he liked, he built the Kirby 40mm Fume Extractor.

His initial idea was for a practical design more suited to his specific needs. But somewhere along the way, the thought of a Kirby fan popped up in his head, and it was too good an idea to pass up. Several Kirby fan designs already existed, but none that satisfied [Chris]. Getting from paper sketch to CAD model required quite an effort but the result was worth the trouble, and the design was quite faithful to the original character features. The main body consists of two halves that screw together, and an outlet grill at the back. The body has space for a 40 mm fan and a 10 mm charcoal filter in the front. The wires come out the back, and connect directly to a power supply barrel jack. Arms and eyes are separate pieces that get glued to the body. The feet glue to an intermediate piece, which slides in a dove tail grove in the body. This allows Kirby to be tilted at the right position for optimum smoke extraction.

While Kirby served the purpose, it still didn’t meet the original requirement of attaching to a clip or arm on the helping hand. So [Chris] quickly designed a revised, no-frills model which is essentially a square housing to hold the fan and the filter. It has a flexible stand so it can be placed on a bench. And it can also be attached to the helping hand, making it a more utilitarian design. This design has the charcoal filter behind the fan, but he also has a third design for folks who prefer to have the filter at the front.

He now had a more useful, practical fume extractor, but he couldn’t bring himself to discard his original Kirby. So he printed a couple more 3D parts so that Kirby could fit the end of his vacuum cleaner hose. Now, Kirby sits on his bench, and helps suck up all the bits and bobs of trash on his workbench. We’re sure Kirby is quite pleased with his new role.

Continue reading “Kirby Sucks, Literally”

Over-powered Fume Hood Is Awesome

fume hood

Recognize the Black & Decker unit up top? Yeah, that’s part of a leaf blower.

[Paul] does a lot of soldering. He had one of those cheap desktop fume extractors but it just wasn’t doing the trick. So after being inspired by the countless DIY fume hoods, like this one, he decided to try his hand at it. A sale on an electric leaf blower inspired a Saturday afternoon of hacking.

The leaf blower is one of those models that can also suck up leaves, so no modification was necessary. He still cracked it open though and upon taking it apart he discovered the motor is in fact a Universal Motor, that can run off of AC or DC! Not wanting to suck up his entire setup, he began to play with a variable power supply to determine the best voltage to run it at — 30V was the sweet spot. Quiet, but still powerful. A few simple modifications to the case and wiring, and it was good to go.

Next up was the enclosure, and like most fume hoods, he started with a large plastic bin. He also happened to have some nice aluminum profiles on the scrap heap that he used to finish the cut edges of the bin, and to support the leaf blower with. It’s done for now, but he also plans on cleaning up the wiring a bit more permanently and adding a proper carbon filter. You can still tell it’s a plastic bin, but we have to admit, it looks pretty nice!