Arduino-Powered Steampunk Steam Gauge

steampunkGauge

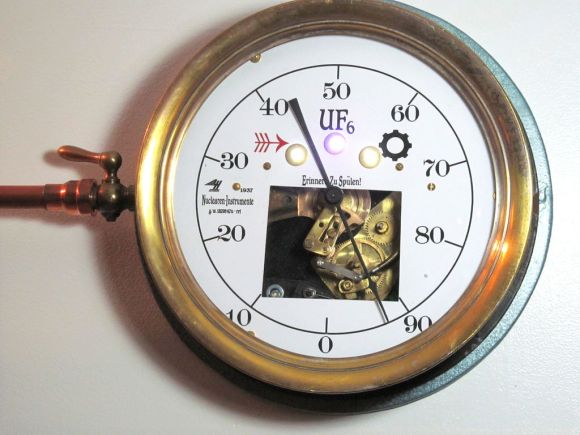
[Murphy’s_Lawyer] had some empty space on the wall in his kitchen, so he decided to fill it with a whirring Steampunk gizmo: an Arduino-driven steam gauge.

The build began as an old 10″ Ashcroft pressure gauge sourced from eBay, which [Murphy’s_Lawyer] dissected to determine the state of its guts. Finding the gauge’s Bourdon tube intact, he got to work constructing a method of generating motion without the need for actual steam. The solution was to mount a continuous rotation servo between the tube and the case. The servo lacked the strength to flex the tube on its own, so [Murphy’s_Lawyer] fashioned a simple lever out of brass to help it along.

The electronics consist of an Arduino Uno and an accompanying homemade PCB. The code for the Uno generates random motion for twirling the servo, and three LEDs built into the face reflect values generated for speed, pause and run time. The final upgrade came in the form of a new dial face, which provides some updated text as well as a cutout square that lets you see the previously obscured gears in action. Check out the video below, then see another Steampunk overhaul: the Edwardian Laptop.

Continue reading “Arduino-Powered Steampunk Steam Gauge”

Smartphone Controlled Paper Plane!

We’ve heard of making remote controlled paper airplanes before, but it looks like someone finally figured out one of the best ways to do it. It’s called the PowerUp 3.0, and it’s a smartphone controlled plane module you can strap to almost any paper plane you make.

[Shai Gotein] is the inventor and is both a pilot and an aviation enthusiast, with over 25 years experience. Back in 2008 he was volunteering to teach Aerodynamics to kids, and he realized how handy it would be to have a small plane capable of indoor flight to explain aviation concepts — so he started designing one. The first iteration (PowerUp 1.0) received the ATA Best Hobby Award, but he didn’t stop there!  Continuing to refine his design, version 3.0 is now controllable via an iPhone or Android device using low-energy Bluetooth communications. This gives it about a 55 meter range, and the tiny battery lasts 10 minutes per charge. The best part is you get to design the plane!

Stick around after the break to see a paper plane do things you’d never expect!

Continue reading “Smartphone Controlled Paper Plane!”

Over-powered Fume Hood Is Awesome

fume hood

Recognize the Black & Decker unit up top? Yeah, that’s part of a leaf blower.

[Paul] does a lot of soldering. He had one of those cheap desktop fume extractors but it just wasn’t doing the trick. So after being inspired by the countless DIY fume hoods, like this one, he decided to try his hand at it. A sale on an electric leaf blower inspired a Saturday afternoon of hacking.

The leaf blower is one of those models that can also suck up leaves, so no modification was necessary. He still cracked it open though and upon taking it apart he discovered the motor is in fact a Universal Motor, that can run off of AC or DC! Not wanting to suck up his entire setup, he began to play with a variable power supply to determine the best voltage to run it at — 30V was the sweet spot. Quiet, but still powerful. A few simple modifications to the case and wiring, and it was good to go.

Next up was the enclosure, and like most fume hoods, he started with a large plastic bin. He also happened to have some nice aluminum profiles on the scrap heap that he used to finish the cut edges of the bin, and to support the leaf blower with. It’s done for now, but he also plans on cleaning up the wiring a bit more permanently and adding a proper carbon filter. You can still tell it’s a plastic bin, but we have to admit, it looks pretty nice!

Making A UNIX Clock While Making A Few Mistakes Along The Way

unixclock

Sometimes the projects we think are easy to design are the ones on which we end up making the most mistakes. The UNIX clock that you see in the picture above is one of these projects. For our readers that don’t know it, UNIX time is the number of seconds since 00:00 on January 1st 1970. The clock that [James] designed is based on an Arduino Pro Mini board, an RTC chip to store the time, a custom made display board and two buttons to set the date/time.

One of the mistakes that [James] made was designing the boards on which will be soldered the seven-segment displays before actually choosing the ones he’ll use, as he was thinking they’d be all the same. The displays he ended up with had a different pitch and needed a different anode voltage, so he had to cut several traces on the PCBs and add another power supply. It also took [James] quite a while to remove the bits that his hackerspace’s laser didn’t cut through. We strongly advise a good look at his very detailed write-up if you are starting in the electronics world.

If you find this Unix time display too easy to read here’s one that’s a bit more of a challenge.

Gravity-Powered Generator: Real Or Fake?

You thought we forgot about your favorite Hackaday comment game, didn’t you? Well, not only is ‘Real or Fake?’ back with a new installment, but this time it concerns everybody’s favorite impossibility: perpetual motion machines! It’s likely that you’ve already seen the photos of Brazilian energy group RAR Energia’s generator “powered exclusively by gravity” (translated). If you’re rolling your eyes and exclaiming “this is so last year..” you might want to scroll down to the bottom of the page; they’re still building this monstrosity and they’ve included some diagram imagesPerhaps someone who reads Portuguese can better translate the claim that the devices are “demonstration models with capacity to generate 30kW.” Oh, didn’t you know? There are two of them now: one in Brazil that is presumably functioning, and a second under construction in Gilman, Illinois.

Now, before you all scream “Photoshopped,” take a gander at a FotoForensics analysis of one of the images, where ELA (error level analysis) seems to indicate consistent levels of compression. EXIF data shows the pictures were shot with a Sony DSC-WX5 and saved in PhotoScape. It may be simpler than that: you can easily recognize the same employees in different shots from different angles, and there are quite a lot of photos. RAR Energia’s most recent endeavor—a second machine in Gilman Illinois—seems to have been erected in the past two months. The Gilman warehouse is located on property belonging to bio-diesel manufacturing firm Incobrasa Industries (named a “Company of the [RAR Energia] group” on the RAR Energia site). Here’s a little internet sleuthing for your consideration: a photo of the completed warehouse and a Google maps link to the location in question (40.763176, -88.012706). Note the distinctly shaped building in the background (another view here, during construction), which can be found due south of the location indicated in the Google maps link. We’re not suggesting that you completely rule out image manipulation, but if it’s Photoshopped, it’s a damned elaborate job.

Unfortunately, there aren’t any videos demonstrating motion or any explanation for how the system works other than vagaries about perpetual energy. So, does this thing exist—and did this company really build two of them? Does it work…or, well, somehow do something?

2.5 Mm Jack Adapter For The Xbox One Headset

As most everyone knows the Xbox One came out last week and if you were one of the lucky few to get one you might have noticed the headset is quite uncomfortable and covers only one ear. [octanechicken] has a possible adapter solution that lets you plug-in an older more comfortable chat headset like a Turtle Beach. It is being reported as a functional hack by others in the comments; however it may still be questionable. We say questionable because the first release of this Instructable clearly had a flaw in the wiring, but updated text seems to have fixed that problem. Using a female 2.5 mm stereo inline jack [octanechicken] was able to get the Xbox One headset controller to work with older Xbox 360 chat headsets having a male 2.5 mm plug.

The photos on the instructable are still incorrect so following the text instructions one simply unsolders the wires from within the ear piece and then solders the white wire to the tip connector, blue wire to the middle ring connector and the bare wire to the rear sleeve connector of the female 2.5 mm stereo inline jack. Remember to leave the black wire disconnected and covered with a bit of tape. If you cut the wires instead of unsoldering them, remember to scrape any varnish off before soldering. But what about that black wire?

Continue reading “2.5 Mm Jack Adapter For The Xbox One Headset”

The Flow Of Time Draws On A River

river

You would think Hackaday would see more projects from public art exhibitions. They really do have everything – the possibility to mount electronics to just about anything in a way that performs interesting but an ultimately useless function. So far, though, [Richard Schwartz’s] Flow of Time is on the top of a very short list of public art installations we like.

The idea behind the build is a German phrase that means something similar to ‘time trickles away’. [Richard]’s project implements this by printing the current time onto the surface of a flowing river in [Richard]’s native Innsbruck.

The build uses five micro piezo pumps to dispense food coloring from a bridge. Every minute, an Arduino pumps this food coloring in a 5×7 pixel digit to ‘write’ the time onto the surface of a river.

Surprisingly, [Richard]’s installation doesn’t require much upkeep. The pumps only use about 70ml of food coloring a day, and the entire device – including the Raspi WiFi webcam – is solar powered with a battery backup.

You can see a video of the time printing on a river below.

Continue reading “The Flow Of Time Draws On A River”