Touchpads, or trackpads, have been around since the 1980s. Today, you can often find them in laptops and notebook computers as pointing devices. With no moving parts, a trackpad are easy to integrate into the body of a portable computer. they’re much smaller than the traditional mouse. Until the advent of multitouch and gestures over the past two decades, though, they were generally poor substitutes for an actual mouse. These days, trackpads have enough features that some users prefer them even on their desktop computers. If you’re that type of person and don’t want to shell out a big pile of money for an Apple, Logitech, or other off-the-shelf trackpad you can always build your own.
If you want to remap some mouse or keyboard keys, and you use Linux, it is easy. If you use Windows or another operating system, you can probably do that without too much trouble. But what if you use all of them? Or what if you don’t have access to the computer in question? Thanks to [jfedor2], you can reach for a Raspberry Pi Pico and make this handy key-and-mouse remapping hardware dongle.
There are many forms of human interface device beyond the ubiquitous keyboard and mouse, but when it comes to fine-tuning a linear setting such as a volume control there’s nothing quite like a knob. When it comes to peripherals it’s not the size that matters, as proven by [Stefan Wagner] with the Tiny Knob. It’s a very small PCB with a rotary encoder and knob, an ATtiny85, a USB port, and not much else.
It uses the V-USB software implementation of USB HID, and should you have a need for a Tiny Knob of your own you can find all the files for it in a GitHub repository. There’s even a very professional-looking 3D-printed enclosure for the finishing touch. We like this project for its simplicity, and we think you might too.
Over the years we’ve brought you more than one knob, they appear to be a popular subject for experimentation. If you’re up for more, have a look at this one.
If you’re pairing a tiny Linux computer to a few peripherals — perhaps you’re building a reasonably custom Pi-powered device — it’s rightfully tempting to use something like an STM32 for all your low-level tasks, from power management to reading keyboard events.
Now, in case you were wondering how to tie the two together, consider HID over I2C, it’s a standardized protocol with wide software and peripheral support, easily implementable and low-power. What’s more, [benedekkupper] gives you an example STM32 project with a detailed explanation on how you too can benefit from the protocol.
There are several cool things about this project. For a start, its code is generic enough that it will port across the entire STM32 lineup nicely. Just change the pin definitions as needed, compile it, flash it onto your devboard and experiment away. Need to change the descriptors? The hid-rdf library used lets you define a custom descriptor super easily, none of that building a descriptor from scratch stuff, and it even does compile-time verification of the descriptor!
[endes0] has been hacking with USB HID recently, and a Logitech M185 mouse’s USB receiver has fallen into their hands. Unlike many Logitech mice, this one doesn’t include a Unifying receiver, though it’s capable of pairing to one. Instead, it comes with a pre-paired CU0019 receiver that, it turns out, is based on a fairly obscure TC32 chipset by Telink, the kind we’ve seen in cheap smart wristbands. If you’re dealing with a similarly obscure MCU, how do you even proceed?
In this case, GitHub had a good few tools developed by other hackers earlier — a Ghidra integration, and a tool for working with the MCU using a USB-UART and a single resistor. Unfortunately, dumping memory through the MCU’s interface was unreliable and frustrating. So it was time to celebrate when fuzzing the HID endpoints uncovered a memory dump exploit, with the memory dumper code helpfully shared in the blog post.
From a memory dump, the exploration truly began — [endes0] uncovers a fair bit of dongle’s inner workings, including a guess on which project it was based on, and even a command putting the dongle into a debug mode where a TC32-compatible debugger puts this dongle fully under your control.
MicroPython is a wonderful Python interpreter that runs on many higher-end microcontrollers, from ESP8266 to STM32 to the RP2040. MicroPython lets you build devices quickly, and its latest release, 1.23, brings a number of improvements you should be aware of.
The first one is custom USB device support, and it’s a big one. Do you want to build HID devices, or play with MIDI, or do multiple serial streams with help of PIO? Now MicroPython lets you easily create USB devices on a variety of levels, from friendly wrappers for creating HID or MIDI devices, to low-level hooks to let you define your own USB descriptors, with user-friendly libraries to help all the way through. Currently, SAMD and RP2040 ports are supported in this part of code, but you can expect more in the future.
Hooray to 10 years of MicroPython!
There’s more – support for OpenAMP, an inter-core communication protocol, has received a ton of improvements for systems where MicroPython reigns supreme on some of the CPU cores but also communicates with different systems on other cores. A number of improvements have made their way through the codebase, highlighting things we didn’t know MicroPython could do – for instance, did you know that there’s a WebAssembly port in the interpreter, letting you run MicroPython in your browser?
Well, it’s got a significant overhaul in this release, so there’s no better time to check it out than now! Library structure has been refactored to improve CPython compatibility, the RP2040 port receives a 10% performance boost thanks to core improvements, and touches upon areas like PIO and SPI interfaces.
We applaud all contributors involved on this release. MicroPython is now a decade old as of May 3rd, and it keeps trucking on, having firmly earned its place in the hacker ecosystem. If you’ve been playing with MicroPython, remember that there are multipleIDEs, graphicslibraries, and you can bring your C code with you!
In the previous two HID articles, we talked about stealing HID descriptors, learned about a number of cool tools you can use for HID hacking on Linux, and created a touchscreen device. This time, let’s talk about an underappreciated HID standard, but one that you might be using right now as you’re reading this article – I2C-HID, or HID over I2C.
HID as a protocol can be tunneled over many different channels. If you’ve used a Bluetooth keyboard, for instance, you’ve used tunneled HID. For about ten years now, I2C-HID has been heavily present in laptop space, it was initially used in touchpads, later in touchscreens, and now also in sensor hubs. Yes, you can expose sensor data over HID, and if you have a clamshell (foldable) laptop, that’s how the rotation-determining accelerometer exposes its data to your OS.
This capacitive touchscreen controller is not I2C-HID, even though it is I2C. By [Raymond Spekking], CC-BY-SA 4.0Not every I2C-connected input device is I2C-HID. For instance, if you’ve seen older tablets with I2C-connected touchscreens, don’t get your hopes up, as they likely don’t use HID – it’s just a complex-ish I2C device, with enough proprietary registers and commands to drive you crazy even if your logic analysis skills are on point. I2C-HID is nowhere near that, and it’s also way better than PS/2 we used before – an x86-only interface with limited capabilities, already almost extinct from even x86 boards, and further threatened in this increasingly RISCy world. I2C-HID is low-power, especially compared to USB, as capable as HID goes, compatible with existing HID software, and ubiquitous enough that you surely already have an I2C port available on your SBC.
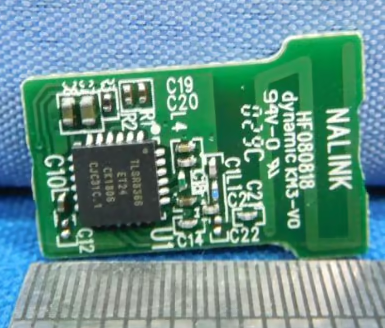
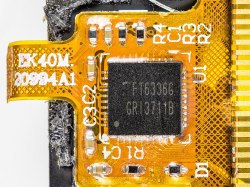
In modern world of input devices, I2C-HID is spreading, and the coolest thing is that it’s standardized. The standardization means a lot of great things for us hackers. For one, unlike all of those I2C touchscreen controllers, HID-I2C devices are easier to reuse; as much as information on them might be lacking at the moment, that’s what we’re combating right now as we speak! If you are using a recent laptop, the touchpad is most likely I2C-HID. Today, let’s take a look at converting one of those touchpads to USB HID.