Making High Concentrations Of Hydrogen Peroxide At Home

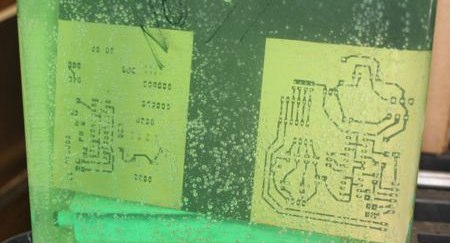
Hydrogen peroxide – the same stuff you can pick up from a drug store or beauty supply store – is one of those very interesting chemicals that belongs on every maker’s cabinet. At concentrations of about 30%, it’s perfect for etching PCB boards, and at even higher concentrations – about 70% – it can be used as rocket fuel. Unfortunately for the home hacker, it’s very difficult and expensive to obtain peroxide in concentrations above 3% or so. That’s alright with [Charlie], though, because he’s come up with a way to concentrate peroxide and measure the concentration once he’s done.

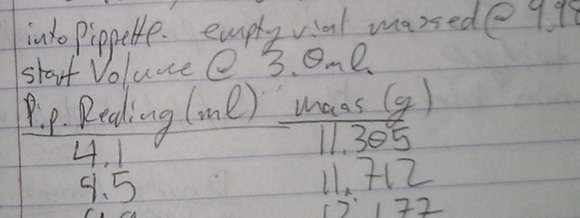
There are a few YouTube videos of kitchen chemists concentrating peroxide by heating it on a stove to just under 100°C. Because hydrogen peroxide boils at 150°C, they’re simply boiling off the water and increasing the concentration of peroxide. This is a qualitative method, and you’ll never know what concentration you’re getting. [Charlie] rigged up a small-scale with a pipette to measure the weight of his concentrated peroxide per unit of volume, giving him the density of his concoction and thus the concentration.

We have to note that concentrated peroxide is dangerous stuff, but the results of [Charlie]’s lab work aren’t much more dangerous than what hair stylists work with every day. If you’re going for high-test peroxide, good job, that’s awesome, but do be aware of the risks.

Etching Your Own Boards Really, Really Fast

Sometimes the planets align and the Hackaday tip line gets two posts that are begging to be used together. Here’s two hacks to etch your own boards at home in just a few minutes.

Toner transfer PCBs on the quick

One way of putting an etch mask on a PCB is with the toner transfer method: print your circuit on a piece of inkjet photo paper using a laser printer, lay that circuit face down on a sheet of copper, and go at it with a clothes iron. This takes a heck of a lot of time and effort, but [Dustin] found another way. He used parchment paper instead of inkjet photo paper. Once the paper was on the board, he rolled it through a laminator. The results are awesome. It’s a very fast process as well – you don’t need to soak your board in water to get the photo paper off.

Etching that’s like wiping the copper away

[Royce] wrote in from the Milwaukee Makerspace to tell us about [Tom]’s etching process that is like wiping the copper off the board.  He used Muratic (Hydrochloric) acid and Hydrogen Peroxide with a sponge to wipe that copper away. The trick in this, we think, comes from the 30% H202 [Tom] picked up at a chemical supply company, but we’re pretty sure similar strengths can be purchased from beauty supply stores. Check out the video after the break to see [Tom] etch a 1 oz. board in just a few seconds.

Continue reading “Etching Your Own Boards Really, Really Fast”

Etching PCBs With Vinegar

When we hear about etching PCBs at home we assume that either Ferric Chloride or Cupric Chloride were used to eat away unmasked copper from the boards. But [Quinn Dunki] just wrote up her PCB etching guide and she doesn’t use either of those. Instead, she combines vinegar, hydrogen peroxide, and salt. It’s easier to find vinegar than muriatic acid (Cupric Chloride is made using this, peroxide, and adding the copper) so this is something to keep in mind if you’re in a pinch (or a Macgyver situation).

The rest of the process is what we’re used to. She’s using photoresistant boards which can be masked with a sheet of transparency instead of using the toner-transfer method. Once they take a bath in the developer solution she puts them in a shallow dish of vinegar and hydrogen peroxide along with a teaspoon of salt. She wipes the surface with a foam brush every minute or so, and inspects them every ten minutes to see if they’re done.

She does discuss disposal. Seems that she throws the solution in the garbage after each use. The liquid will contain copper salts which are bad for wildlife. We’ve heard that you should neutralize the acid and make a block of concrete using the liquid, then throw it in the garbage. Does anyone have a well-researched, ethical, and environmentally friendly way of getting rid of this stuff?

Restoring Yellowed Computer Plastics

retr0brite1

Many of our cherished computers and consoles from the past have not stood up well over time. It’s not the hardware as much as the color. From Commodores, Apples, to Super Nintendos, the machines have slowly drifted towards a sickly yellow and even brown. The culprit appears to be the fire retardant chemicals used in the plastics. Amiga enthusiasts have spent the last year perfecting a technique that restores the plastic of these machines to its original splendor. Dubbed ‘Retr0brite‘ it’s a gel made from hydrogen peroxide, xanthan gum, glycerine, and ‘Oxy’ style laundry booster. The results are really impressive. If you do start restoring your own machines, caution should be used since it requires strong concentrations of hydrogen peroxide typically employed in bleaching hair.

[via Waxy]

Ferric Chloride Etching Chemistry

[ladyada] has republished an interesting snippet from the synthDIY mailing list. [David Dixon] discusses the actual chemistry behind ferric chloride based home circuit board etching. He concludes that ferric chloride is essentially a ‘one-shot’ oxidant. It can’t be regenerated and can be difficult to dispose of properly. The use of acidified copper chloride is a much better path and becomes more effective with each use, as long as you keep it aerated and top up the acidity from time to time. This etchant solution is actually the result of initially using hydrogen peroxide as an oxidant along with muriatic acid. You can see us using this solution in our etching how-to and while creating the board for our RGB lock. For more information on using hydrogen peroxide, check out [Adam Seychell]’s guide and this Instructable.

Aside: [ladyada] has added the receiver code to the Wattcher project page.