Prosthetic Spines Become Musical Instruments

spine

[Joseph] and [Ian] have been working on a project that turns physical objects into bendable, snake-like controllers

This build is the culmination of an earlier project that digitally modeled a flexible object with accelerometers, gyroscopes, and IMUs. When we first saw this build, we wondered what it could actually be used for, but it seems [Joseph] and [Ian] came up with a pretty cool use for it: turning prosthetic spines and ribs into musical instruments.

These flexible devices are loaded up with sensors along their joints and are connected to a microcontroller with a Zigbee radio transceiver. The positioning data from these devices is transmitted to a computer where it’s turned into audio, effectively turning a dancer into a musical instrument.

For an art piece, it’s pretty cool, but as a new means of interacting with a computer, we’re thinking this might be a game changer. Imagine a gauntlet loaded up with IMUs being turned into a waldo, or precisely controlling virtual objects naturally with your hand.

Clean And Minimal Self-balancing Robot

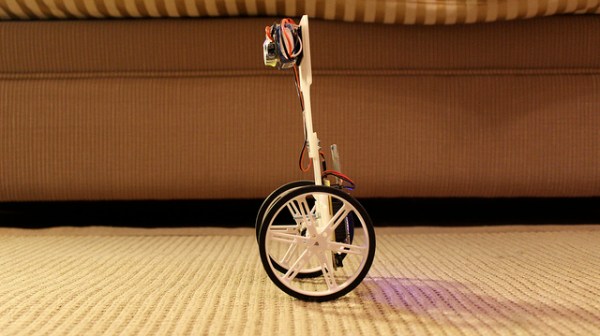
The VertiBOT is a self balancing robot project taken on for the purpose of exploring how the sensors work in conjunction with some PID algorithms.

[Miguel] didn’t roll any extras into the build. But you have to admit that makes it look interesting. There’s almost nothing to it and yet, as you can see in the clip after the break, he accomplished everything he set out to.

The body and wheels are 3D printed, with black bands for tires to help give it some traction. Note the connection in the center of the body which allowed him to make a longer part by printing in two stages. On the electronic side of things he’s using an Arduino Nano. A level converter lets it communicate with the 6 DOF IMU board which is used to detect movement. Three potentiometers provide a way for him to tweak the PID loop without having to bother with reflashing any code. And of course there’s an option to control it remotely thanks to a Bluetooth module also in the mix.

Continue reading “Clean And Minimal Self-balancing Robot”

Self-balancing Unicycle Using Arduino And Sparkfun IMU

Raptor-Bike-self-balancing-unicycle

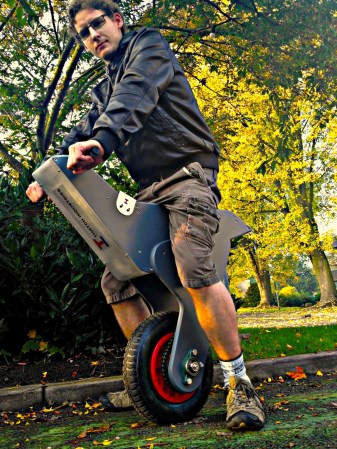
Here’s proof that you can build cool stuff with simple tools. This self-balancing unicycle uses an Arduino and a five degree of freedom IMU from Sparkfun to keep the rider upright. Well, it’ll keep you upright as long as you have good side-to-side balance. But that’s true of any unicycle, right?

The Raptor was built by [Nick Thatcker] who is no stranger to self-balancing transportation. A few years back he built a Segway clone and the same type of geared motor used in that project also went into this one. I connects to the wheel with a chain, allowing him to keep the motor hidden in the saddle. He gets between 90 and 120 minutes of used on one charge with a top speed of 10 MPH. The motor could move you along faster but he has limited this in firmware to ensure it has enough power to ‘catch up’ if you lean too far forward.

Don’t miss the demo after the break. If you like this unicycle there are several others worth looking at.

Continue reading “Self-balancing Unicycle Using Arduino And Sparkfun IMU”

Wii Nunchuck Controlled Robot Exhibits Rock Solid Balancing

[Willy Wampa] is showing off his self-balancing robot. What strikes us about the build is how well tuned his feedback loop seems to be. In the video after the break you will see that there is absolutely no visible oscillation used to keep its balance.

The parts used are quite easy to obtain. The acrylic mounting plates are his wife’s design and were custom cut through the Pololu service. They were also the source of the gear motors. He’s using a SparkFun IMU with an Arduino and a motor shield. He first posted about the build about a month ago, but the new revision switches to a Pololu motor driver shield which he says works much better, and adds control via a wireless Wii Nunchuck.

The PID loop which gives it that remarkably solid upright stance is from a library written by [Brett Beauregard]. Once again the concept of open source lets us build great things by standing on the shoulders of others.

Continue reading “Wii Nunchuck Controlled Robot Exhibits Rock Solid Balancing”

Tutorial Explains The Concepts Behind An IMU

[Anilm3] wrote in to share the IMU tutorial series he is working on. An Inertial Measurement Unit is most often found in self-balancing robots and quadcopters, providing enough high-speed sensor data to keep up with the effects of gravity.  He previously used some all-in-one IMU devices in school which did most of the work for him. But he wanted to grind down and look at what each sensor spits out and how those measurements are used. The first installment deals with the accelerometer, using its data to calculate pitch and roll. For these demonstrations [Anilm3] is using this ADXL345 sensor board, an Arduino, and some processing sketches for testing.

Whenever working with sensors you need to take noise into consideration. The post shows how to implement a low-pass filter in the code which will help smooth out the readings. The filtered data is then fed to a couple of mostly-painless formulas which calculate the movement of the accelerometer in degrees. The demonstration sketch is mapped to a 3D cube to give you an idea of how accurate the accelerometer is. There’s a little bit of lag which would let a self-balancing robot have a nasty fall. The solution to this issue will be discussed in upcoming parts of the series. The next installment tackles the gyroscope sensor.

Self Balancing Robot Uses Cascading PID Algorithms

At this point we’re beginning to think that building a self-balancing robot is one of the rights of passage alongside blinking some LEDs and writing Hello World on an LCD screen. We’re not saying it’s easy to pull off a build like this one. But the project makes you learn a lot about a wide range of topics, and really pushes your skills to the next level. This latest offering comes from [Sebastian Nilsson]. He used three different microcontrollers to get the two-wheeler to stand on its own.

He used our favorite quick-fabrication materials of threaded rod and acrylic. The body is much taller than what we’re used to seeing and to help guard against the inevitable fall he used some foam packing material to protect the top level. Three different Arduino boards are working together. One monitors the speed and direction of each wheel. Another monitors the IMU board for position and motion feedback, and the final board combines data from the others and takes care of the balancing. Two PID algorithms provide predictive correction, first by analyzing the wheel motion, then feeding that data into the second which uses the IMU feedback. It balances very well, and can even be jostled without falling. See for yourself in the clip after the break.

Continue reading “Self Balancing Robot Uses Cascading PID Algorithms”

LayerOne Badge Hacking Twofer

Here’s a pair of LayerOne Badge hacks that actually included the RC as intended by the badge designers.

First up, we have the autonomous RC car built by [Arko]. He calls it Stanley Jr. as an homage to the Stanford DARPA Grand Challenge vehicle. It uses an Arduino shield to add a servo with an ultrasonic rangefinder on it. The lets the vehicle drive a bit, stop and scan the horizon, then drive some more. The hope is the rangefinder will keep it from running into anything. There’s a quick test run embedded after the break.

On the right is the badge hack which [Zjpahle] finished up after the contest was already over. He also chose to go with an Arduino shield, this time it’s an IMU board. But he added a standalone Arduino board to the vehicle which drives some EL wire (ground effects) and adds IR sensors to the front of the car. The IR sensors are for obstacle avoidance, and the IMU lets him tilt his badge for direction control.

We looked at the winner of the badge hacking competition on Wednesday. That hack didn’t involve the car, but used the badge as a Morse Code beacon.

Continue reading “LayerOne Badge Hacking Twofer”