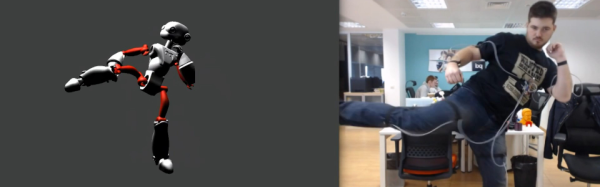
Apollo, The Everything Board

The best projects have a great story behind them, and the Apollo from Carbon Origins is no exception. A few years ago, the people at Carbon Origins were in school, working on a high power rocketry project.

Rocketry, of course, requires a ton of sensors in a very small and light package. The team built the precursor to Apollo, a board with a 9-axis IMU, GPS, temperature, pressure, humidity, light (UV and IR) sensors, WiFi, Bluetooth, SD card logging, a microphone, an OLED, and a trackball. This board understandably turned out to be really cool, and now it’s become the main focus of Carbon Origins.

There are more than a few ways to put together an ARM board with a bunch of sensors, and the Apollo is extremely well designed; all the LEDs are on PWM pins, as they should be, and there was a significant amount of time spent with thermal design. See that plated edge on the board? That’s for keeping the sensors cool.

The Apollo will eventually make its way to one of the crowdfunding sites, but we have no idea when that will happen. Carbon Origins is presenting at CES at the beginning of the year, so it’ll probably hit the Internet sometime around the beginning of next year. The retail price is expected to be somewhere around $200 – a little expensive, but not for what you’re getting.

PCB of the NoteOn Smartpen showing components

THP Semifinalist: NoteOn Smartpen

There are a ton of apps out there for taking notes and recording ideas, but sometimes the humble pen is best. However, if you have the tendency to lose, crumple, or spill caffeinated beverages on your pen and paper notes, having a digital copy is quite nice.

The NoteOn Smartpen by [Nick] aims to digitize your writing on the fly while behaving like a normal pen. It does this by using the ST LSM9DS0TR: a 9-axis inertial measurement unit (IMU). These inertial measurements are processed by a STM32 Cortex M4F processor and stored on the internal flash memory.

To retrieve your notes, the Nordic nRF8001 Bluetooth Low Energy radio pairs the MCU with a phone or computer. The USB port is only used to charge the device, and the user interface is a single button and LED.

The major hardware challenge of this device is packaging it in something as small as a pen. Impressively, the board is a cheap 2 layer PCB from OSHPark. The assembled device has a 10 mm diameter, which is similar to that of ‘dumb’ pens.

The NoteOn doesn’t require special paper, and relies only on inertial measurements to reconstruct writing. With the hardware working, [Nick] is now tackling the firmware that will make the device usable.

SpaceWrencherThe project featured in this post is a quarterfinalist in The Hackaday Prize.

Hackaday Links: September 7, 2014

Like Adventure Time? Make your own BMO! It’s a little more expressive than the Adafruit version we saw earlier due to the Nokia LCD. It’s got audio playback too so it can talk to football.

A few years ago, [Matt] made a meat smoker with a PID controller and an SSR. Now the same controller is being used as a sous vide. PID controllers: the most useful kitchen gadget ever.

[Josh] keeps his server in a rack, and lacking a proper cable management solution, this means his rack is a mess. He adapted some Dell wire management arms to his system, using a PCI card bracket to attach the arm to the computer.

[Dr. Dampfpunk] has a lot of glowey things on his Youtube channel

Another [Josh] built a 3D tracking display for an IMU. It takes data off an IMU, sends it over Bluetooth, and displays the orientation of the device on a computer screen. This device also has a microphone and changes the visualization in response to noises.

Remember the pile of failure in a bowl of fraud that is the Scribble pen? Their second crowdfunding campaign was shut down. Don’t worry; they’re still seeking private investment, so there’s still a chance of thousands of people getting swindled. We have to give a shout-out to Tilt, Scribble’s second crowdfunding platform. Tilt has been far more forthcoming with information than Kickstarter ever has with any crowdfunding campaign.

Virtual Physical Reality With Kintinuous And An Oculus Rift

oculus

The Kinect has long been able to create realistic 3D models of real, physical spaces. Combining these Kinect-mapped spaces with an Oculus Rift is something brand new entirely.

[Thomas] and his fellow compatriots within the Kintinuous project are modeling an office space with the old XBox 360 Kinect’s RGB+D sensors. then using an Oculus Rift to inhabit that space. They’re not using the internal IMU in the Oculus to position the camera in the virtual space, either: they’re using live depth sensing from the Kinect to feed the Rift screens.

While Kintinuous is very, very good at mapping large-scale spaces, the software itself if locked up behind some copyright concerns the authors and devs don’t have control over. This doesn’t mean the techniques behind Kintinuous are locked up, however: anyone is free to read the papers (here’s one, and another, PDF of course) and re-implement Kintinuous as an open source project. That’s something that would be really cool, and we’d encourage anyone with a bit of experience with point clouds to give it a shot.

Video below.

Continue reading “Virtual Physical Reality With Kintinuous And An Oculus Rift”

Self-Balancing Robots Wobble, But They Don’t Fall Down

[Trandi] can check ‘build a self-balancing robot’ off of his to-do list. Over a couple of weekends, he built said robot, and, in his own words, managed not to over-design it. It even kept the attention of his 2-year-old son for several minutes, and that’s always a plus.

He was originally going to re-purpose one of his son’s RC cars, but didn’t want to risk breaking it. Instead, he designed a triangular 3-D printed chassis to hold a motor and some cogs to fit both the motor shaft and some re-used Meccano wheels. [Trandi]’s design employs an MPU 6050 6-DOF IMU for the balancing act and is built on an Arduino Nano clone.

[Trandi] is controlling the motor with an L293D, which has built-in flyback diodes to minimize spikes. He found that the Nano clone was not powerful enough to handle everything, so he added an L7805CV voltage regulator. After the break, watch [Trandi]’s cute bot tool around on various types of terrain, with and without a payload.

Don’t have an IMU lying around? You don’t really need one to build a self-balancing bot, as this IR-based lilliputian bot will demonstrate.

Continue reading “Self-Balancing Robots Wobble, But They Don’t Fall Down”

Turning A Building Into A Rubik’s Cube

cube

[Javier] must have an awesome academic adviser. For his master’s thesis, he turned a building into a Rubik’s cube.

The Ars Electronic Center in Linz, Austria, is a building with a whole bunch of colored, programmable lights on the facade. [Javier] thought this would make for an excellent Rubik’s cube, and set to work convincing his thesis advisers this idea was possible, and building the hardware and software.

Since only two sides of the building are visible at any one time, [Javier] needed to build a controller for this project. The solution was to build a normal Rubik’s cube and stuff a microcontroller and a FreeIMU in the center. This setup senses the twists and turns of the Rubik’s cube, as well as it’s position in space, effectively creating an interface between the hand and a giant light-covered building.

The Rubik’s cube interface connects to a computer running an app written in openFrameworks. By sensing the direction the cube is oriented, it can automatically display the two sides of the cube facing the user.

There’s a great video showing just how this building-sized Rubik’s cube works. You can check that out below.

Continue reading “Turning A Building Into A Rubik’s Cube”

Retrotechtacular: The Apollo Guidance Computer

There is so much amazing technology that came out of the space race. For this week’s Retrotechtacular we’re looking at the guidance computer used in the Apollo program undertaken by NASA in the 1960’s.

One of the main components of this system is the Inertial Measurement Unit or IMU. That’s a familiar term for hackers who build quadcopters or other devices for which spacial awareness is paramount. In this case the IMU provided critical information about the motion and orientation of the capsule during it’s trip from the Earth to the Moon and back. But it wasn’t just high tech electronics along for the flight. To determine actual position a sextant was used for triangulating position. Yes, this is the same type of measuring device used for centuries. The method of using the sextant is displayed above. The spacecraft was turned until the sextant pointed at a landmark on Earth. The instrument was the adjusted to line up a star as a landmark, then the computer calculated position based on time and the angles of the two points being sighted. There’s a lot more shown in this thirty-minute film including in-depth assembly and testing of the computer components.

Before we point you to a few related articles we’d like to mention that our stash of really cool Retrotechtacular tips is running low. So if you know of some old footage that’s awesome to watch please send us a tip about it.

Now if you can’t get enough about NASA electronics you should check out the LVDC board which [Fran] got her hands on. Also, it’s worth checking out the unbelievable soldering techniques specified in the NASA manual. There’s a pretty good discussion about that going on in the Reddit thread.

Continue reading “Retrotechtacular: The Apollo Guidance Computer”