A Better Use For The AGP Slot, Decades Later

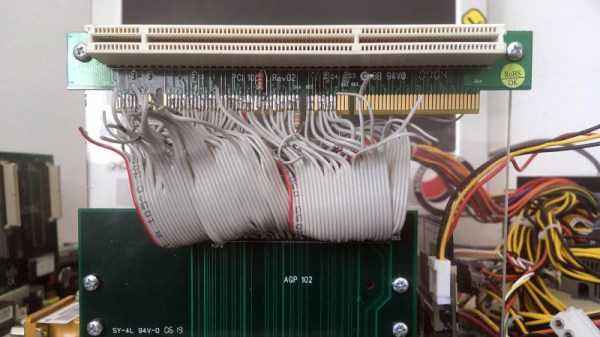
For a while around a quarter century ago PC motherboards came with a special slot, a little shorter than the PCI slots which ruled the roost back then, and offset from them further into the case. This was the Accelerated Graphics Port, or AGP, a standard created to more quickly serve the 3D graphics cards which were then taking the world by storm. It was everywhere for a few years, then in the mid-2000s it was replaced by PCI Express and faded into obscurity. [Peter] has a Socket 7-based NAS with an AGP slot, and was left wondering whether the unused port could be put to a worthwhile purpose.

AGP is a superset of PCI clocked at 66 MHz, and usually benefiting from having its own exclusive bridge to the processor bus. Thus he reasoned that he could make an AGP to PCI adapter and it might work, as the right connections are all there. A hacked-together version was made by butchering two riser cards, and when a network card worked quite happily he knew he was on to something and made a PCB. There’s a caveat that it only works with 66-MHz capable PCI cards so not everything will work, but if you’re one of the very few people who must be in the market for one, he can do you a PCB.

We’d normally end with a link to a related project here, but we must instead congratulate [Peter]. As far as we can find, this is Hackaday’s first AGP hack, two decades later. Continue reading “A Better Use For The AGP Slot, Decades Later”

The USB Protocol, Explained

If you can explain what a USB PID, a J state, a K state, and an SOF are, you can probably stop reading now. But if you don’t know or you want a refresher, you can spend 15 minutes watching [Sine Lab’s] straightforward explanation of the USB protocol details. You can find the video below.

The motivation for this is he wants to add USB to his projects using an ATMega with a hardware USB implementation. Honestly, most of the time, you’ll just consume some premade library and get it working that way. However, understanding the terminology can help you, especially if things don’t go as planned.

Continue reading “The USB Protocol, Explained”

Old-School Video Switching Levels Up With Modern USB Control

Video effects and mixing are done digitally today, but it wasn’t always so. When analog ruled the video world, a big switch panel was key to effective results.

VIdeo like this was the result of combining different analog feeds with different effects. The better the hardware, the more was possible.

Devices like [Glen]’s Grass Valley Series 300 Crosspoint Switch Panel were an important part of that world. With tools like that, a human operator could set up a composited preview feed in true WYSIWYG style, and switch to live on cue. All done with relatively simple CMOS ICs and buttons. Lots and lots of buttons.

[Glen] reverse engineers the panel to show how it works, and most of the heavy lifting is done by the MC14051B analog multiplexer/demultiplexer, and the MC14532B 8-bit priority encoder. Once that’s figured out, the door is open to modernizing things a little by using a microcontroller to drive the device, turning it into a USB peripheral.

With a little design work, [Glen] builds a PCB around the EFM8UB2 8-bit microcontroller to act as a USB peripheral and control the switch panel, taking care of things like key scanning and lamp control. The last step: a GUI application for monitoring and controlling the panel over USB.

This isn’t [Glen]’s first time interfacing to vintage video mixing and switching, and as many of us know it’s sometimes tricky work to interface to existing hardware. We covered his earlier video switcher project using hardware that was not nearly as easy to work with as this one.

Parts: AT Keyboard

atkeyboard

Last week we introduced a new version of the Bus Pirate universal serial interface tool. The last firmware update included an AT keyboard decoder library for both hardware versions.

There’s a ton of old AT keyboards making their way to the landfill. We’ll show you how to recycle one as an input device for your next project.

Continue reading “Parts: AT Keyboard”

Parts: Precision Humidity And Temperature Sensor (SHT1x/7x)

sht11

Sensirion’s SHTxx is a digitally interfaced humidity and temperature sensor. Accurate humidity measurements usually require careful analog design, but the SHTxx moves all that complicated stuff into a single chip. Through-hole (SHT7x) and surface mount (SHT1x) versions are available, we used the surface mount SHT11 with +/-3% accuracy. We’ll show you how to use the SHTxx below.

Continue reading “Parts: Precision Humidity And Temperature Sensor (SHT1x/7x)”

Parts: 1K 1-Wire EEPROM (DS2431)

1keeprom-450

The Maxim DS2431 1K EEPROM is 1-Wire device that adds storage to a project using a single microcontroller pin. We previously interfaced a 1-wire thermometer, but this EEPROM is slightly different because it draws power directly from the 1-Wire bus. Grab the datasheet (PDF) and follow along while we read and write this simple 1-Wire memory.

Continue reading “Parts: 1K 1-Wire EEPROM (DS2431)”

Parts: 133MHz-16.2kHz Programmable Oscillator (DS1077)

cover

The DS1077 is a 5volt, 133MHz to 16kHz programmable clock source. The internal frequency divider is configured over a simple I2C interface, and the chip requires no external parts. Not bad for under $2. We used the Bus Pirate to test this chip before using it in a project. Grab the datasheet (PDF) and follow along. Continue reading “Parts: 133MHz-16.2kHz Programmable Oscillator (DS1077)”