Steel Reinforcement Toughens Cracked Vintage Knobs

Nothing can ruin a restoration project faster than broken knobs. Sure, that old “boat anchor” ham rig will work just fine with some modern knobs, but few and far between are the vintage electronics buffs that will settle for such aesthetic affrontery. But with new old stock knobs commanding dear prices, what’s the budget-conscious restorationist to do? Why, fix the cracked knobs yourself, of course.

At least that’s what [Level UP EE Lab] tried with his vintage Heahkit DX60 ham transmitter, with pretty impressive results. The knobs on this early-60s radio had all cracked thanks to years of over-tightening the set screws. To strengthen the knobs, he found some shaft collars with a 1/4″ inside diameter and an appropriate set screw. The backside of the knob was milled out to make room for the insert, which was then glued firmly in place with everyone’s go-to adhesive, JB Weld. [Level UP] chose the “Plastibonder” product, which turns out not to be an epoxy but rather a two-part urethane resin, which despite some initial difficulties flowed nicely around the shaft collar and filled the milled-out space inside the knob. The resin also flowed into the channels milled into the outside diameter of the shaft collars, which are intended to grip the hardened resin better and prevent future knob spinning.

It’s a pretty straightforward repair if a bit fussy, but the result is knobs that perfectly match the radio and still have the patina of 60-plus years of use. We’ll keep this technique in mind for our next restoration, or even just an everyday repair. Of course, for less demanding applications, there are always 3D printed knobs.

Continue reading “Steel Reinforcement Toughens Cracked Vintage Knobs”

Epoxy Fix For A Combusted PCB

When the Magic Smoke is released, chances are pretty good that you’ve got some component-level diagnosis to do. It’s usually not that hard to find the faulty part, charred and crusty as it likely appears. In that case, some snips, a new non-crusty part, and a little solder are usually enough to get you back in business.

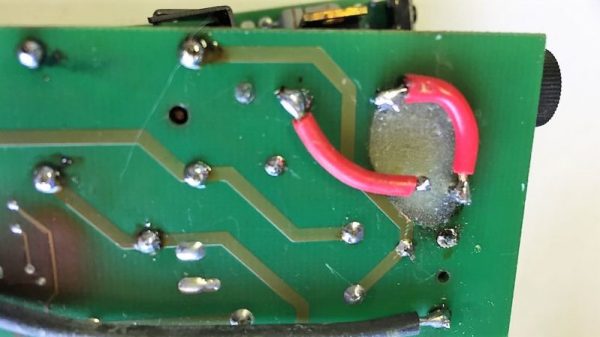
But what if the smoke came not from a component but from the PCB itself? [Happymacer] chanced upon this sorry situation in a power supply for an electric gate opener. Basking in the Australian sunshine for a few years, the opener started acting fussy at first, then not acting at all. Inspection of its innards revealed that some unlucky ants had shorted across line and neutral on the power supply board, which burned not only the traces but the FR4 of the board as well. Rather than replace the entire board, [Happymacer] carefully removed the carbonized (and therefore conductive) fiberglass and resin, leaving a gaping hole in the board. He fastened a patch for the hole from some epoxy glue; Araldite is the brand he used, but any two-part epoxy, like JB Weld, should work. One side of the hole was covered with tape and the epoxy was smeared into the hole, and after a week of curing and a little cleanup, it was ready for duty. The components were placed into freshly drilled holes, missing traces were replaced with wire, and it seems to be working fine.

This seems like a great tip to keep in mind for when catastrophe strikes your boards. There are more extreme ways to do it, of course, but perhaps none so flexible. After all, epoxy is versatile stuff.

JB Weld – Strong Enough To Repair A Connecting Rod?

JB Weld is a particularly popular brand of epoxy, and features in many legends. “My cousin’s neighbour’s dog trainer’s grandpa once repaired a Sherman tank barrel in France with that stuff!” they’ll say. Thankfully, with the advent of new media, there’s a wealth of content out there of people putting these wild and interesting claims to the test. As the venerable Grace Hopper once said, “One accurate measurement is worth a thousand expert opinions“, so it’s great to see these experiments happening.

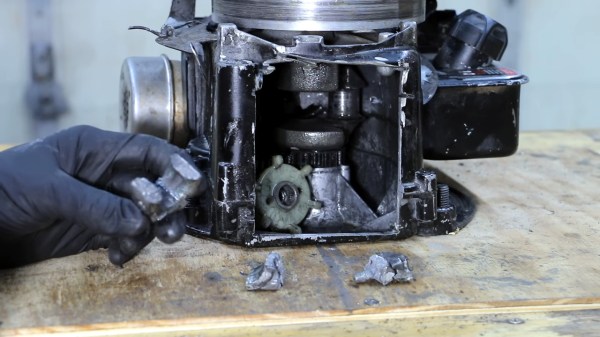
[Project Farm] is one of them, this time attempting to repair a connecting rod in a small engine with the sticky stuff. The connecting rod under test is from a typical Briggs and Stratton engine, and is very much the worse for wear, having broken into approximately 5 pieces. First, the pieces are cleaned with a solvent and allowed to properly dry, before they’re reassembled piece by piece with lashings of two-part epoxy. Proper technique is used, with the epoxy being given plenty of time to cure.

The result? Sadly, poor — the rod disintegrates in mere seconds, completely unable to hold together despite the JB Weld’s best efforts. It’s a fantastic material, yes – but it can’t do everything. Perhaps it could be used to cast a cylinder head instead?

Continue reading “JB Weld – Strong Enough To Repair A Connecting Rod?”

A Slightly Scientific Examination Of Epoxies

Two-part epoxy is one of those must-have items in your toolbox, albeit kept in a ziploc bag to keep all that goo off the rest of your tools. It’s a glue with a million uses, but which brand is best? Should you keep some cheap five-minute epoxy around, or should you splurge for the fancy, long-setting JB Weld. It’s not a perfect analysis, but at least [Project Farm] has done the experiment. This is a test of which two-part epoxy you can find at your local home supply store is strongest.

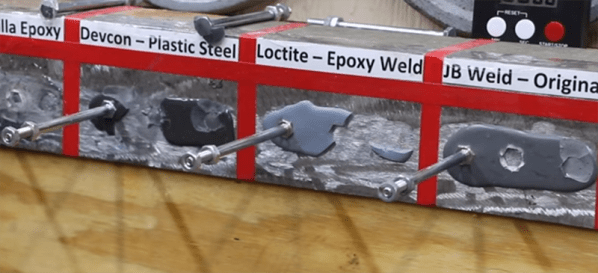
The epoxies tested include Gorilla epoxy, Devcon Plastic Steel, Loctite Epoxy Weld, JB Weld original, JB Weld Kwik Weld, and JB ExtremeHeat. This more or less covers the entire gamut of epoxies you would find in the glue aisle of your local home supply store; the Gorilla epoxy is your basic 5-minute epoxy that comes in a double barrel syringe, and the JB Welds are the cream of the crop.

The testing protocol for this experiment consisted of grinding a piece of steel clean, applying a liberal blob of each epoxy, and placing three bolts, head down, in each puddle. The first test was simply suspending weights in 2.5-pound increments to each bolt as a quick test of shear strength. Here, the losers in order were the JB Weld ExtremeHeat, JB Weld KwikWeld, Loctite, Gorilla Epoxy, Devcon Plastic Steel, and finally the JB Weld Original. Your suspicions are confirmed: those fancy new versions of JB Weld aren’t as good as the original. The fact that they’re worse than 5-minute epoxy is surprising, though. The second test — torquing the bolts out of the epoxy — gave similar results, with Devcon Plastic Steel beating the JB Weld Original just barely.

So, what do these results tell us? Cheap five-minute epoxy isn’t terrible, and actually better than the fancy new versions of JB Weld. Loctite is okay, and the Devcon and original JB Weld are at the top of their game. That’s not that surprising, as you can cast cylinder heads for engines out of JB Weld.

Continue reading “A Slightly Scientific Examination Of Epoxies”

Fridge Compressor To 2-Stroke Engine: JB Weld For The Win

We like this one because it has a real Junkyard Wars feel to it: turning a cast-off fridge compressor into a two-stroke internal combustion engine. [Makerj101] is doing this with tooling no more complicated than a hacksaw and a hand drill. And JB Weld — lots and lots of JB Weld.

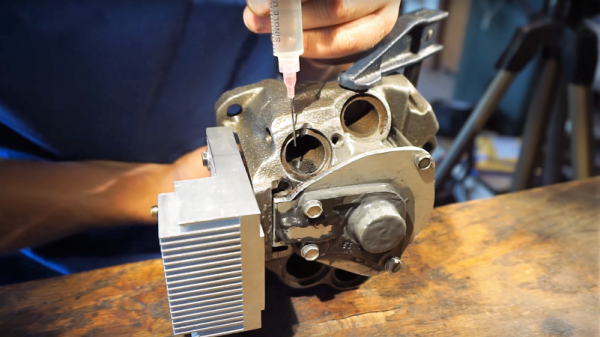
[Makerj101]’s video series takes us through his entire conversion process. Despite the outward similarity between compressors and engines, there are enough crucial differences to make the conversion challenging. A scheme for controlling intake and exhaust had to be implemented, the crankcase needed to be sealed, and a cylinder head with a spark plug needed to be fabricated. All of these steps would have been trivial in a machine shop with mill and lathe, but [Makerj101] chose the hard way. An old CPU heat sink serves as a cylinder head, copper wire forms a head gasket and spacer to decrease the compression ratio, and the old motor rotor serves as a flywheel. JB Weld is slathered everywhere, and to good effect as the test run in the video below shows.

Think you recognize [Makerj101]? You probably do, since we featured his previous machine shop-less engine build. This guy sure gets his money’s worth out of a tube of JB Weld.

Continue reading “Fridge Compressor To 2-Stroke Engine: JB Weld For The Win”

Casting Cylinder Heads Out Of JB Weld

Like friendship, JB Weld is magic. Rumors persist of shade tree mechanics in the Yukon repairing cracked engine blocks with JB Weld, and last month this theory was proved correct. [Project Farm] over on YouTube took a grinder to the head of a lawnmower engine, filled the gouge with JB Weld, and ran the engine for twenty minutes.

However, as with anything mechanical that doesn’t have a foul-mouthed Canadian in it, arguments ensued. ‘This was not a true test of JB Weld repairing a cracked engine block’, claimed Internet commenters, ‘I won’t even watch the video because the idea alone is click bait.’

Now, [Project Farm] is back at it. Is it possible to use JB Weld to cast an entire cylinder head for a lawnmower? It sure is. With a cast epoxy cylinder head, this engine will run for just long enough for a proof of concept.

This experiment began by casting a single monolithic block of JB Weld that’s a bit larger than the cylinder head for a lawnmower. After curing, this JB Brick was surfaced on both sides with a belt sander. No, there was no vacuum chamber or any other techniques used by people who work with epoxies for a living. With the brick surfaced, the head gasket was used to place the bolt holes, the brick was tapped for a spark plug, and a bit of the inside was Dremeled out for the valves.

After attaching the JB Weld cylinder head to a lawnmower, [Project Farm] ran the lawnmower for about a minute. Is this a proof of concept? Yes. Did it work? Absolutely. Is it the ultimate test of JB Weld and the myth of the cracked engine block? Unfortunately, no. For that, someone will have to build a real engine entirely out of JB Weld. Until then, just check out the video below.

Continue reading “Casting Cylinder Heads Out Of JB Weld”

JB Weld Fixes Cracked Cylinder Heads

There are persistent rumors that the main ingredient in JB Weld is magic. This two-part epoxy that you would normally find on a shelf next to your basic 5-minute epoxy, Titebond, various cyanoacrylates, and Gorilla glue is somehow different. Stories of ‘some guy’ in the Yukon using JB Weld on a cracked engine block abound. These stories are of course met with skepticism.

Now, finally, we have evidence you can use JB Weld to fix an engine. [Project Farm] over on YouTube gave it the ultimate test: he took the cylinder head off a lawnmower, took a grinder to the head, and patched the hole with JB Weld. The head had good compression, and the engine actually ran for 20 minutes before the test was concluded.

If this were a test of a field repair, it would be a test of an extremely crappy field repair. [Project Farm] made no attempt to ensure the piston didn’t make contact with the blob of JB Weld, and in fact, there was some slight knocking from the piston tapping against a blob of epoxy. Still, this repair worked.

While this serves as proof of the feasibility of repairing an engine block with JB Weld, there is one ultimate test of JB Weld epoxy: build an engine out of it. For years, I’ve been casting my leftover JB Weld into a small square plastic container. In a few more years, I’ll have a block of JB Weld ‘stock’, large enough to machine the parts for a small (.049 cc) glow engine, like what you would find in ye olde tymie model planes and cars. Will it work? I have no idea, but now I can’t wait to find out.

Continue reading “JB Weld Fixes Cracked Cylinder Heads”