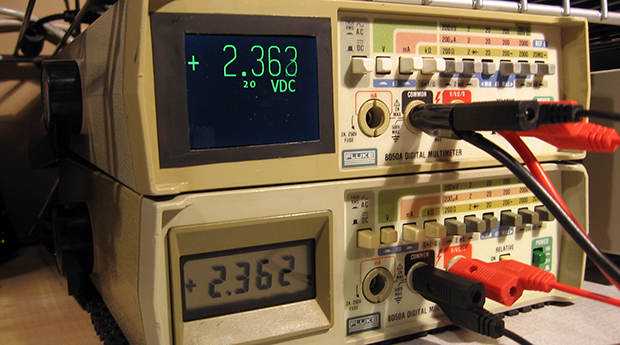
Asteriods: The Belt Buckle

asteroids-video-game-belt-buckle

This is going to change the way you play with yourself. What if every time you got a little bored you reached for your belt rather than your smart phone? [Cunning_Fellow] may be doing that more often now that he finished this slick-looking video game belt buckle which plays the classic Asteroids game.

It isn’t just an intriguing concept. The build was pulled off at a very high level of quality… this thing should have no problem standing the test of time. First off he had to figure out if it was even possible to run the game at a respectable frame-rate. Cheap 320×240 LCD screens don’t have a frame marker (think of it as a vertical sync signal with can be used as an interrupt for the microcontroller). But he thought it was possible that the frame marker pin just wasn’t connected like on more expensive screens and he was right with at least one model he acquired.

With that out of the way he laid out and etched a beautiful double-sided board to house all of the electronics. But he still needed a case. To get a one-of-a-kind look he masked and etched a sheet of brass. Once cut out and folded ti gives a wonderful look and protects the electronics inside quite well. 

Hinged NES Case Hides An Integrated LCD Screen

We’ve sure been seeing a lot of original NES cases used in projects lately. This time around the thing still plays the original cartridges. This was one of the mains goals which [Maenggu] set for himself when integrating the LCD screen with the gaming console. There is a quick video clip which shows off the functionality of the device. It’s embedded after the break along with a few extra images.

To our eye the NES looks completely unmodified when the case is closed. The cartridge slot still accepts games, but you don’t have to lower the frame into place once that cartridge has been inserted. The image above shows a ribbon cable connecting the top and bottom halves of the build. It routes the signals for both the LCD screen and the cartridge adapter to the hardware in the base. He mentions that he used the original power supply. We’re not sure if the original motherboard is used as well or if this is using some type of emulator.

Continue reading “Hinged NES Case Hides An Integrated LCD Screen”

Making A Commodore 64 Portable

making-a-c64-portable

This is [Wpqrek’s] Commodore 64 modified to go on the road with him. The elderly machine has a special place in his heart as it was what he learned to code on. He performed a series of hacks which house everything necessary to use the machine inside the original case.

Obviously the hack that has the most effect when it comes to portability was swapping a display for the small LCD mounted above the number keys. This was a pretty simple process because the screen, originally intended for a rear view camera in a vehicle, already had a composite video input. To emulate the floppy disc drive he’s using an SD card via an sd2iec board which he laid out himself. Rounding up the alterations is a stereo SID. The second channel uses the pre-amp circuit cut from a second C64. This audio hardware will let him do cool things like playing some classic Zeppelin.

You can get a video tour of these alterations after the break.

Continue reading “Making A Commodore 64 Portable”

LCD-based QR Clock

Here’s a new take on the QR clock concept that uses an LCD display. The concept comes from the work [ch00f] put into his two versions of a QR clock (both of which used LED arrays). The time of day is encoded using the Quick Response Code standard. This version generates a new code each second which encapsulates date, hour, minute, and second information. If you look at the image on the left you’ll notice the code is not centered. Take a look at the video after the break and you’ll see that’s because it’s bouncing around the LCD like a screensaver. Watch a little longer and you’ll see the psychedelic effects shown in the image on the right.

A PIC32 is driving the display. It’s connected to a DCF77 radio module which feeds the system atomic clock data. The color plasma effects are used to show when the device has locked onto the radio signal.

Continue reading “LCD-based QR Clock”

Breathing Life Into An Old LCD

panel

Out of the depths of a junk drawer, [Alex]’s friend pulled out an old monochrome LCD display. This is an older low-resolution display from ancient electronics that unfortunately doesn’t have its own controller chip. No worries, though, because with the help of an FPGA [Alex] figured out how to drive this display.

On the back of this display are eight Hitachi LCD drivers, six column shifters and two row shifters, allowing the LCD to display a 256×128 pixel image. Without an LCD controller, though, [Alex] couldn’t just send a static image to the LCD. Instead, he had to continuously refresh the display just like a VGA monitor.

With the help of a 1500-page PDF titled Hitachi LCD Controller/Driver LSI Data Book, [Alex] was able to dump pixels into the ICs on the display with the help of a Papilio One FPGA board. A lot of work just to display the beautiful [Lena], but she wouldn’t have it any other way.

Adding An LCD Screen Terminal For TP-Link Routers

Routers running embedded Linux offer quite a bit of power depending on what you need to do. To extend the usefulness of his TP-Link router [Roman] built a rig that adds an LCD screen to display the terminal. But it ended up being quite a bit more powerful than that.

The first portion of the project was to build a USB video card for the display. [Roman] went with an STM32 development board which resolves the USB device end with the QVGA screen driver (translated). This seems like it would be the lion’s share of the project, but he still needed a driver on the router to interface with the device. This thrust him into the world of USB-class drivers (translated). It even included building graphics support into the kernel of OpenWRT. The final piece of the puzzle was to write a frame buffer (translated) that would help regulate the output to the screen. The result works so well he is even able to play games using ScummVM. See for yourself in the clip after the break.

Continue reading “Adding An LCD Screen Terminal For TP-Link Routers”

Pulling The LCD Screens Out Of A MyVu Glasses Display

myvu-led-module-teardown

[John Floren] really sells us on a pair of MyVu 301 Video Glasses. He lists the features as being bulky, ugly, and uncomfortable. That’s the reason why he’s showing you how to crack open the glasses in order to steal the tiny LCD modules.

The LCD screen for each eye is mounted inside of the assembly seen above. The screen is perpendicular to the wearer’s eye, with some space in the body to facilitate the lens and reflector that enlarge the image and direct it toward the eye. After removing the display from the module [John] tried to hook it up to a camera via the driver hardware which comes with the glasses. It must have been a bit of a head scratcher that all he could get was a plain white image. This is fixed by finding the polarizing filter inside the module and laying it over the screen. This is demonstrated in the clip after the break.

We don’t know where he’s planning to go from here, but we can suggest a few different projects. This hardware could be useful in creating his own augmented reality hat. Using it as a video game controller is another thing that pops to mind. Wouldn’t it be cool to have this in the scope sight of a light gun?

Continue reading “Pulling The LCD Screens Out Of A MyVu Glasses Display”