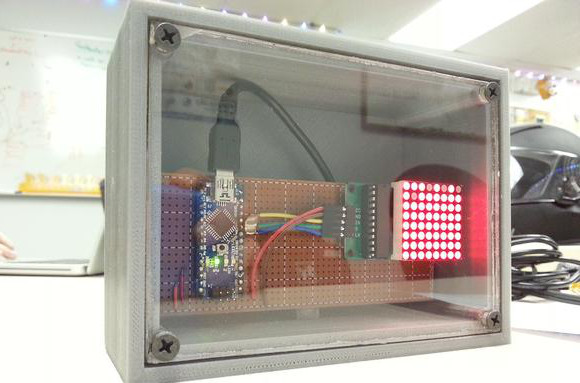
Arduino-based Sieve Of Eratosthenes

ofTs7UD

[Darkmoonsinger’s] sister is finishing her graduate degree in mathematics, and [Darkmoonsinger] wanted to give her a gift that fit with her achievement. Naturally, building a Sieve of Eratosthenes using an LED matrix and an Arduino made perfect sense. If you’re unfamiliar, a Sieve of Eratosthenes is a simple, but very efficient, technique for finding prime numbers. Starting with a group of numbers, you step through each one in order. If it’s prime, you eliminate any multiples from the list. After a few iterations, the numbers remaining are all primes. After getting the LED matrix and sieve algorithm running, [Darkmoonsinger] designed an enclosure for the project. She made a couple of mistakes with this part, and happily included them for everyone’s benefit.

It only figures primes up to 64, and she lights the LED for 1 because it ‘makes the array look prettier’. Also, we couldn’t help but think that mounting the components a bit differently would have made a cleaner install (here’s a prime number generator with a backlit faceplate). However, that probably doesn’t matter to his sister. As they say, it’s the thought that counts, and we never get tired of seeing people build rather than buy!

Hackaday Links: September 15, 2013

hackaday-links-chain

First a quick announcement. We changed our “Kickstarter” category to “Crowd Funding“. We get a huge number of tips about crowd funding projects. We’re always interested in details. If you’re trying to get your crowd funding campaign on our front page make sure you’ve shared as many gritty project details (development process, problems/successes along the way, etc.) as possible . We usually prefer if this is done in a separate blog post from the campaign page itself.

Here’s a peephole hack that purportedly cost four grand. It uses a full on DSLR for the peephole hardware. Add a motion sensor and maybe you’ll be able to learn the faces of the neighbors who live on your floor. [via Gizmodo]

[Matthias] tells us that support for Rigol DS1052E oscilloscopes has been included in the 3.11 version of the Linux Kernel. Prior to this, getting the hardware to work on Linux was a hack, and a buggy one at that. For what it’s worth, here’s confirmation that support was added.

A post about reverse engineering the FitBit Aria Wi-Fi scale was sent in by [Christopher]. This makes us wonder if you could patch into a digital scale, using your own electronics to spoof the FitBit version?

We always keep our paperboard six-pack carriers so that we have a way to transport our homebrew beer. But rolling into a party with this laser-cut beer caddy which [Daniel] designed looks a lot cooler.

Texas Instruments has an MSP430 Selection Guide (PDF) which we found interesting. The first nine pages or so are pretty much just marketing, but several pages of parametric tables found after that make for a great collection of data on the hardware families. [via Dangerous Prototypes]

[Antoine] spared no expense building a coffee table that showcases his old motherboards. The illuminated glass and wood art piece rang in at around $400 in materials. We’re a little more minimalist with our home decor. We still want something along the lines of this LED matrix version.

Speaking of LED matrices, [Mario] dropped off a link to his LED Space Invaders game in the comments of last week’s Game of Light post. What we can’t figure out is why so many people hesitate to send in a tip about their awesome projects?

Game Of Light

gameoflight

Hyperrealistic graphics may be the standard for gaming, but Game of Light (Warning: Loud video volume) is a welcomed detour into vivid, low-res delight. Built for a course at the University of Oslo by [Abdimaalik], [Martin], [Andre], [Eivind], and [Stian], Game of Light has a handful game options, some of which allow up to four players. The build uses eight DE-DP14211 LED dot matrix boards, each with 32×16 bi-color LEDs and a built-in HT1632C display controller to handle the multiplexing. They are mounted together to form the 64×64 resolution display.

The box was custom-made out of what we suspect is acrylic, and uses some 3D printed pieces to offset the top from the bottom and to hold components in place. SNES controllers send data to the Arduino, which also runs the games and feeds the display controllers. Buried in the mix are two fans to keep the components cool. Everything is open source, so race to Github for source code and the games.

For another LED matrix project with a lot of gaming potential, check out [Brad’s] PS2 mouse interface that lets him interactively draw in real-time.

Continue reading “Game Of Light”

PixelBrite Is An LED Wall/coffee Table Done Right

pixelbrite

The scope of this project is almost as jaw-dropping as the cost of the parts. [LeoneLabs] calls the project PixelBrite. It’s a highly-polished modular RGB LED panel system, and he’s not keeping it a secret. We think it’s reasonable to call the build documentation mammoth. If you’re a fan of fast-motion assembly videos he’s got you covered there as well.

It’s interesting to compare this build to some of the Daft Punk tables from years back. It shows how economies of scale in the hobby electronics industry have helped new and affordable products to emerge. For instance, this offering is a 10×10 grid which is outside of the normal 8 pixel wide orientation dictated by 8-bit microcontrollers. The reason for the change is that this doesn’t use a matrix built with point-to-point soldering. It uses a string of RGB pixels (WS2801).

The enclosure is also a thing of beauty. The dividers that make up each cell are laser cut foam board. This makes the joints very tight to prevent light from leaking into the next cell. The housing is acrylic held in place by an aluminum rail system. Need more than one panel? No problem, a single connector chains one panel to the next. But we did mentioned the cost of materials. Unassembled you can expect to drop over five hundred bones for the pleasure of seeing this thing blink.

Continue reading “PixelBrite Is An LED Wall/coffee Table Done Right”

Heart-shaped Project Takes No Shortcuts

heart-shaped-project

If all [Blake] wanted to do is scroll “Blake loves Kim” on some LEDs he could have stopped with the breadboard version of the project. Or hastily craft a cardboard heart around the marquee. But he really just used this heart-shaped electronics project as an excuse to get his feet wet with several different types of manufacturing.

The project started as a simple scrolling message pendant. Something along these lines. His very small LED module was being driven by an ATtiny85. He planned to run it from battery which is a perfect excuse to learn how to use the sleep functions built into the chip.

The initial design worked so well he decided to lay out his own circuit board. This made it quite simple to add in a side-positioned button to wake from sleep, and a coin cell battery holder on the back. He used OSH Park for board manufacturing — good thing they allow creative board outlines. To protect the circuitry he also ordered laser-cut acrylic plates that work in conjunction with stand offs to form a case.

He mentions he missed his Valentine’s Day delivery date by a long shot. But that’s how these sort of things go, right?

Continue reading “Heart-shaped Project Takes No Shortcuts”

Visualize Twitter With An LED Matrix

visualizing-twitter

What’s your favorite color? Don’t tell us, Tweet it to [Sebastian’s] favorite color Twitter display and you’ll be contributing to the artwork hanging on his wall.

This answers a very important question, what do you do with your projects after they’re completed? For us the best part is the planning and building. Once it’s done the thrill is pretty much gone for us. We haven’t even switched on our Ping Pong clock in over a year. But [Sebastian] recently dusted his 10×10 LED matrix for this project.

Tweets are parsed by a Python project he wrote to try out the Twitter API. It looks for a set list of colors . He asserts that people aren’t that creative when you solicit their favorite color but to prove him wrong we’re going to say our favorite is Amaranth. After it finds the color it pushes it to the next pixel in the spiraling pattern shown above. But wait, there’s more! To give the pixels a but if extra meaning he uses the total length of the tweet to set intensity.

If you need a Titter enabled hack that displays a bit more specific data you’ll want something that can actually display what was Tweeted.

Making A QR Clock Bigger, Cheaper, And Better

With the massive response and blog cred from his QR Code clock, [ch00f] felt it was time to step up his game and update his design to a proper commercial product. His new QR clock is bigger, brighter, cheaper, and in every way better than the old version, but these improvements came at a cost.

The LED matrices [ch00f] used in his earlier, smaller version weren’t very aesthetically pleasing. He wanted the lights to shine a brilliant white, and also be somewhat attractive when not illuminated. The 8×8 LED arrays [ch00f] picked up from Futurlec had a disgusting yellow coating on each LED that turned light emitted by the blue LEDs inside to a brilliant white. This simply wouldn’t do for a commercial product with [ch00f]’s name on it, so he turned to the one place in the universe where everything was for sale: alibaba.com.

After some trials and tribulations with component manufacturers in China, [ch00f] had the perfect LED matrix; not too expensive, very good quality control, and something that looked really good when both unpowered and illuminated.

Now that his boards are being spun up, [ch00f] hopes to sell his QR clock on Tindie. Each 24×24 LED matrix should cost less than $100, a pretty good deal if you ask us. He’d like to know if anyone out there has any feature requests, to which we can only say he should get rid of the PCB border. Tiling a few of these displays and controlling them via serial would be much cooler than a QR Code clock.