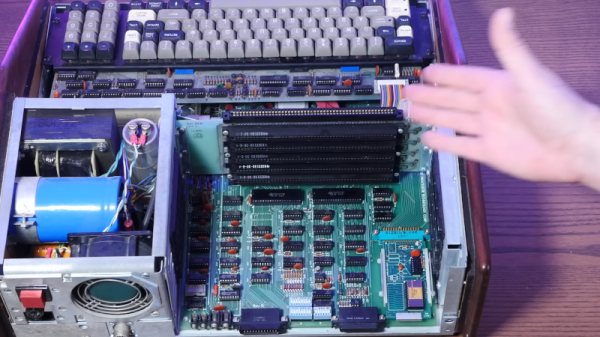
[Action Retro] came into an antique Sol-20 computer and argues that it was the first totally integrated computer aimed at consumers that didn’t require you to buy or build some kind of terminal. These are fairly rare, so we appreciated the peek inside that you can see in the video below.
Sure, the Sol-20 wasn’t the very first computer out there in the market. It was, however, one of the first ones that didn’t need anything more exotic than a monitor to have a functional system (and the monitor was included). There were alternatives such as a Xerox Alto or a Wang 2200, but those had price tags that didn’t land them in your home. Even Apple, which would become famous for a turnkey system, was only producing the Apple I at that time. As the video points out, it was complete as long as you could build your own power supply and knew how to interface a keyboard — keeping in mind that keyboards were all wildly different in those days.
[Roman Parise] and [Georgios Is. Detorakis] have created OpenSPICE a fork of the PySpice project, adding a new simulation engine written entirely in Python. This enables the same PySpice simulations to be executed on any platform that runs python (which we reckon is quite a few!) whilst leveraging the full power of the python infrastructure. Since it is a fork — for supported platforms — you can also run your simulations upon Ngspice as well as Xyce, giving options for scaling up to larger systems when required, but importantly without having to recreate your circuit from scratch.
The OpenSPICE simulator first converts the parsed netlist into a set of data structures that represent the equations describing the various parts of the system. These are then in turn passed along the scipy library “optimize.root” function which solves the system, generating a list of branch currents and node voltages. The output of the simulation is a numpy array, which can be further processed and visualized with the mathplotlib library. All pretty standard stuff in python circles. Since this is based upon PySpice, it’s also possible to use KiCAD netlists, so you have a nice way to enter those schematics. We’ve not dug into this much yet, but support for the vast libraries of spice models out there in circulation would be high up on our wish list if it already can’t handle this. This scribe will most definitely be checking this out, as LTSpice whilst good, is a bit of a pain to use and does lack the power of a Python backend!
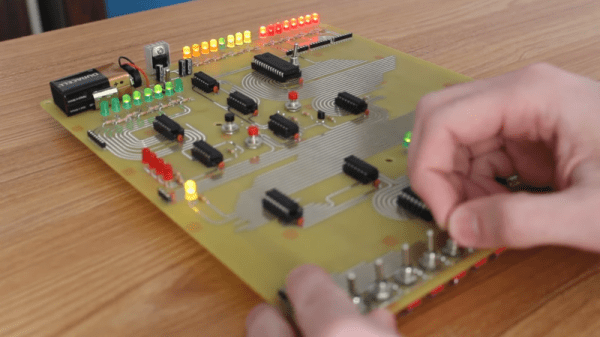
While the world has been racing for higher and higher bit counts for CPUs, there are always those that buck the trend. Consider the venerable Motorola MC14500B, a 1-bit CPU, no kidding. [Usagi Electric] built up a computer based on one of these chips using a breadboard but has since pulled it apart to use the breadboard for other things. So this time, he’s made a permanent version on a PCB and created a simple game to show it off. You can see the result in the video below.
Well, the chip had one bit in the datapath. It did not have any memory, but it did have a way to feed it 4-bit instructions, and, as you might guess, there were 16 possibilities for instructions. The chip was meant to replace industrial controllers where even a PLC might be overkill, and apparently, it did see some use in the real world.
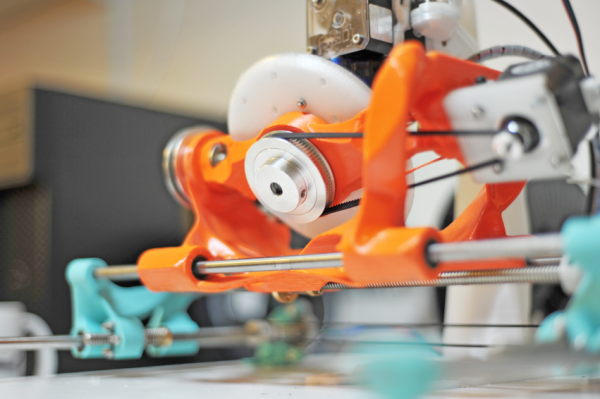
RepRap 3D printers were designed with the ultimate goal of self-replicating machines. The generatively-designed Gen5X printer by [Ric Real] brings the design step of that process closer to reality.
While 5-axis printing is old hat in CNC land, it remains relatively rare in the world of additive manufacturing. Starting with “a set of primitives… and geometric relationships,” [Real] ran the system through multiple generations to arrive at its current design. Since this is a generative design, future variants could look different depending on which parameters you have the computer optimize.
The Gen5X uses the 5 Axis Slicer from DotX for slicing files and runs a RepRap Duet board with Duex expansion. Since the generative algorithm uses parametric inputs, it should be possible to to have a Gen5X generated based on the vitamins you may have already. With how fast AI is evolving, perhaps soon this printer will be able to completely design itself? For now, you’ll have to download the files and try it yourself.
If you want to see some more printers with more than 3-axes, check out the RotBot or Open5X.
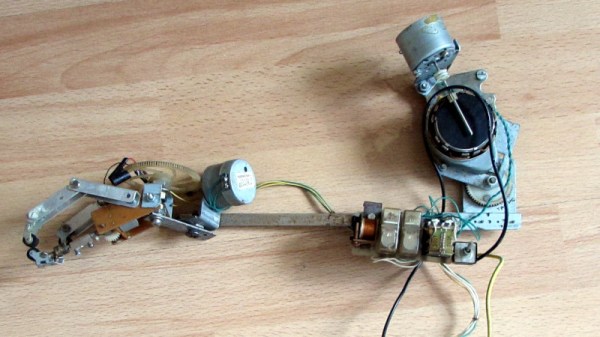
With laser cutters and 3D printers in our arsenal as well as the global toy shop of mass-produced parts and single-board computers, building a robotic project has almost never been easier. In times past though, there was more of a challenge, with a computer likely meaning a chunky desktop model and there being no plethora of motors at low prices, a robot arm required more ingenuity. [Marius Taciuc] shares with us an arm he built from the most minimal of parts back in 2003, and it’s a beautiful exercise in creative reuse.
The arm itself uses metal and FR4 for its structure, and borrows extensively from cassette tape mechanisms for motors and gears. The stronger motor for the forearm is a geared unit from a heating system, and to control all this, a relay board is hooked up to a computer’s parallel port. This last assembly is particularly ingenious, having no optocouplers handy he made his own by coupling LEDs to metal can transistors with their lids removed.
The arm was entered in a competition, and he relates a tale with which we’ll all be familiar — at the critical moment, it didn’t work. Fortunately a last-minute accidental covering of the board with a floppy disk solved the problem, as it turned out that enough light was leaking into those home-made optocouplers to trigger them. The prize was won not just on the strength of the arm, but on his explanation of the lessons learned along the way.
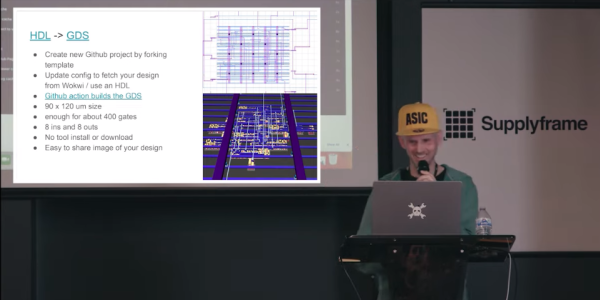
Not that long ago, rolling your own printed circuit boards was difficult, time-consuming and expensive. But thanks to an army of cheap, online manufacturing services as well as high-quality free design software, any hobbyist can now make boards to rival those made by pros. A similar shift might be underway when it comes to chip design: affordable manufacturing options and a set of free software tools are slowly bringing custom chips into the realm of hackers and hobbyists. One of those working hard to democratize chip design is Matt Venn, who’s been telling us all about his current big project, called Tiny Tapeout, in his talk at Remoticon 2022.
Matt’s quest to bring IC design to the masses started in 2020, when the first open-source compatible Process Design Kit (PDK) was released to the public. A PDK is a collection of files, normally only available under strict non-disclosure agreements, that describe all the features of a specific chip manufacturing process and enable you to make a design. With this free PDK in hand and a rag-tag collection of free software tools, Matt set out to design his first chip, a VGA clock, which he taped out (released to manufacturing) in July 2020. Continue reading “Supercon 2022: Matt Venn’s Tiny Tapeout Brings Chip Design To The Masses”→
This is the first we’ve heard of Parametric Press — a digital magazine with some deep dives into a variety of subjects (such as particle physics, “big data” and such) that have interactive elements or simulations of various types embedded within each story.
The first one that sprung up in our news feed is a piece by [Omar Shehata] on the humble JPEG image format. In it, he explains the how and why of the JPEG encoding process, allowing the reader to play with the various concepts along the way, in real time, within the browser.
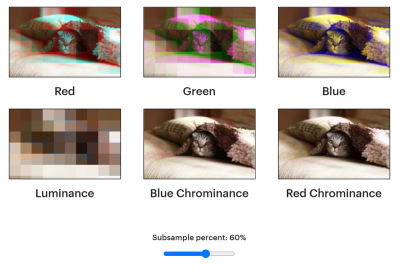
RGB colour-space subsampling doesn’t affect each component to the same degree due to the human eye cone cell response. Also, the chroma components are much less affected than the luminance.
For those not familiar with the format, the first step (which is actually optional) to JPEG encoding is to transform the image from the RGB color space, into a YCbCr (luminance, chrominance) color space. Since the human eye is far more sensitive to luminance (brightness) differences than it is to Cb (chroma relative blueness) and Cr (chroma relative redness) differences, these latter two components can be subsampled by only storing a single value for each, in every 2×2 pixel matrix. JPEG allows other matrix sizes, but 2×2 is the most common.
This sets the scene for the clever bit, that comes next and allows more of that harder-to-perceive chroma information to be discarded. It’s fun to play with the chroma sub-sampling slider and see how the different colours are not equally affected, due to the relative sensitivities of the human eye cone cells.
Next, the three YCbCr components are treated independently to a discrete cosine transform and quantization. This transforms each 8×8 pixel block into 64 discrete spatial frequencies. The JPEG compression level (which you can change) affects how many of the upper-frequency components get discarded, and thus how much of the fine spatial detail gets discarded. This is the main source of JPEG image quality loss. Finally, the compressed blocks are delta encoded, where each subsequent block is coded as the difference from the previous one. Like chroma subsampling, this doesn’t offer any compression on its own but allows the subsequent run-length encoding to be more effective, giving more (lossless) compression. Finally, the whole lot is then Huffman compressed with a unique table stored in the JPEG header. So want to play with JPEGs some more? here’s the GitHub source.
If all of this theoretical stuff is a bit useless to you, perhaps you just want to decode some JPEGs, then here is a speedy library for just that.