Laser Scanning Microscope

Remember that feeling when you first looked down on a microscope? Now you can re-live it but in slightly different way. [Venkes] came up with a way to make a Laser Scanning Microscope (LSM) with mostly off the shelf components that you probably have sitting around, collecting dust in your garage. He did it using some modified DVD pick-ups, an Arduino Uno, a laser and a LDR.

fuyati3iy4qiced-large
EPROM die shot

To be honest, there’s some more stuff involved in the making of the LSM but [Venkes] did a detailed Instructable explaining how everything fits together. You will need a fair dose of patience, it’s not very easy to get the focus right and it’s quite slow, an image takes about half an hour to complete, but it can do 1300x amplification at 65k pixels (256×256). From reading the instructions it seems that you will need a steady hand to assemble it together, some steps look kind of tricky. On the software side, the LSM uses Arduino and Processing. The Arduino part is responsible for the steering of the lens and taking the LDR readings. This information is then sent to Processing which takes care of interpreting the data and translate it to an image.

The build difficulty level should be between the DIY Smartphone Microscope and the Laser Sequencer Super Microscope. In the end, if everything goes right, you will end up with some cool images:

Continue reading “Laser Scanning Microscope”

Hackaday Prize Entry: Mouse Controlled Microscope

You might imagine that all one should need to operate a microscope would be a good set of eyes. Unfortunately if you are an amputee that may not be the case. Veterinary lab work for example requires control of focus, as well as the ability to move the sample in both X and Y directions, and these are not tasks that can easily be performed simultaneously with only a single hand.

[ksk]’s solution to this problem is to use geared stepper motors and an Arduino Mega to allow the manual functions of the microscope to be controlled from a computer mouse or trackball. The motors are mounted on the microscope controls with a custom 3D-printed housing. A rotary selector on the control box containing the Arduino allows the user to select a slow or fast mode for fine or coarse adjustment.

It’s fair to say that this project is still a work in progress, we’re featuring it in our series of posts looking at Hackaday Prize entries. However judging by the progress reported so far it’s clear that this is a project with significant potential, and we can see the finished product could be of use to anyone operating the microscope.

We’ve featured one or two mouse controlled projects over the years, though not controlling microscopes. Here’s one mouse controlled robot arm, and we’ve covered another arm with a 3D mouse.

Shop-built Inspection Camera Lends Optical Help On A Budget

As your builds get smaller and your eyes get older, you might appreciate a little optical assistance around the shop. Stereo microscopes and inspection cameras are great additions to your bench, but often command a steep price. So this DIY PCB inspection microscope might be just the thing if you’re looking to roll your own and save a few bucks.

It’s not fancy, and it’s not particularly complex, but [Saulius]’ build does the job, mainly because he thought the requirements through before starting the build. MDF is used for the stand because it’s dimensionally stable, easy to work, and heavy, which tends to stabilize motion and dampen vibration. The camera itself is an off-the-shelf USB unit with a CS mount that allows a wide range of lenses to be fitted. A $20 eBay macro slider allows for fine positioning, and a ring light stolen from a stereo microscope provides shadow-free lighting.

We’d say the most obvious area for improvement would be a linkage on the arm to keep the plane of the lens parallel to the bench, but even as it is this looks like a solid build with a lot of utility – especially for hackers looking to age in place at the bench.

Hackaday Prize Entry: A Cheap Robotic Microscope

The microscope is one of the most useful instruments for the biological sciences, but they are expensive. Lucky for us, a factory in China can turn out webcams and plastic lenses and sell them for pennies. That’s the idea behind Flypi – a cheap microscope for scientific experiments and diagnostics that’s based on the ever-popular Raspberry Pi.

Flypi is designed to be a simple scientific tool and educational device. With that comes the challenges of being very cheap and very capable. It’s based around a Raspberry Pi and the Pi camera, with the relevant software for taking snapshots, recording movies, and controlling a few different modules that extend the capabilities of this machine. These modules include a Peltier element to heat or cool the sample, a temperature sensor, RGB LED, LED ring, LED matrix, and a special blue LED for activating fluorescent molecules in a sample.

The brains behind the Flypi, [Andre Chagas], designed the Flypi to be cheap. He’s certainly managed that with a frame that is mostly 3D printed, and some surprisingly inexpensive electronics. Already the Flypi is doing real science, including tracking bugs wandering around a petri dish and fluorescence microscopy of a zebrafish’s heart. Not bad for a relatively simple tool, and a great entry for the Hackaday Prize.

Hackaday Prize Entry: An Internet Of Things Microscope

For their entry into the Citizen Scientist portion of the Hackaday Prize, the folks at Arch Reactor, the St. Louis hackerspace, are building a microscope. Not just any microscope – this one is low-cost, digital, and has a surprisingly high magnification and pretty good optics. It’s the Internet of Things Microscope, and like all good apparatus for Citizen Scientist, it’s a remarkable tool for classrooms and developing countries.

When you think of ‘classroom microscope’, you’re probably thinking about a pile of old optics sitting in the back of a storage closet. These microscopes are purely optical, without the ability to take digital pictures. The glass is good, but you’re not going to get a scanning stage when you’re dealing with 30-year-old gear made for a classroom full of sticky-handed eighth graders.

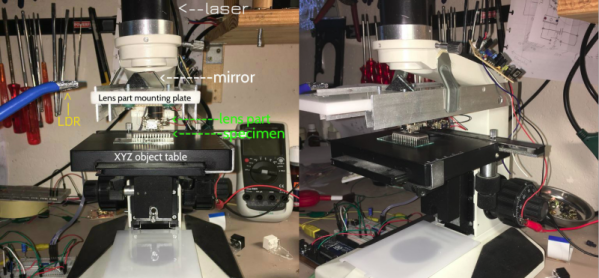
The Internet of Things Microscope includes a scanning stage that moves across the specimen on the X and Y axes, stitching digital images together to create a very large image. That’s a killer feature for a cheap digital microscope, and the folks at Arch Reactor are doing this with a few cheap stepper motors and stepper motor drivers.

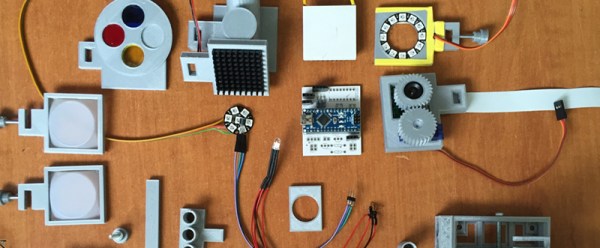
The rest of the electronics are built around a Raspberry Pi, Raspberry Pi camera (which recently got a nice resolution upgrade), and a some microscope eyepieces and objectives. Everything else is 3D printed, making this a very cheap and very accessible microscope that has some killer features.
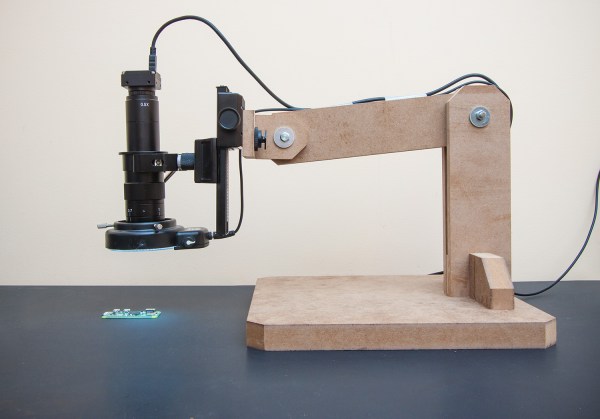
Automating A Microscope For CNC Micrographs

[Maurice] is a photographer specializing in micrographs. These very large images of very small things are beautiful, but late last year he’s been limited by his equipment. He needed a new microscope, one designed for photography, that had a scanning stage, and ideally one that was cheap. He ended up choosing a microscope from the 80s. Did it meet all his qualifications? No, but it was good enough, and like all good tools, capable of being modified to make a better tool.

This was a Nikon microscope, and [Maurice] shoots a Canon. This, of course, meant the camera mount was incompatible with a Canon 5D MK III, but with a little bit of milling and drilling, this problem could be overcome.

That left [Maurice] with a rather large project on his hands. He had a microscope that met all his qualifications save for one: he wanted a scanning stage, or a bunch of motors and a camera controller that could scan over a specimen and shoot gigapixel images. This was easily accomplished with a few 3D printed parts, stepper motors, and a Makeblock Orion, an Arduino-based board designed for robotics that also has two stepper motor drivers.

With a microscope that could automatically scan over a specimen and snap a picture, the only thing left to build was a piece of software that automated the entire process. This software was built with Processing. While this sketch is very minimal, it does allow [Maurice] to set the step size and how many pictures to take in the X and Y axis. The result is easy automated micrographs. You can see a video of the process below.

Continue reading “Automating A Microscope For CNC Micrographs”

Hackaday Prize Entry: Microscopy With Blu-ray

Confocal microscopy is an imaging technique that provides higher resolution micrographs than that of traditional optical microscopy. Confocal microscopes attain this higher resolution from an image sensor behind a pinhole. By eliminating out of focus light, and by scanning the specimen back and forth under the microscope, a very high resolution image may be produced. This technique has applications ranging from life sciences to semiconductor work. For this year’s Hackaday Prize, [andreas.betz] is building a confocal microscope using little more than a Blu-ray drive read head.

[andreas]’ build uses a standard Playstation 3 Blu-ray drive mechanism. The read head for this mechanism is well documented, but [andreas] still has to drive the laser and the voice coils for this machine to do anything. With the Blu-ray drive working, only the optics remained.

Just this last week, [andreas] imaged the die of a transistor with a resolution of about 680nm. An inductor was also imaged, showing a track separation of about 10um. This is approaching the limits of optical microscopy, and the apparatus is simple enough for anyone to replicate.

As a feat of technical ingenuity, this is a great project. It’s one of the best we’ve seen for the Citizen Science portion of the Hackaday Prize, and can’t wait to see what other images [andreas] can make with this machine.

The HackadayPrize2016 is Sponsored by: