Hackaday Prize Entry: Invisible

[Kate Reed] found a quote by a homeless person that said “No one sees us”, which led her to exploring what it actually means to be invisible — and if we actually choose to be invisible by hiding away our emotions, sexual preference, race or income. She realized that too often, we choose to only see what we want to see, rendering all the rest invisible by looking away. Her public art campaign and Hackaday Prize entry “Invisible” aims to increase social awareness and strengthening the community by making hidden thoughts, feelings and needs visible.

Continue reading “Hackaday Prize Entry: Invisible”

Puzzling Out An 80s Puzzle Toy

[Ido Gendel] looks back a time in the 80s when kids would learn by answering the questions to quizzes on their “TOMY Teacher,” or, “Sears Quiz-A-Tron”. There’s a bit of a conundrum with this toy. How did it know which answers were correct. Chip memory of any kind wasn’t the kind of thing you’d sweep into the dust bin if you had extras like it is now; it was expensive.

To use the toy, the child would place the notebook in the plastic frame on the device. They’d open the page with the quiz they would like to take. Printed in the upper left hand corner were three colored squares. There was a matching set of colored buttons on the device. They’d press the corresponding buttons in order from top to bottom and then the machine would magically know which answers on the quiz were correct.

[Ido] wondered how the machine handled this information. Was there an internal table for all 27 possible codes? Did it generate the answer table somehow? He sat down with a spreadsheet filled with the notebook code on the left and the corresponding correct answers on the right. Next he stared at the numbers.

He eventually determined that there was a pattern. The machine was using the colored squares as the input for a function that determined what the answers were. A table would have only taken up 68 bytes, but with one 80s chip on board, sounds to play, and lights to switch on and off, the machine needed all the free space it could get.

Wireless Robotic Gripper With Haptic Feedback

We’re not sure what kind of, “High School,” [Sam Baumgarten] and [Graham Hughes] go to that gave them the tools to execute their robotic gripper so well. We do know that it was not like ours. Apparently some high schools have SLS 3D printers and Solidworks. Rather than a grumpy shop teacher with three fingers who, despite that, kept taking the safety off the table saws and taught drafting on boards with so many phalluses and names carved into the linoleum, half the challenge was not transferring them to the line work.

Our bitterness aside, [Sam] and [Graham] built a pretty dang impressive robotic gripper. In fact, after stalking [Sam]’s linkedin to figure out if he was the teacher or the student, (student) we decided they’re bright enough they could probably have built it out of scraps in a cave. Just like [HomoFaciens], and Ironman.

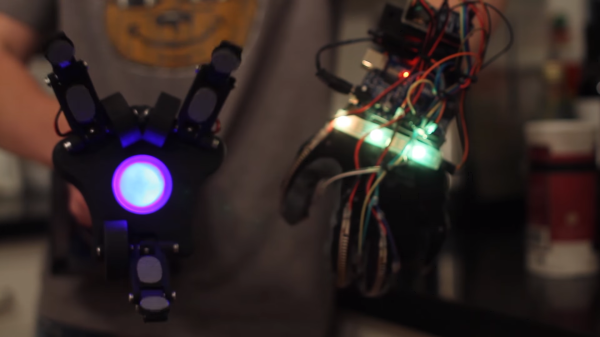
The gripper itself is three large hobby servos joined to the fingers with a linkage, all 3D printed. The mechanical fingers have force sensors at the contact points and the control glove has tiny vibrating motors at the fingertips. When the force of the grip goes up the motors vibrate more strongly, providing useful feedback. In the video below you can see them performing quite a bunch of fairly fine motor skills with the gripper.

The gripper is mounted on a pole with some abrasive tape, the kind found on skateboard decks. At the back of the pole, the electronics and batteries live inside a project box. This provides a counterbalance to the weight of the hand.

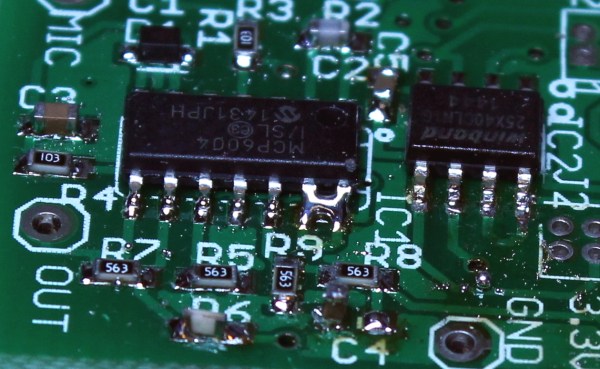
The control glove has flexible resistors on the backs of the fingers. The signal from these are processed by an Arduino which transmits to its  partner arduino in the gipper via an Xbee module.

[Sam] and [Graham] did a great job. They worked through all the design stages seen in professional work today. Starting with a napkin sketch they moved onto digital prototyping and finally ended up with an assembly that worked as planned. A video after the break explaining how it works along with a demo video.

Continue reading “Wireless Robotic Gripper With Haptic Feedback”

Denver Mini Maker Faire Roundup

I had a great time at Denver’s 3rd annual Mini Maker Faire, which was held inside the Denver Museum of Nature and Science. The official theme this year was “Building the Future” and looking back, I can tell you that they pulled the theme off well. There was a strong turnout in two categories that are crucial to building the future: the growth that comes from education at all ages and the physical places where learning becomes immersive.

The Really Fun Stuff

poison arrow[Casey] from Caustic Creations were showing off Poison Arrow just in time for season 2 of the BattleBots reboot. Poison Arrow is 250-lb. drum spinner that destroys things at 9,000 RPM. Here’s a nice introductory video shot by their sponsor, Arrow Electronics. [Casey] told me that Poison Arrow will be on the June 30th episode, so set your DVR.

Who knew that Colorado had so many maker- and hackerspaces? Colorado Makerhub, that’s who. They provide a portal to everything maker-related in Colorado, and they were in attendance along with most of the ‘spaces within a 50-mile radius of the city. Denver’s own Denhac brought a huge multiplayer rig that they had built for Comic Con last year. It runs Artemis, a spaceship bridge simulator game that divides up the tasks necessary for successful intergalactic travel. Here’s a video of Denhac member [Radio Shack] describing the game and giving a tour of one of the consoles. The group landed a space in one of the darker areas of the museum, which made the blinkenlights irresistible, especially to boys of a certain age range.

Continue reading “Denver Mini Maker Faire Roundup”

3D Printed Zoetrope Sculpture Squashes 4 Dimensions Into 3

This fascinating project manages to be both something new and something old done in a new way. Artist [Akinori Goto] has used 3D printing to create a sort of frameless zoetrope. It consists of a short animation of a human figure, but the 3D movements of that figure through time are “smeared” across a circular zone – instead of the movements of the figure being captured as individual figures or frames, they are combined into a single object, in a way squashing 4 dimensions into 3.

zoetrope-1
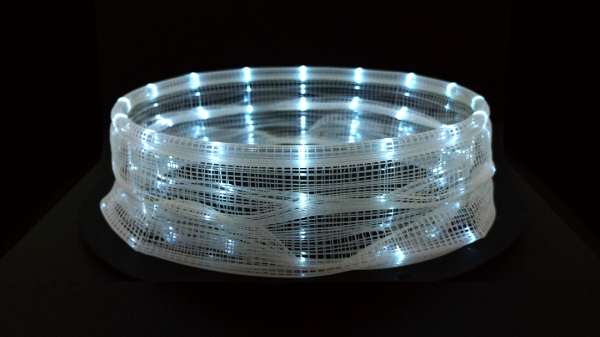
“Slices” of that object, when illuminated by a thin shaft of light, reveal the figure’s pose at a particular moment in time. When the object is spun while illuminated in this way, the figure appears to be animated in a manner very similar to a zoetrope.

There are two versions from [Akinori Goto] that we were able to find. The one shown above is a human figure walking, but there is a more recent and more ambitious version showing a dancer in motion, embedded below.

Since a thin ray of light is used to illuminate a single slice of the sculpture at a time, it’s also possible to use multiple points of illumination – or even move them – for different visual effects. Check out the videos below to see these in action.

Continue reading “3D Printed Zoetrope Sculpture Squashes 4 Dimensions Into 3”

Tools Of The Trade – Inspection

In the last episode, we put our circuit boards through the reflow process. Unfortunately, it’s not 100% accurate, and there are often problems that can occur that need to be detected and fixed. That’s what the inspection step is for. One could insert an inspection step after paste, after placement, and after reflow, but the first two are icing on the cake — the phase where most mistakes can be caught is after reflow.

There are a number of problems typical with a surface mount reflow process: Continue reading “Tools Of The Trade – Inspection”

The EAGLE Has Landed: At Autodesk!

The selloffs continue at Farnell! We’d previously reported that the UK distributor of electronics parts was being sold to a Swiss distributor of electronics parts. Now it looks like they’re getting rid of some of their non-core businesses, and in this case that means CadSoft EAGLE, a popular free-for-limited-use PCB layout suite.

But that’s not the interesting part: they sold EAGLE to Autodesk!

Autodesk had a great portfolio of professional 3D-modeling tools, and has free versions of a good number of their products. (Free as in beer. You don’t get to see the code or change it.) By all accounts, the professional versions of their tools are very professional if you can afford them, and the trial versions are still useful. This makes EAGLE slot very nicely into their business model, filling a hole (PCB design) in their toolchain.

What does this mean for those of you out there still using EAGLE instead of open-source alternatives? (We haven’t used EAGLE since KiCAD got good a couple years back.) Beats us! Care to speculate wildly? That’s why we have a comments section. Go! In the mean time we hope to have more info for you directly from Autodesk soon so stay tuned to the front page.