Hackaday editors Elliot Williams and Mike Szczys highlight the most delightful hacks of the past week. Need a random-number showpiece for your office? Look no further than that fish tank. Maybe the showpiece you actually need is to complete your band’s stage act? You want one of Tristan Shone’s many industrial-chic audio controllers or maybe just a hacked turntable sitting between your guitar and amp.
Plus citizen science is alive and well in the astronomy realm, and piezo elements are just never going to charge your electric vehicle.
Take a look at the links below if you want to follow along, and as always tell us what you think about this episode in the comments!
Take a look at the links below if you want to follow along, and as always, tell us what you think about this episode in the comments!
Back at the 2017 Superconference, Hackaday Managing Editor Elliot Williams started his talk about the so-called “Internet of Things” by explaining the only part he doesn’t like about the idea is the Internet… and the things. It’s a statement that most of us would still agree with today. If anything, the situation has gotten worse in the intervening years. Commercial smart gadgets are now cheaper and more plentiful than they’ve ever been, but it seems like precious little has been done to improve their inherent privacy and security issues.
But his talk doesn’t serve to bash the companies producing these devices or even the services that ultimately folded and left their customers with neigh useless gadgets. That’s not his style. The central theme of “Nexus Technologies: Or How I Learned to Love WiFi”is that a smart home can be wonderful thing, assuming it works the way you want it to. Elliot argues that between low-cost modular hardware and open source software, the average hacker has everything they need to build their own self-contained home automation ecosystem. One that’s not only cheaper than what they’re selling at the Big Box electronics store, but also doesn’t invite any of the corporate giants to the party.
Of course, it wasn’t always so. A decade ago it would have been all but impossible, and five years ago it would have been too expensive to be practical. As Elliot details his journey towards a truly personal smart home, he explains the advances in hardware and software that have made it not just possible on the DIY level, but approachable. The real takeaway is that once more people realize how cheap and easy it is to roll your own smart home gadgets, they may end up more than willing to kick Big Brother to the curb and do IoT on their own terms.
This previously unpublished recording somehow slipped between the cracks of the editing room floor but upon recent discovery, it’s still just as relevant today. Take a look at Elliot’s view on Nexus Technologies, then join us after the break for a deeper dive. Make sure to subscribe to Hackaday’s YouTube channel to get in on the 2019 Hackaday Superconference live stream starting Saturday, November 16th.
There’s certainly no shortage of “smart” gadgets out there that will provide you with a notification, or even a live audiovisual stream, whenever somebody is at your door. But as we’ve seen countless times before, not everyone is thrilled with the terms that most of these products operate under. Getting a notification on your phone when the pizza guy shows up shouldn’t require an email address, credit card number, or DNA sample.
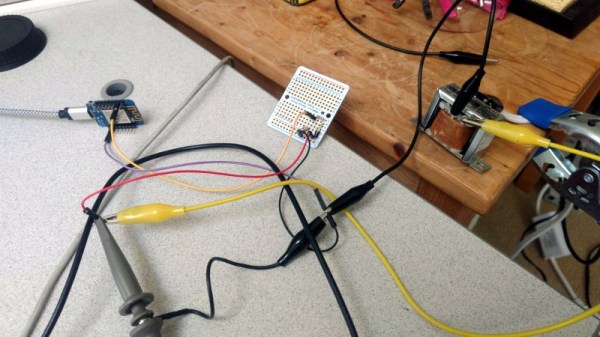
For [Nick Touran], half the work was already done. There was already a traditional wired doorbell in his home, he just had to come up with a minimally invasive way to link it with Home Assistant. He reasoned that he could tap into the low-voltage side of the doorbell transformer and watch for the telltale fluctuations that would indicate the bell was doing its thing. The ESP8266 has an ADC to measure voltage and WiFi to connect to Home Assistant, so it seemed like the perfect bridge between old and new.
Of course, as with any worthwhile project, it ended up being a bit more complicated. Wired doorbells generally operate on 16-24 VAC, and [Nick] knew if he tried to put his Wemos D1 across the line he’d release the critical Magic Smoke. What he needed was a voltage divider circuit that would take low-voltage AC and drop it to an even lower DC voltage that the microcontroller could cope with.
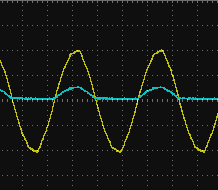
The simple circuit [Nick] comes up with cuts the voltage way down and removes the negative component completely. So what was originally 18.75 VAC turned into a series of 60 Hz blips at 2.4 VDC; perfect for feeding into a microcontroller ADC. With a baseline to work from, he could then write some code that would watch for variations in this signal to determine when the bell was ringing.
Or at least, that was the idea. While the setup worked well enough on the bench, its performance in the real-world left something to be desired. If his house guest had a heavy hand, it worked great. But a quick tap of the doorbell button would tend to go undetected. After investigating the issue, [Nick] found that he needed to use some software trickery to ensure the ESP8266 was able to keep up with the speedy signal. Once he was able to reliably detect short and long button presses, the rest was just a simple matter of sending an MQTT message to his automation system.
The first step to reducing the energy consumption of your home is figuring out how much you actually use in the first place. After all, you need a baseline to compare against when you start making changes. But fiddling around with high voltage is something a lot of hackers will go out of their way to avoid. Luckily, as [Xavier Decuyper] explains, you can build a very robust DIY energy monitoring system without having to modify your AC wiring.
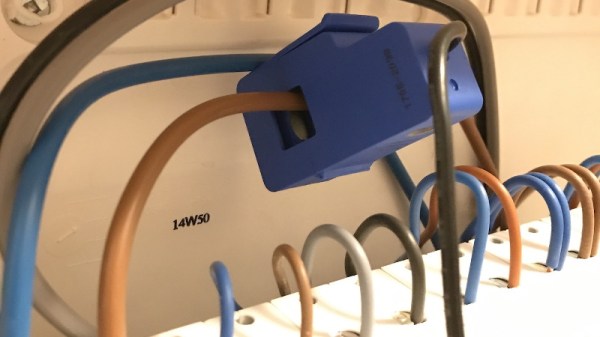
In the video after the break, [Xavier] goes over the theory of how it all works, but the short version is that you just need to use a Current Transformer (CT) sensor. These little devices clamp over an AC wire and detect how much current is passing through it via induction. In his case, he used a YHDC SCT-013-030 sensor that can measure up to 30 amps and costs about $12 USD. It outputs a voltage between 0 and 1 volts, which makes it extremely easy to read using the ADC of your favorite microcontroller.
Once you’ve got the CT sensor connected to your microcontroller, the rest really just depends on how far you want to take the software side of things. You could just log the current consumption to a plain text file if that’s your style, but [Xavier] wanted to challenge himself to develop a energy monitoring system that rivaled commercial offerings so he took the data and ran with it.
A good chunk of his write-up explains how the used Amazon Web Services (AWS) to process and ultimately display all the data he collects with his ESP32 energy monitor. Every 30 seconds, the hardware reports the current consumption to AWS through MQTT. The readings are stored in a database, and [Xavier] uses GraphQL and Dygraphs to generate visualizations. He even used Ionic to develop a cross-platform mobile application so he can fawn over his professional looking charts and graphs on the go.
If you read Hackaday, it is a good bet you’ve heard of MQTT — Message Queueing Telemetry Transport. If you’ve not used MQTT before, you should check out Ably’s [Kayla Matthews’] post entitled MQTT: A Conceptual Deep Dive paper. She does mention their MQTT protocol connector at the end, and has a few notes about Ably’s products, but most of the post is a normal white paper and has a lot of good info.
MQTT’s claim to fame, of course, is that it is very tiny and is made to minimize power consumption compared to heavier-weight protocols. When you are trying to provide or consume data from a device that has to last a year on a coin cell, MQTT is your friend.
If you live in an area with high bird activity, setting up a bird feeder and watching some hungry little fellows visit you can be a nice and relaxing pastime. Throw in a Raspberry Pi with some sensors and it can also be the beginning of your next IoT project, as it was the case for [sbkirby] with his Bird Feeder Monitor project.
To track the arrival and departure times of his avian visitors, [sbkirby] attached a set of capacitive touch sensors to each side of his bird feeder, and hooked them up to a Raspberry Pi Zero W via a CAP1188 breakout board. The data is published via MQTT to another Raspberry Pi that serves as backend and stores the data, as well as to an optional additional camera-equipped Pi that will take a picture of each guest along the way. Taking into account that precipitation might affect the sensor readings, he also checks the current weather situation to re-calibrate the sensors if necessary, and also to observe a change in the birds’ presence and eating behavior based on weather conditions.
It seems that sensor-based animal feeding will always serve as inspiration for some new projects, whether feeding the animal itself is the goal, like most recently this fish feeder has shown, or whether the eating behavior is monitored and used for further research such as this squirrel-based weather forecast system.
Like many of us, [Josef Adamčík] finds himself fascinated with so-called “freeform” electronic designs, where the three dimensional circuit makes up sections of the device’s structure. When well executed, such designs really blur the line between being a practical device and an artistic piece. In fact his latest design, an ESP8266 MQTT client, would seem to indicate there might not be much of a “line” at all.
The inspiration for this project actually comes from something [Josef] had worked on previously: an ESP8266-based environmental monitoring system. That device had sensors to pick up on things such as humidity and ambient light level, but it didn’t have a display of its own; it just pushed the data out onto the network using MQTT. So he thought a companion device which could receive this environmental data and present it to him in a unique and visually appealing way would be a natural extension of the idea.
As the display doesn’t need any local sensors of its own, it made the design and construction much easier. Which is not to say it was easy, of course. In this write-up, [Josef] takes the reader through the process of designing each “layer” of the circuit in 2D, printing it out onto paper, and then using that as a guide to assemble the real thing. Once he had the individual panels done, he used some pieces of cardboard to create a three dimensional jig which helped him get it all soldered together.
On the software side it’s pretty straightforward. It just pulls the interesting bits of information off of the network and displays it on the OLED. Right now it’s configured to show current temperature on the display, but of course that could be changed to pretty much anything you could imagine if you’re looking to add a similar device to your desktop. There’s also a red LED on the device which lights up to let [Josef] know when the batteries are getting low on the remote sensor unit; a particularly nice touch.