Yesterday’s Drill Press Packed With Tomorrow’s Upgrades

Those who hibernate in their workshops have a habit of re-imagining their relationship to tools. And [Marius Hornberger] is no exception, but the nine upgrades he’s added to his grandfather’s old drill press puts this machine on a whole other level.

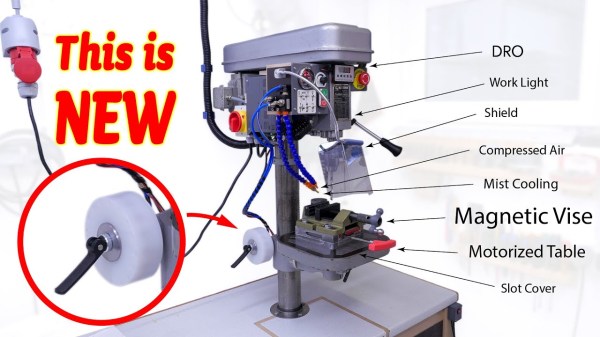
In proper storytime fashion, [Marius] steps us through each upgrade, the rationale, and the time and effort that went into crafting the solution. Some of these upgrades, like a digital readout (DRO), add modern features to an old-school device. Others, like an oil mist cooling system and a compressed air chip blower, borrow from other machines with similar setups. Some, like the chip guard, are nice personal touches. And a few, like the motorized table with automatic clamp, transform the entire operator experience. On the whole, these upgrades follow a gentle theme of personalizing the machine to [Marius’] tastes, giving him a delightful, more personal operator experience that’s tuned through his everyday use. Amid the sheer volume of tweaks though, we’re convinced that you’ll find something that tickles your tinkering fancy.

It’s worth mentioning that the pneumatic table clamp alone (at 4:28) makes the entire video worth the watch. If you’ve ever had the mishap of pinching your finger or struggling to hold the table steady while clamping it in place, this little upgrade takes all of that away, replacing the swivel handle with a homebrew pneumatic cylinder made in the shop. With a single button press, a swoosh of compressed air either clamps or releases the table. Best of all, the setup still sports a hand clamp if [Marius] is operating without a compressed air source.

It’s also worth mentioning that a couple of [Marius’] upgrades completely skip the CAD step altogether. Instead, [Marius] creates templates directly off the drill press with tracing paper and then immediately transfers them onto stock materials. It’s a nice reminder that not every small project needs to start with a 3D model.

If all these upgrades are getting you ready to modify your machine, look no further than the video description where he’s courteously posted inks to key components behind these upgrades.

The story of many-a-workshop often involves reinventing your machine tools. If you’re looking for more tales of tool upgrades, have a look at resurrecting a machine from literal ashes or a machine that improves itself.

Continue reading “Yesterday’s Drill Press Packed With Tomorrow’s Upgrades”

Pneumatic Can Crusher Awaits Your Command

A powerful robot awaiting for a verbal command to crush its foes might sound like something from a science fiction film, but now it’s a permanent fixture of the [Making Stuff] garage.  (Video, embedded below.) Thankfully this robot’s sworn enemy are aluminum cans, and the person controlling it with their voice isn’t a maniacal scientist, just a guy who’s serious about recycling. Well, we hope so anyway.

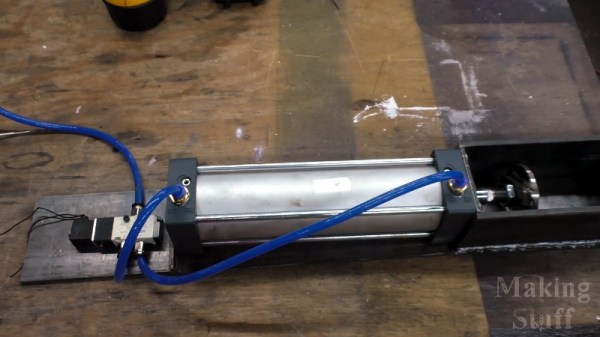
The star of the show is a heavy duty wall-mounted can crusher that [Making Stuff] built from some scrap steel and a pneumatic cylinder hooked up to the garage’s compressed air system. A solenoid operated valve allows an Arduino with attached ESP-01 to extend the cylinder whenever the appropriate command comes over the network. In this case, the goal was to tie the crusher into Google Assistant so a can would get smallified whenever one of Google’s listening devices heard the trigger phrase.

Note the ejector air line.

Obviously, those who’d rather keep Big Data out of their recycling bin don’t have to go down the same path. But that being said, having to give a specific voice command to activate the machine does provide a certain level of operational safety. At least compared to trusting some eBay sensor to tell the difference between an aluminum can and a fleshy appendage.

After crushing a few cans with his new toy, [Making Stuff] noticed a fairly troubling flaw in the design. Each time a can was crushed he had to reach into the maw of the machine to push its little flattened carcass out of the way. In other words, he was one bad line of code away from having one good hand.

The solution ended up being a new hose that runs from the exhaust port of the valve to the crushing chamber: once the cylinder retracts, the air exiting the valve pushes the crushed can out the rear of the machine and into a waiting pail underneath. Very slick.

Even if you’re not interested in the voice control aspect, this is a great design to base your own can crusher on. While it’s always a treat when a fully automatic crusher comes our way, we’ll admit the challenges of getting one to work reliably probably aren’t worth the hassle.

Continue reading “Pneumatic Can Crusher Awaits Your Command”

Pneumatic fighting robot arm concept

From Foot Pump Cylinders To Pneumatic Robot Fighting Arm

Halfords Essentials foot pump

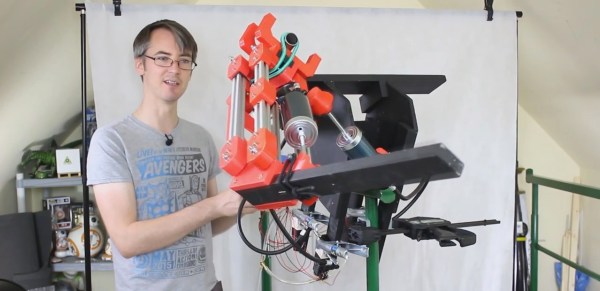
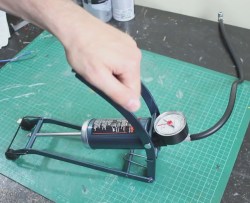
[James Bruton] is well known for making robots using electric motors but he’s decided to try his hand at using pneumatics in order to make a fighting robot. The pneumatic cylinders will be used to give it two powerful punching arms. In true [James Bruton] fashion, he’s started with some experiments first, using the pneumatic cylinders from foot pumps. The cylinders he’s tried so far are taken out of single cylinder foot pumps from Halfords Essentials, costing only £6.29, around $8.11 US. That’s far cheaper than a commercial pneumatic cylinder, and perfectly adequate for this first step.

He did have to hack the cylinder a little though, besides removing it from its mounting and moving it to a DIY frame. Normally when you step down on a foot pump’s lever, you compress the cylinder, forcing air out the hose and into whatever you’re inflating. But he wanted to push air in the other direction, into the hose and into the cylinder. That would make the cylinder expand and thereby extend a robot fighting arm. And preferably that would be done rapidly and forcefully. However, a check valve at the hose outlet prevented air from entering the cylinder from the hose. So he removed the check valve. Now all he needed was a way to forcefully, and rapidly, push air into the hose.

For that he bought a solenoid activated valve on eBay, and a compressor with a 24 liter reservoir and a decent air flow rate of 180 liters per minute. The compressor added £110 ($142) to the cost of his project but that was still cheaper than the batteries he normally buys for his electric motor robots.

After working his usual CAD and 3D printing magic, he came up with an arm for the cylinder and a body that could fit two more valve activated cylinders to act as a working shoulder. A little more 3D printing and electronics, and he had 3 switches, one for each valve and cylinder. He then had the very successful results his experiment. You can see the entire R&D process in the video below, along with demonstrations of the resulting punching robot arm. We think it’s fairly intimidating for a first step.

Continue reading “From Foot Pump Cylinders To Pneumatic Robot Fighting Arm”

Pneumatic leg assistance

AirLegs Augment Your Cardio By 10%

Here’s another very interesting project to come out of the 4 Minute Mile challenge — pneumatically boosted legs.

It’s another project by [Jason Kerestes] in cooperation with DARPA. We saw his jet pack a few days ago, but this one looks like it has a bit more promise. It is again a backpack mounted system, but instead of a few jet turbines, it has a pneumatic cylinders which move your legs for you.

Just watching it it’s hard to believe it makes it easier to run, but apparently after being tested at the Army Research Laboratories last year it demonstrated a whopping 10% reduction in metabolic cost for subjects running at high speeds. It can actually augment the human running gait cycle, and is the only device the US Army has confirmed can do so.

He is already hard at work designing version 2.0 which is lighter and more flexible. There’s a bunch of test videos after the break so stick around to see it in action.

Continue reading “AirLegs Augment Your Cardio By 10%”

Exoskeleton Lift

Homemade Superhero: [James’] DIY Exoskeleton

We’re not just a bunch of monkeys with typewriters here at Hackaday; we don our hacker hat whenever our schedules allow. Or, in the case of Hackaday’s own [James Hobson]—aka [The Hacksmith]—he dons this slick exoskeleton prototype instead,turning himself into a superhero. Inspired by the exoskeleton from the film Elysium, this project puts [James] one step closer to the greater goal of creating an Iron Man-style suit.

For now, though, the exoskeleton is impressive enough on its own. The build is a combination of custom-cut perforated steel tubing and pneumatic cylinders, attached to a back braces of sorts. In the demonstration video, [James] stares down 170 pounds of cinder block affixed to a barbell, and although he’s no lightweight, you can tell immediately from his reaction how much assistance the exoskeleton provides as [James] curls the makeshift weights over and over. And that’s only at half pressure. [James] thinks he could break the 300 pound mark of lifting if he didn’t break his legs first.

There’s plenty of behind-the-scenes footage of the build process to be had, so make sure you stick around after the jump for a sizable helping of videos, and check out [The Hacksmith’s] website for more of his projects.

Continue reading “Homemade Superhero: [James’] DIY Exoskeleton”

Pneumatic Powered Flight Simulator

FX7UCGEHK6XMQ3G.MEDIUM

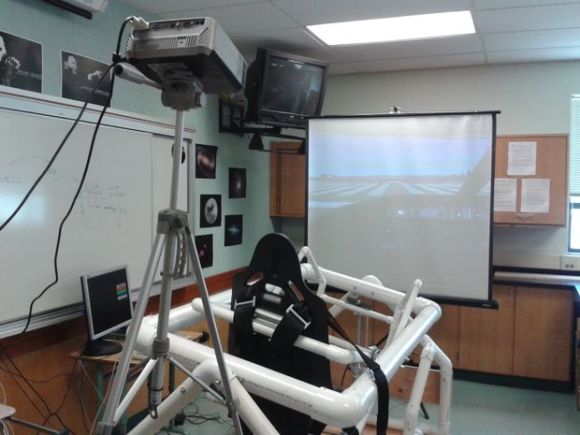
Remember that feature a few days ago about the Cessna 172 flight simulator? It was pretty awesome. But do you know what it was missing? It was missing this. A fully motion-controlled, pneumatically driven, flight simulator cockpit.

[Dominick Lee] is a high school senior, and he was able to whip together this awesome flight simulator made out of PVC pipe, pneumatic cylinders, an Arduino, a projector, and a gaming PC — in just a few months time! He calls it the LifeBeam Flight Simulator, and he’s released all the information required to make one yourself.

It’s most similar to a Stewart platform simulator, which features 2 degrees of freedom, but instead of 6 actuators, this one runs on only two pneumatic cylinders. It works by exporting the roll and pitch (X and Y) data from the game, and then parsing it to an Arduino which controls the pneumatic valve amplifier, powering the cylinders.

It’s an amazing project, and it sounds like [Dominick] had an awesome physics professor, [Dr. Bert Pinsky], to help mentor him. Don’t forget to check out the demonstration video!

Continue reading “Pneumatic Powered Flight Simulator”

Accurate-ish Pneumatic Cylinder Positioning

pneumatic flow positioning

Pneumatic cylinder positioning? If you have a technical background you should be scratching your head right now. Pneumatic cylinder positioning? That’s not really suppose to work! Well, [arduinoversusevil] has hacked together a system, that… kind of does work.

First a little background on [arduinoversusevil]. He’s building a hydraulic/pneumatic, bartending robot. Awesome.

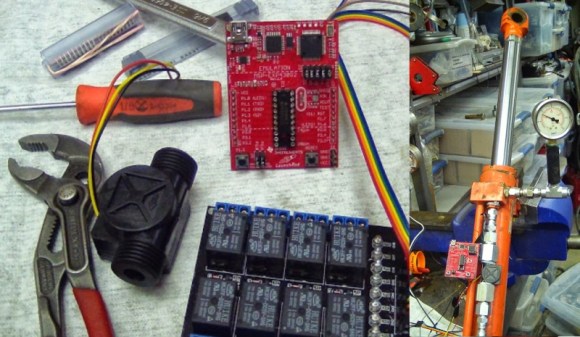
Anyway, he recently picked up old hydraulic cylinder for next to nothing, and decided to try messing around with it. He purged the oil out of it and is now using it as a pneumatic cylinder. He also picked up a cheap $10 plastic Adafruit flow meter, and decided to try to make a positional pneumatic cylinder. Using a Launchpad development board, he controls the solenoid valves using a Dangerous Prototypes ATX breakout board. Surprisingly the cheap Adafruit flow meter was sufficiently accurate enough to measure the amount of air in the cylinder, which, depending on the load, can be used to position the cylinder, somewhat accurately.

He ran a test of about 360 cycles before the flow meter broke, and was able to achieve an accuracy of about 5mm! Not bad at all. Stick around after the break to see it in action — and to hear his colorful commentary.

Continue reading “Accurate-ish Pneumatic Cylinder Positioning”