Are Minimills Worth It?

These days, the bar for home-built projects is high. With 3D printers, CNC, and cheap service providers, you can’t get away with building circuits in a shoe box or an old Tupperware container. While most people now have access to additive manufacturing gear, traditional subtractive equipment is still a bit less common. [Someone Should Make That] had thought about buying a “minimill” but he had read that they were not worth it. Like a lot of us, he decided to do it anyway. The pros and cons are in the video you can watch below.

During setup, he covered a few rumors he’d heard about these type of mills, including they are noisy, have poor tolerances, and can’t work steel. Some of these turned out to be true, and some were not.

Continue reading “Are Minimills Worth It?”

More Drill Press Mods: Adding A VFD Means No More Belt Changes

A decent drill press is an essential machine tool for almost any kind of shop, and marks a significant step up in precision compared to a hand drill. The ability to drill square, true holes is one thing, but the added power over what’s possible with a portable tool is the real game changer. If only you didn’t have to switch around those damn belts to change speeds, though.

You don’t, of course, if you go through the effort to add a variable frequency drive to your drill press like [Midwest Cyberpunk] did, along with some other cool mods. The donor tool for these mods came from — where else? — Harbor Freight. Some will quibble with that choice, but the tool was pretty cheap, and really all [Midwest] was interested in here was some decent castings and a quill with acceptable runout, since the entire power train of the tool was slated for replacement. The original motor gave way to a beefy Baldor 3-phase/240-volt motor controlled by a VFD mounted on a bracket to the left of the drill press head, allowing the stock belt and step pulley transmission to be greatly simplified. Continue reading “More Drill Press Mods: Adding A VFD Means No More Belt Changes”

Yesterday’s Drill Press Packed With Tomorrow’s Upgrades

Those who hibernate in their workshops have a habit of re-imagining their relationship to tools. And [Marius Hornberger] is no exception, but the nine upgrades he’s added to his grandfather’s old drill press puts this machine on a whole other level.

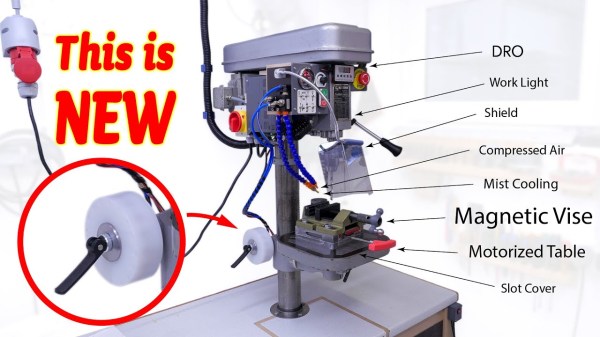
In proper storytime fashion, [Marius] steps us through each upgrade, the rationale, and the time and effort that went into crafting the solution. Some of these upgrades, like a digital readout (DRO), add modern features to an old-school device. Others, like an oil mist cooling system and a compressed air chip blower, borrow from other machines with similar setups. Some, like the chip guard, are nice personal touches. And a few, like the motorized table with automatic clamp, transform the entire operator experience. On the whole, these upgrades follow a gentle theme of personalizing the machine to [Marius’] tastes, giving him a delightful, more personal operator experience that’s tuned through his everyday use. Amid the sheer volume of tweaks though, we’re convinced that you’ll find something that tickles your tinkering fancy.

It’s worth mentioning that the pneumatic table clamp alone (at 4:28) makes the entire video worth the watch. If you’ve ever had the mishap of pinching your finger or struggling to hold the table steady while clamping it in place, this little upgrade takes all of that away, replacing the swivel handle with a homebrew pneumatic cylinder made in the shop. With a single button press, a swoosh of compressed air either clamps or releases the table. Best of all, the setup still sports a hand clamp if [Marius] is operating without a compressed air source.

It’s also worth mentioning that a couple of [Marius’] upgrades completely skip the CAD step altogether. Instead, [Marius] creates templates directly off the drill press with tracing paper and then immediately transfers them onto stock materials. It’s a nice reminder that not every small project needs to start with a 3D model.

If all these upgrades are getting you ready to modify your machine, look no further than the video description where he’s courteously posted inks to key components behind these upgrades.

The story of many-a-workshop often involves reinventing your machine tools. If you’re looking for more tales of tool upgrades, have a look at resurrecting a machine from literal ashes or a machine that improves itself.

Continue reading “Yesterday’s Drill Press Packed With Tomorrow’s Upgrades”

Square Cuts On Aluminum Extrusion, No Mill Required

If you’re looking for the perfect excuse to buy that big, beautiful Bridgeport mill, we’ve got some bad news: it’s not going to be making perfectly square end cuts on aluminum extrusion. Sadly, it’s much more cost-effective to build this DIY squaring jig, and search for your tool justification elsewhere.

There’s no doubting the utility of aluminum extrusion in both prototyping and production builds, nor that the versatile structural members often add a bit of class to projects. But without square cuts, any frames built from them can be seriously out of whack, leading to misery and frustration down the road. [Midwest Cyberpunk]’s mill-less solution uses a cheap Harbor Freight router as a spindle for a carbide endmill, riding on a laser-cut acrylic baseplate fitted with wheels that ride in the V-groove of — you guessed it — aluminum extrusions. A fence and clamping system holds the extrusion firmly, and once trammed in, the jig quickly and easily squares extrusions that have been rough cut with a miter saw, angle grinder, or even a hacksaw. Check out the video below for a peek at the build details.

We love the simplicity and utility of this jig, but can see a couple of areas for improvement. Adding some quick-throw toggle clamps would be a nice touch, as would extending the MDF bed and fence a bit for longer cuts. But even as it is, this tool gets the job done, and doesn’t break the bank like a mill purchase might. Still, if your heart is set on a mill, who are we to stand in the way?

Continue reading “Square Cuts On Aluminum Extrusion, No Mill Required”

File testing rig

Science Vs Internet Trolls: Testing Another Kind Of File System

No matter what you do or say on the Internet, you’re always doing it wrong. Keyboard commandos are ready to pounce and tell you how it’s “ackchyually” supposed to be done. And so it was of little surprise when [Jason] of Fireball Tools was taken to task by the armchair millwright for his supposedly deficient method of filing metal.

But [Jason] chose to fight back not with words but deeds, building a system to test alternative methods of filing. His filing style is to leave the file in contact with the stock on both the front- and back-strokes, which enraged those who claim that a file must never be dragged back over the workpiece, lest the teeth become dull. The first video below shows the build of the test rig, which leveraged his enormous Cinncinatti shaper as the prime mover, as well as a pneumatic jig to hold the workpiece and imitate both styles of filing. Part two below shows the test rig in action, and [Jason] really outdoes himself with his experimental approach. He tested three different grades of Pferd files — nothing but the best, no expense spared — and did duplicates of each run using both the Internet-approved style and his lazier style.

The result? We won’t spoil that for you, but suffice it to say that the hive mind isn’t always right. And what’s more, [Jason]’s careful myth-busting yielded a few interesting and unexpected results. His channel is full of great shop tips and interesting builds, so check him out if you want to see how metalworking is done.

Continue reading “Science Vs Internet Trolls: Testing Another Kind Of File System”

Big homemade lathe

Heavy Metal Lathe Build Doesn’t Spare The Steel

It’s common wisdom that the lathe is the essential machine tool, and the only one that can make copies of itself. While we won’t argue the primacy of the lathe in the machine shop, this scratch-built, heavy-duty lathe gives the lie to the latter argument — almost.

We’re used to seeing homebrew lathes, of course, and we’ve featured more than a few of them before. But two things make [Jornt]’s build stand out: how few specialized tools were needed to build it, and the sheer size and bulk of the finished product. Where most homebrew lathes tend to be the bench top variety and feature cast aluminum parts, [Jornt] went with steel for his build, and a lot of it. The base and bed of the machine are welded from scrap steel I-beams, and the ways are made from angle iron that has been ground flat with a clever jig to hold an angle grinder. The angle grinder plays a prominent role in the build, as do simple tools like a hand drill, files, and a welder — and yes, the unfinished lathe itself, which was used to bore out the bearing blocks for the headstock.

The completed lathe, powered by a treadmill motor in a way that [Jeremy Fielding] would no doubt endorse, comes in at a beefy 450 kg. It honestly looks like something you could buy from a catalog, and has most of the features of commercial machines. One thing we’d love to see on this lathe is the electronic lead screw that [James Clough] developed for his off-the-shelf lathe.

Continue reading “Heavy Metal Lathe Build Doesn’t Spare The Steel”

Gorgeous Mini-Lathe Makes The Most Out Of Wood And Metal

It’s a cliche that the only machine tool that can make copies of itself is the lathe. It’s not exactly true, but it’s a useful adage in that it points out that the ability to make big round things into smaller round things, and to make unround things into round things, is a critical process in so many precision operations. That said, making a lathe primarily out of wood presents some unique challenges in the precision department

This isn’t [Uri Tuchman]’s first foray into lathe-building. Readers may recall the quirky creator’s hybrid treadle-powered and electric lathe, also primarily an exercise in woodworking. That lathe has seen plenty of use in [Uri]’s projects, turning both wood and metal stock into parts for his builds. It wasn’t really optimal for traditional metal turning, though, so Mini-Lathe 2 was undertaken. While the bed, headstock, and tailstock “castings” are wood — gorgeously hand-detailed and finished, of course — the important bits, like the linear slides for the carriage and the bearings in the headstock, are all metal. There’s a cross-slide, a quick-change tool post, and a manual lead screw for the carriage. We love the finely detailed brass handcranks, which were made on the old lathe, and all of the lovely details [Uri] always builds into his projects.

Sadly, at the end of the video below we see that the lathe suffers from a fair amount of chatter when turning brass. That’s probably not unexpected — there’s not much substitute for sheer mass whenit comes to dampening vibration. We expect that [Uri] will be making improvements to the lathe in the coming months — he’s not exactly one to leave a job unfinished.

Continue reading “Gorgeous Mini-Lathe Makes The Most Out Of Wood And Metal”