Haunting A Smart Mirror With Hue And Alexa

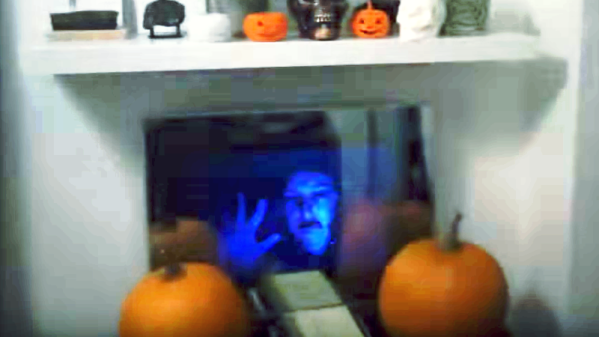
So, your smart mirror has been running for a while, but Halloween is coming up and you want to come up with some cool Halloween stuff to display on the mirror. If you’re looking for ideas, check out [Ben Eagan]’s cool Haunted Smart Mirror which connects the mirror via a Raspberry Pi with Amazon Alexa and Phillips Hue lighting.

[Ben] points to another of his blog pages for those readers interested in the nuances of setting up Alexa with a smart mirror, while concentrating on communication with the Hue bridge and creating the setup for a new Alexa command in this post. Dealing with the Phillips Hue API seems fairly straightforward: Get the IP address of your Hue bridge from your router and the ID of your lights from the Hue app and you’re set to send commands via HTTP. [Ben] includes a Python script to make the lights flicker, which you can modify for your own lights as you wish. Once that’s done, you’ll need to set up the intent that Alexa listens for, and then modify the AWS lambda function that sends commands to the Pi. When the command shows up in the queue on the Pi, any commands [Ben] wants to play are fired off – in this case, a video is played and the Hue lights start to flicker.

There’s no mention of security in the article, so that may be worth a little attention with Alexa and the Hue, but with Halloween coming up fast even if you haven’t built a magic mirror yet, if you’ve got Hue lights, this would be a great, quick, Halloween idea. Especially if you could combine it with your outside lights so that Trick-or-Treaters can join in on the fun. Maybe you’d prefer looking up passing planes using Alexa? Or how about getting your fish to talk?

Continue reading “Haunting A Smart Mirror With Hue And Alexa”

The World’s Thinnest Raspberry Pi 3

We’ve become used to readily available single board computers of significant power in form factors that would have seemed impossibly small only a few years ago. But even with a board the size of a credit card such as a Raspberry Pi, there are still moments when the available space is just too small to fit the computer.

The solution resorted to by enterprising hardware hackers is often to remove extraneous components from the board. If there is no need for a full-size USB port or an Ethernet jack, for example, they can safely be taken away. And since sometimes these attempts result in the unintended destruction of the board, yonder pirates at Pimoroni have taken viewers of their Bilge Tank series of videos through the procedure, creating in the process what they describe as “The World’s Thinnest Raspberry Pi 3“.

The USB and Ethernet ports, as large through-hole components, were the easiest to tackle. Some snipping and snapping removed the tinware and plastic, then the remains could be hand-desoldered. The GPIO pins resisted attempts to remove their plastic for easy desoldering, so for them they had to resort to a hot air gun. Then for the remaining camera, HDMI, and display ports the only option was hot air. Some cleaning up with desoldering braid, and they had their super-thin Pi. They weren’t quite done though, they then took the reader through modifying a Raspbian Lite distribution to deactivate support those components that have been removed. This has the handy effect not only of freeing up computer resources, it also saves some power consumption.

You might point out that they could have just used a Pi Zero, which with its SD card on the top surface is even a little bit thinner. And aside from the question of extra computing power, you’d be right. But their point is valid, that people are doing this and not always achieving a good result, so their presenting it as a HOWTO is a useful contribution. We suspect that a super-thin Pi 3 will still require attention to heat management though.

Take a look at the video, we’ve put it below the break.

Continue reading “The World’s Thinnest Raspberry Pi 3”

Inception object recognizer in a box

DIY Raspberry Neural Network Sees All, Recognizes Some

As a fun project I thought I’d put Google’s Inception-v3 neural network on a Raspberry Pi to see how well it does at recognizing objects first hand. It turned out to be not only fun to implement, but also the way I’d implemented it ended up making for loads of fun for everyone I showed it to, mostly folks at hackerspaces and such gatherings. And yes, some of it bordering on pornographic — cheeky hackers.

An added bonus many pointed out is that, once installed, no internet access is required. This is state-of-the-art, standalone object recognition with no big brother knowing what you’ve been up to, unlike with that nosey Alexa.

But will it lead to widespread useful AI? If a neural network can recognize every object around it, will that lead to human-like skills? Read on. Continue reading “DIY Raspberry Neural Network Sees All, Recognizes Some”

Liquid cooled Raspberry Pi with mineral oil

Liquid Cooling Overclocked Raspberry Pi With Style

[HydroGraphix HeadQuarters] has earned his name with this one. While he is using mineral oil instead of hydro, he’s certainly done a nice job with the graphics of it. The ‘it’ in questions is an overclocked Raspberry Pi 3 in a transparent container filled with mineral oil, and with a circulating fan.

He’s had no problem running the Pi at 1.45 GHz while running a Nintendo 64 emulator, getting between 40 °C and 50 °C. The circulating fan is a five volt computer USB fan. It’s hard to tell if the oil is actually moving, but we’re pretty sure we see some doing so near the end of the video below the break.

Mineral oil is not electrically conductive, and is often used to prevent arcing between components on high voltage multiplier boards, but those components are always soldered together. If you’ve ever worked with mineral oil, you know that it creeps into every nook and cranny, making us wonder if it might work its way between some of the (non-soldered) contacts in the various USB connectors on this Raspberry Pi. Probably not, but those of us with experience with it can attest to it’s insidiousness.

Continue reading “Liquid Cooling Overclocked Raspberry Pi With Style”

Networking: Pin The Tail On The Headless Raspberry Pi

Eager to get deeper into robotics after dipping my toe in the water with my BB-8 droid, I purchased a Raspberry Pi 3 Model B. The first step was to connect to it. But while it has built-in 802.11n wireless, I at first didn’t have a wireless access point, though I eventually did get one. That meant I went through different ways of finding it and connecting to it with my desktop computer. Surely there are others seeking to do the same so let’s take a look at the secret incantations used to connect a Pi to a computer directly, and indirectly.

Continue reading “Networking: Pin The Tail On The Headless Raspberry Pi”

Introduction To TensorFlow

I had great fun writing neural network software in the 90s, and I have been anxious to try creating some using TensorFlow.

Google’s machine intelligence framework is the new hotness right now. And when TensorFlow became installable on the Raspberry Pi, working with it became very easy to do. In a short time I made a neural network that counts in binary. So I thought I’d pass on what I’ve learned so far. Hopefully this makes it easier for anyone else who wants to try it, or for anyone who just wants some insight into neural networks.

Continue reading “Introduction To TensorFlow”

Gaming Beyond Retropie

Looking for something a bit more from your Raspberry Pi? Tired of the usual console and arcade games? Eltech’s Exagear Desktop is a virtual machine that runs on your Raspberry Pi and allows you to run x86 games. [Dmitry]’s done a write-up about running more modern games on your Raspberry Pi.

Up until now, the Pi has been a great platform for retro gaming. By running MAME or EmulationStation, you can play classic arcade games as well as the great console games you played as a kid. Exagear Desktop goes one further, allowing you to use Wine to play more modern PC games on your Raspberry Pi 3.

The Pi 3 is still a bit underpowered for bleeding edge games, but is powerful enough that it can play some of the PC games from a few years ago. [Dmitry]’s example shows how to get Arcanum, Disciples II, and Fallout running on the Raspberry Pi. In the second part of the write-up, [Dmitry] shows you how to get Heroes of Might and Magic 3, Sid Meier’s Alpha Centauri, and Caesar 3 installed and running as well.

Obviously they will always lag behind today’s gaming machines, but the power now available in a computer the size of a credit card is pretty impressive. It’s nice to have a tool that allows one to play more than just the console games from years gone by — this opens up a whole range of great PC games to add to our library. Maybe it’s time to fabricate that new PC game controller.  Or, if the Raspberry Pi seems like too much power, you could consider playing retro games on an Arduino.