What’s the best way to image a room? A picture? Hah — don’t be so old-fashioned! You want a LIDAR rig to scan the space and reconstruct it as a 3D point map in your computer.
Hot on the heels of [Saulius Lukse]’s scanning thermometer, he’s replaced the thermal camera on their pan/tilt setup with a time-of-flight (TOF) camera — a Garmin LIDAR — capable of 500 samples per second and end up scanning their room in a mere fifteen minutes. Position data is combined with the ranging information to produce a point cloud using Python. Open that file in a 3D manipulation program and you’ll be treated to a sight like this:
Kids, please don’t try this at home. Or at least make sure there’s nothing flammable around.
With that out of the way, we have to ask — who doesn’t love playing with fire? We’re betting that many of you also have enjoyed a little skateboarding at some point in your lives. [mikeasaurus] has married the two beloved activities and made a flame throwing skateboard! The parts count is fairly low, and it looks like everything can be purchased from Amazon if you can’t source all of the items locally.
[mikeasaurus] gives a few useful tips such as how he bent one of the two pipes on the fuel tank cap to prevent fuel from pouring out. Also, he used an adapter to bring down the diameter of the tubes from 1/4″ to 1/8″ which makes for a better performing fuel stream.
Instead of making this little foot cooker more complicated with additional electronics and wires to be operated by a hand-held remote control, [mikeasaurus] decided to build the controls directly into the skateboard with just a couple of foot-activated switches. This keeps his hands free to wave at all of the onlookers watching him speed by. Or better yet, to carry a fire extinguisher.
Admittedly, it appears from the video that the flame doesn’t really get ‘thrown’ too far, and [mikeasaurus] himself says:
“As long as you’re moving forward when the flames are activated, you’re good to go!”
Because of this, you probably don’t want to use your favorite board, as it’s going to be subject to direct flames.
You’ll see this when you watch the video after the break.
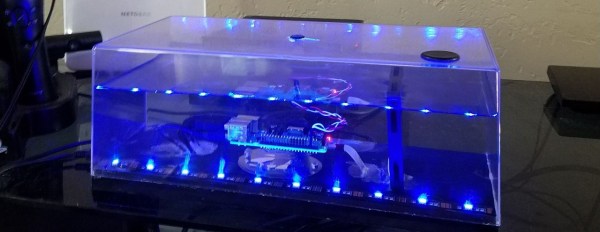
He’s had no problem running the Pi at 1.45 GHz while running a Nintendo 64 emulator, getting between 40 °C and 50 °C. The circulating fan is a five volt computer USB fan. It’s hard to tell if the oil is actually moving, but we’re pretty sure we see some doing so near the end of the video below the break.
Mineral oil is not electrically conductive, and is often used to prevent arcing between components on high voltage multiplier boards, but those components are always soldered together. If you’ve ever worked with mineral oil, you know that it creeps into every nook and cranny, making us wonder if it might work its way between some of the (non-soldered) contacts in the various USB connectors on this Raspberry Pi. Probably not, but those of us with experience with it can attest to it’s insidiousness.
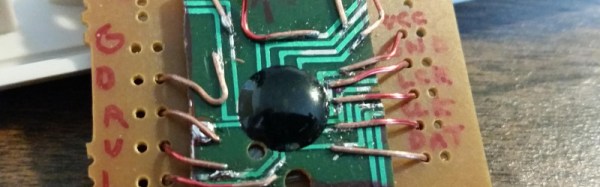
We will all at some point have opened up a device to investigate its internal workings, and encountered a blob of resin on the PCB concealing an integrated circuit. It’s usually a cost thing, the manufacturer has sourced the chip as bare silicon rather than in encapsulated form, and it has been bonded to the board with its connections made directly using fine wires. The whole fragile component is then hidden by a protective layer of resin.
Normally these chips are off-limits to we experimenters because they can not be removed from the board without damage, and we have no information such as a part number about their function. Today though we have a rare example of a wire bonded chip being reused courtesy of Reddit user [BarockObongle], who has incorporated the controller from a multi-game joystick into his handheld NES project by cutting a square of PCB containing the chip, and soldering lengths of wire to the PCB tracks.
Of course, he’s in the rare position of knowing the function of the chip in question, and having a ready application for it. But it’s probable that few of us have considered the possibility of taking a resin blob from its original board and using it in a different way, so even though this is quite a straightforward piece of work it is sufficiently unusual to be worth a look. Sadly we don’t have the rest of the build to see it in context, it would be nice to think we’ll be able to feature it when it is completed.
Consider for a second the Internet of Things. A vast network of connected devices, programmable matter, and wearable electronics can only mean one thing: there’s going to be a ton of batteries. While changing the battery in a smoke detector may seem tolerable, changing the batteries in a thousand sensor nodes is untenable. The solution to this problem is self-contained sensor nodes, and right now the best power source for mobile devices is probably solar.
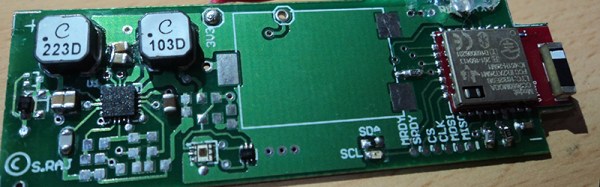
For his Hackaday Prize entry, [Shantam Raj] is building a self-contained sensor node. It’s a Bluetooth device for the Internet side of this Thing, but the real trick to this device is solar energy harvesting and low power capabilities through optimized firmware.
Basically, this system is a low-power SoC with Bluetooth. The power from this device comes from a small solar cell coupled with a very efficient power supply and some new, interesting supercapacitors from Murata. These supercaps are extremely small, have high storage capacity, low ESR, and fast charging and discharging. The test board (seen in the video below) provides a proof of concept, but this device has a problem: there’s a single ‘sanity check’/power LED on the board that consumes 4 mA. The microcontroller, when running the optimized firmware, only consumes 1 mA. Yes, the LED thrown into the prototype that only serves as an indication the device is on is the biggest power sink in the entire system.
This project is great, and it’s exactly what we’re looking for in The Hackaday Prize. If the Internet of Things ever happens as it was envisioned, we’re going to be buried under a mountain of coin cell lithium batteries. Some sort of energy harvesting scheme is the only way around this, and we’re happy to see someone is working on the problem.
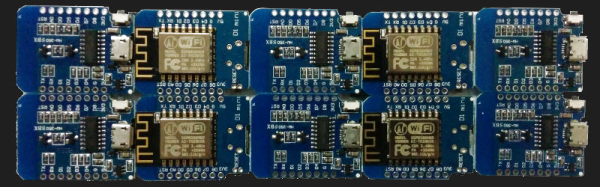
ESP8266-based development boards have proliferated rapidly. One favorite, the WEMOS Mini-D1 is frequently imitated and sold without any branding. As these boards continue to ship to hobbyists and retailers around the world, we thought it might be interesting to conduct a little experiment.
There are a few ESP8266 development boards available, and the most popular seem to be the NodeMCU ‘Amica’ board. Of course, there are dozens of other alternatives including the WiFiMCU, Sparkfun’s ESP8266 Thing, and Adafruit’s HUZZAH ESP8266. Given that, why is this review limited to the Mini D1 boards? Because the Mini D1 is the cheapest. Or was, until it was cloned.
We took a look at some of these ‘clone’ boards to figure out the differences, find out if they work as intended, and perhaps most importantly, are these clone boards shipped out reliably. What are the results? Check that out below.
If you’re in the Bay Area this weekend, the only place to be on Saturday night is O’Neill’s Irish Pub in San Mateo. Hackaday is once again hosting a meetup after Maker Faire closes for the evening, and you don’t want to miss it. Please RSVP now.
This is the fourth year of our BAMF meetup and we’re continually amazed at the turnout — we pack ’em in and it’s not just because the first round of drinks is on us. This is the mixer for everyone who is passionate about hardware. You’ll find your Internet heroes on hand (think YouTube and electronics podcasts), those going through the grinder of startups exhibiting at the faire, engineers for the giant silicon valley firms, plus all of the hackers who spend their time in basements, garages, and taking over the kitchen table to break something open and make it their own. And of course the Hackaday crew will be on hand, you’ll find [Mike], [Jasmine], [Shulie], [Rich], [Jordan], and [Gerrit] losing our voices as the conversation carries on late into the evening.
The photo at the top of the page is from the 2016 Meetup. This photo is from the 2015 Meetup. Now’s your chance to be the face of the party in next year’s announcement!
Our profoundly awesome sister site, Tindie, is also putting out the call to all hardware artisans (they call themselves Tindarians) to turn out for the meetup. If you’ve never heard of Tindie you’re missing out. And if you’ve never sold your creations there, this meetup is a perfect chance to meet some of the people who do. They’re not just purveyors of bleeding edge hardware, they’re the ones who dream it up and make it happen. You should join their ranks!
We love hackers from all walks of life. But unfortunately, because of the venue for this event, we must limit this to those who are 21 years of age and older. If you can’t get into this event, come find us at the Hackaday/Tindie booth at the Faire.
Other than that, we love to see smiling faces, blinking or moving hardware, and the coolest T-shirt you have in your dresser. Come hang out with Hackaday. You’ll have a most excellent evening if you do. See you Saturday!