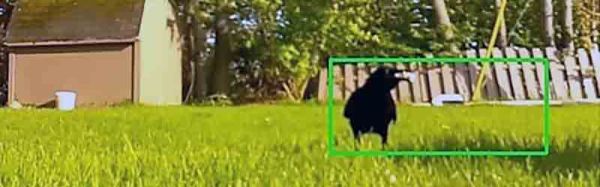
The Raspberry Pi Becomes A SCSI Device

SCSI devices were found in hundreds of different models of computers from the 80s, from SUN boxes to cute little Macs. These hard drives and CDROMs are slowly dying, and with that goes an entire generation of technology down the drain. Currently, the best method of preserving these computers with SCSI drives is the SCSI2SD device designed by [Michael McMaster]. While this device does exactly what it says it’ll do — turn an SD card into a drive on a SCSI chain — it’s fairly expensive at $70.

[GIMONS] has a better, cheaper solution. It’s a SCSI device emulator for the Raspberry Pi (original link dead, here’s the new location of this writeup). It turns a Raspberry Pi into a SCSI hard drive, magneto-optical drive, CDROM, or an Ethernet adapter using only some glue logic and a bit of code.

As far as the hardware goes, this is a pretty simple build. The 40-pin GPIO connector on the Pi is attached to the 50-pin SCSI connector through a few 74LS641 transceivers with a few resistor packs for pullups and pulldowns. The software allows for virtual disk devices – either a hard drive, magneto-optical drive, or a CDROM – to be presented from the Raspberry Pi. There’s also the option of putting Ethernet on the SCSI chain, a helpful addition since Ethernet to SCSI conversion devices are usually rare and expensive.

Officially, [GIMONS] built this SCSI hard drive emulator for the x68000 computer, developed by Sharp in the late 80s. While these are popular machines for retrocomputing aficionados in Japan, they’re exceptionally rare elsewhere — although [Dave Jones] got his mitts on one for a teardown. SCSI was extraordinarily popular for computers from the 70s through the 90s, though, and since SCSI was a standard this build should work with all of them.

If your retrocomputer doesn’t need a SCSI drive, and you’re feeling left out of the drive-emulation club, the good news is there’s a Raspberry Pi solution for that, too: this Hackaday Prize entry turns a Pi into an IDE hard drive.

Thanks [Gokhan] for the tip!

New Part Day: The $239 Pi Clone

Linaro has announced a new ARM-based single board computer.

The HiKey 960, built in collaboration with 96Boards, gives the user 4 ARM Cortex-A73 cores clocked at 2.4GHz, 4 ARM Cortex-A53 cores clocked at 1.8 GHz, a Mali GPU (ugh), 32GB of Flash storage, 3GB of LPDDR4, HDMI 1.2, WiFi, Bluetooth, USB 3.0 type A, PCIe on an M.2 connector, and a familiar 40-pin GPIO connector whose configuration is not published yet but is one we can make a very educated guess about. This is a powerful ARM-based single-board computer that’s the same size as a credit card.

This single board computer draws more power than a Raspberry Pi (but less than 24 W with a 12V supply), but that’s what you get when you need a powerful ARM chip. Interestingly, the HiKey 960 places all the connectors on one side of the board. This is a feature very often overlooked in ARM-based single board computers; all the ports on your desktop are on the back, and it only makes sense to constrain the cables and dongles to one side of a Nintendo-shaped 3D printed enclosure.

This is not the first ARM-based single board computer that markets itself as a more powerful Pi. The Pine64 was supposed to be significantly more powerful, handle 4K HDMI, and bring Android to the desktop. The first versions of the Pine64 really, really sucked. However, most of the kinks have been worked out and the folks behind the Pine64 are now shipping a somewhat reasonable low-end Chromebookesque laptop for $89. This is a laptop for under a Benjamin, whereas the HiKey 960 will sell for $239. That’s the same price as an Intel NUC or other mini PC running an x86 CPU. Of course, the HiKey 960 will have higher performance compared to the latest Pi, or other Pi Killer such as the Asus Tinker board, but there must be a point of diminishing returns. Either way, we look forward to getting our hands on one of these powerful single board computers.

Hackaday Prize Entry: High Speed Sampling For The Raspberry Pi

The Raspberry Pi has become a firm favorite in our community for its array of GPIOs and other interfaces, as well as its affordable computing power. Unfortunately though despite those many pins, there is a glaring omission in its interfacing capabilities. It lacks an analogue-to-digital converter, so analog inputs have to rely on an expansion card either on those GPIOs or through the USB port.

Most people remain content with simple ADCs such as Microchip’s MCP3008, or perhaps a USB sound card for low frequency moving targets. But not [Kelu124], he’s set his sights on something much faster. The original Pi is reputed to be capable of handling a 10Msamples/s ADC, so he thinks its faster successors should be able to work much faster. To that end, he’s created an ADC pHAT which he thinks should be good for twice that figure.

The choice of silicon is a CA3306E, a 6-bit device that’s rated at 15Msamples/S. It’s something of a dated device as is shown by its DIP package, and a quick look through major suppliers shows it to be no longer available. Happily though, when you look at his GitHub repo it emerges that he’s also producing a board based on the ADC08200, so his software is targetable at other chips.

Whether or not you need your Pi to serve as video digitizer or high-speed instrument, it’s useful and interesting to take a look at a board like this one in action. We often don’t use the raw power of our single board computers, and this project proves that should we ever need to, we can.

If ADCs interest you, take a look at [Bil Herd]’s series on delta-sigma ADCs.

Thanks [Fustini] for the tip.

Linger Keeps You Around After You’ve Gone

We’re not sure if this is art, anti-snooping guerilla warfare, or just a cheeky hack, but we do know that we like it! [Jasper van Loenen]’s Linger keeps the SSIDs that your cell phone (for example) spits out whenever it’s not connected to a WiFi network, and replays them after you’re gone.

Some retail stores and other shady characters use MAC addresses and/or the unique collection of SSIDs that your phone submits in probe requests to fingerprint you and track your movement, either through their particular store or across stores that share a tracking provider. Did you know that you were buying into this when you enabled “location services”? Did the tracking firms ask you if that was ok? Of course not. What are you going to do about it?

Linger replays the probe requests of people who have already moved on, making it appear to these systems as if nobody ever leaves. Under the hood, it’s a Raspberry Pi Zero, two WiFi dongles, and some simple Python software that stores probe requests in a database. There’s also a seven-segment display to indicate how many different probe-request profiles Linger has seen. We’re not sure the price point on this device is quite down to “throwie” level, but we’d love to see some of these installed in the local mall.  Continue reading “Linger Keeps You Around After You’ve Gone”

Get Up Close To Your Soldering With A Pi Zero Microscope

Do your Mark 1 Eyeballs no longer hold their own when it comes to fine work close up? Soldering can be a literal pain under such conditions, and even for the Elf-eyed among us, dealing with pads at a 0.4-mm pitch is probably best tackled with a little optical assistance. When the times comes for a little help, consider building a soldering microscope from a Pi Zero and a few bits and bobs from around the shop.

Affordable commercial soldering scopes aren’t terribly hard to come by, but [magkopian] decided to roll his own by taking advantage of the streaming capabilities of the Raspberry Pi platform, not to mention its affordability. This is a really simple hack — nothing is 3D-printed or custom milled. The stage base is a simple aluminum project box for heat resistance and extra weight, and the arm is a cheap plastic dial caliper. The PiCam is mounted to the sliding jaw of the caliper on a scrap of plastic ruler. The lens assembly of the camera needs to be hacked a little to change the focal length to work within 10 centimeters or so; alternatively, you could splurge and get a camera module with an adjustable lens. The Pi is set up for streaming, and your work area is presented in glorious, lag-free HDMI video.

Is [magkopian]’s scope going to give you the depth perception of a stereo microscope? Of course not. But for most jobs, it’ll probably be enough, and the fact that it can be built on the cheap makes it a great hack in our book.

Continue reading “Get Up Close To Your Soldering With A Pi Zero Microscope”

This Hacker Fit An Entire RetroPie In An Altoids Tin

A few months ago, [wermy] built the mintyPi, a Raspberry Pi-based gaming console that fits inside an Altoids tin. It’s amazing — there’s a composite LCD, an audio DAC, and a chopped up Nintendo controller all connected to a Raspberry Pi for vintage gaming goodness on the road. Now, there’s a new mintyPi. The mintyPi 2.0 vastly improves over the earlier generation of this groundbreaking mint-based gaming console with a better screen, better buttons, customized 3D printed bezels, and better audio. Truly, we live in a Golden Age.

Version two of mintyPi uses 3D printed parts and includes a real hinge to keep the display propped up when the Altoids tin is open. Instead of a DAC-based audio solution, [wermy] is using a USB sound card for clearer, crisper sound. This version also uses the new, wireless version of the Raspberry Pi Zero. The Raspberry Pi Zero W allows this Altoids tin to connect to the Internet or, alternatively, gives the user the ability to dump ROMs on this thing without having to connect it to a computer.

For the software, this retro Altoids video game machine is running RetroPie, a very popular way to get retro video games running under low-power Linux machines. Everything is in there, from the NES to Amstrad to the Sega Master system.

Right now, there aren’t a whole lot of details on how [wermy] created the mintyPi 2.0, but he promises a guide soon. Until then, we’ll just have to drool over the video embedded below.

Continue reading “This Hacker Fit An Entire RetroPie In An Altoids Tin”

The Raspberry Pi As An IR To WiFi Bridge

[Jason] has a Sonos home sound system, with a bunch of speakers connected via WiFi. [Jason] also has a universal remote designed and manufactured in a universe where WiFi doesn’t exist. The Sonos can not be controlled via infrared. There’s an obvious problem here, but luckily tiny Linux computers with WiFi cost $10, and IR receivers cost $2. The result is an IR to WiFi bridge to control all those ‘smart’ home audio solutions.

The only thing [Jason] needed to control his Sonos from a universal remote is an IR receiver and a Raspberry Pi Zero W. The circuit is simple – just connect the power and ground of the IR receiver to the Pi, and plug the third pin of the receiver into a GPIO pin. The new, fancy official Raspberry Pi Zero enclosure is perfect for this build, allowing a little IR-transparent piece of epoxy poking out of a hole designed for the Pi camera.

For the software, [Jason] turned to Node JS, and LIRC, a piece of software that decodes IR signals. With the GPIO pin defined, [Jason] set up the driver and used the Sonos HTTP API to send commands to his audio unit. There’s a lot of futzing about with text files for this build, but the results speak for themselves: [Jason] can now use a universal remote with everything in his home stereo now.