The Midwest RepRap Festival is over – forever. This was the last one. Apparently enough people complained that Goshen, Indiana wasn’t in the midwest. The number of Dairy Queens I passed contradicts this, but whatever. Next year, there’s going to be a different con in Goshen. Same content, different name. If you have a suggestion, you know where to put it.


I promised the world’s largest 3D printed trash can, and I gave you the world’s largest 3D printed trash can. This gigantic orange vase was printed on the PartDaddy, SeeMeCNC’s 18-foot tall delta printer a few months ago at the NYC Maker Faire. I have been using this as a trash can in my basement since then, making me one of the only people who have their trash can on Wikipedia.

Speaking of the PartDaddy, this is what a fail looks like. The first PartDaddy print was a Groot, a 13-hour long print job. It was left running overnight, but it ran out of PLA pellets sometime around 4 in the morning. If you’re wondering what the black band is around the Groot’s face is, here’s the breakdown:
The PartDaddy sucks PLA pellets up from a trash can (that’s not 3D printed), and dispenses it into a hopper above the print head. This hopper was 3D printed on the PartDaddy, and there is still a little bit of colarant dust in there. When the PLA pellets run out, that dust is embedded in the extrusion. When you realize that masterbatch is only about 5% of the finished plastic, it doesn’t take much black dust to discolor a print.
Yes, this is a print fail that could have been fixed by having an all-night bash. A few other people left their printers running overnight including [The Great Fredini] and his Scan-A-Rama. This was a Rostock Max that had something wonky happen with the Bowden. There was filament everywhere.
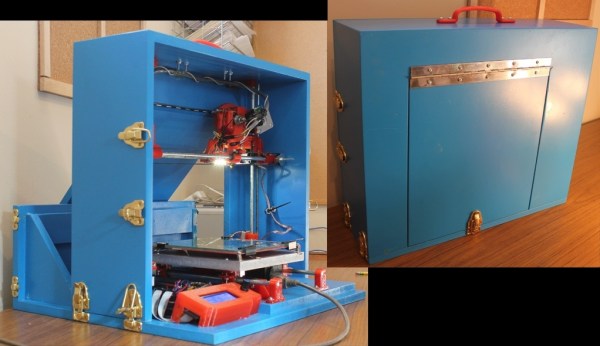
How about some Star Wars droids? An R2 from the Droid Builder’s Club was there, but there was also the beginnings of a completely 3D printed Roger. While we’re on the subject of plastic robots that will fall apart at a moment’s notice, there was a K’NEX 3D printer. Yes, it’s made almost entirely out of K’NEX, and it did work at one time. Those orange parts sitting next to it? Those came out of the K’NEX printer. If you’re looking for the definitive RepStrap, there ‘ya go.


NEW FILAMENTS
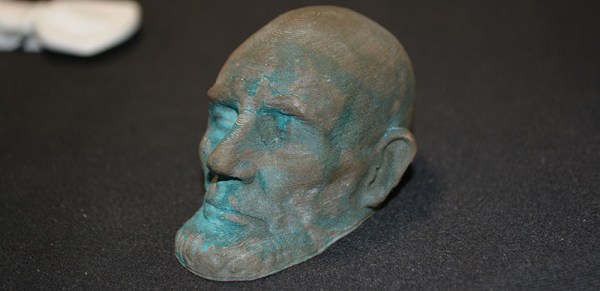
For the last few months, metal filaments – PLA with tiny particles of copper, brass, bronze, iron, or aluminum have been available. MRRF was the first place where you could see them all together. A few things of note: these filaments are heavy – the printed objects actually feel like they’re made out of metal. They’re actually metal, too: the iron-based filaments had a tiny bit of red corrosion, and the Lincoln death mask above was treated with acetic acid. These filaments are also expensive, around $100 for 1kg. Still, if you want to print something that will be around in 100 years, this is what you should get.
The most beautiful printer ever
MRRF should have had a contest for the best looking 3D printer at the show. A beautiful delta from Detroit Rock City would have won:
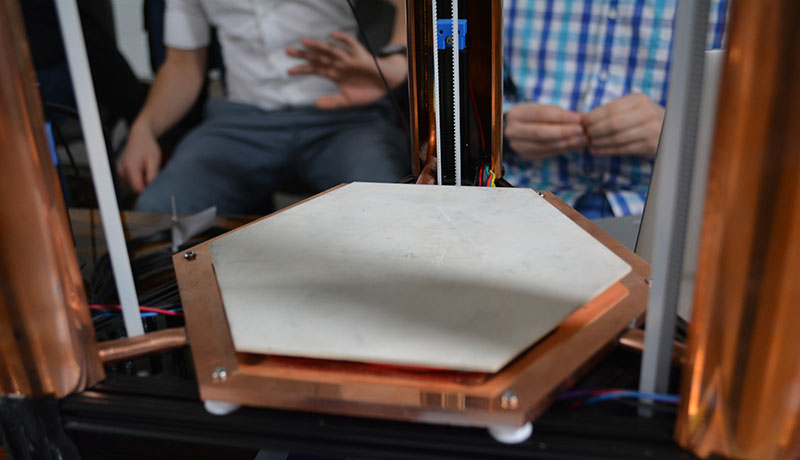
 That white hexagon in the center is a ceramic PCB that I’m told cost an ungodly amount of money. Underneath the ceramic build plate, there’s a few Peltiers between the bed and the large copper heat sink. The heat sink is connected to the three risers by heat pipes, making the entire printer one gigantic heat sink. Why would anyone make such an amazing art deco printer? For this.
Because you can use Peltiers to heat and cool a bed, a little bit of GCode at the end of a print will cool the bed to below room temperature. If you do your design right, this means the print will just fall over when it’s done. When the print bed is cooling, you can actually hear the bond between the bed and print cracking. It’s beautiful, it’s cool, and I’m told this printer will make its way to hackaday.io soon.
There you go, the best and coolest from the last Midwest RepRap Festival ever. There will never be another one. It only needs a better name, and [John] at SeeMeCNC is great at coming up with names. Just ask what VIP is a backronym of.
I told you there would be a T-shirt cannon. That’s 300 PSI shop air.