Illustrated Kristina with an IBM Model M keyboard floating between her hands.

Keebin’ With Kristina: The One With The Folding Typewriter

Have you built yourself a macro pad yet? They’re all sorts of programmable fun, whether you game, stream, or just plain work, and there are tons of ideas out there.

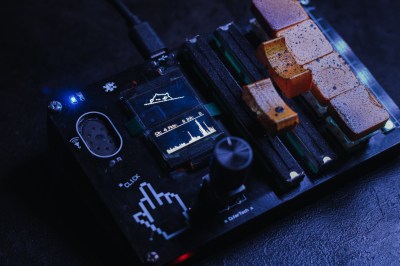
A DIY macro pad with key switches, dual linear pots, a rotary encoder, a screen, and a speaker.
Image by [CiferTech] via Hackaday.IO
But if you don’t want to re-invent the wheel, [CiferTech]’s MicroClick (or MacroClick — the jury is still out) might be just what you need to get started straight down the keyboard rabbit hole.

This baby runs on an ATmega32U4, which known for its Human Interface Device (HID) capabilities. [CiferTech] went with my own personal favorite, blue switches, but of course, the choice is yours.

There are not one but two linear potentiometers for volume, and these are integrated with WS2812 LEDs to show where you are, loudness-wise. For everything else, there’s an SSD1306 OLED display.

But that’s not all — there’s a secondary microcontroller, an ESP8266-07 module that in the current build serves as a packet monitor. There’s also a rotary encoder for navigating menus and such. Make it yours, and show us!

Continue reading “Keebin’ With Kristina: The One With The Folding Typewriter”

A persistence-of-vision business card which displays information when shaken (not stirred).

2024 Business Card Challenge: Make Them Shake Your Handiwork

Before COVID, people traditionally sealed their initial introduction to each other with a handshake. Nowadays, that activity seems kind of questionable. But you can still give them something to shake if you build this persistence of vision (POV) business card from [chaosneon] to show your credentials in blinkenlights form.

As you might have guessed, the input comes from a tilt switch. The user simply shakes the card back and forth, and the sensor detects the direction and cadence of the shake. Cleverly, the pattern plays forward-ways on the swing, and backwards on the back stroke, which just reinforces the POV effect. Don’t worry about how slow or fast to shake it, because the timing adjusts for your speed.

The first version used individual white LEDs, hand-soldered to an ATtiny2313. Now, in the updated version which you can see in the demo video after the break, [chaosneon] is using an RGB NeoPixel strip, which only needs one data wire to connect to the microcontroller. Thanks to this, [chaosneon] was able to to downsize to an ATtiny85.

Continue reading “2024 Business Card Challenge: Make Them Shake Your Handiwork”

Linear LED clock displaying the time using different-colored triangles.

Linear LED Clock Looks Decidedly Vintage

We just love a good clock around here, and something about those triangles gives this linear LED clock a deliciously mid-century vibe. If you’ve read these pages for any length of time, you know that [andrei.erdei] loves clocks as much as we do, and is always coming up with interesting ways of displaying the passage of time.

Two upward-facing triangles sandwich one downward-facing triangle, and they are lighting up as follows: right, left, middle.This one is a remix of some other linear RGB clocks, but the result is distinctly [andrei.erdei]’s style. There’s nothing crazy going on under the hood here — it’s essentially a Wemos D1 mini running a strip of RGBs, and the microcontroller connects to a Wi-Fi router to get the time from a server. The magic is in the programming and the way the clock is read.

The brief but thorough demo video after the break does a much better job of explaining the display by showing various times of the day, but we’ll give it a shot. For one thing, it uses 24-hour time exclusively. There are four groups of triangles; yellow, red, green, and blue which correspond to tens and units of hours, and tens and units of minutes.

The triangles light up in groups of three in the order depicted in the animation. At midnight, none of the triangles are lit up. Again, it’s best explained in the video, looking at various times of day.  Plus you can see the neat-o startup animation.

Are you more into sound than blinkenlights? Then this customizable bird clock may be for you.

Continue reading “Linear LED Clock Looks Decidedly Vintage”

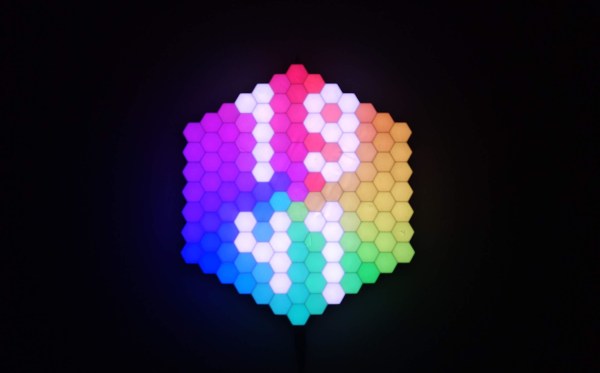
An RGB LED clock that resembles a color blindness test.

RGB LED HexaClock Doesn’t Actually Light Up The Night

Who says a clock can’t be both useful and beautiful? That seems to be the big idea behind the lovely little HexaClock from [Bulduper]. And boy, is it both.

Probably the most important part of this well-illuminated clock is the light sensor, which allows it to adjust the brightness automatically. If you’re not into that, well, there’s a really nice web app that’ll let you program the dickens out of it.

The brains of this thing is an ESP8266 on a custom PCB which controls the 127 individually addressable RGB LEDs. The clock may look large, but the big printed parts just fit on the bed of a Prusa i3. [Bulduper] used ABS because the LED strip and the PCB might get a little warm; they didn’t want to risk using PLA and having it turn into a Salvador Dali clock (although that could be cool).

Speaking of heat, make sure to use 18 AWG or thicker wires as [Bulduper] advises. LEDs may be efficient, but this clock uses lots of them! If you want to build one of these to bathe your wall in useful light, everything you need is available on GitHub. Watch HexaClock do its thing in the brief demo and walk-through video after the break.

If this is a little too bright for your tastes, check out this synesthesia clock.

Continue reading “RGB LED HexaClock Doesn’t Actually Light Up The Night”

Cyberpunk Guitar Strap Lights Up With Repurposed PCBs

Sometimes, whether we like it or not, ordering PCBs results in extra PCBs lying around, either because of board house minimums, mistakes on either end, or both. What’s to be done with these boards? If you’re Hackaday alum [Jeremy Cook], you make a sound-reactive, light-up guitar strap and rock out in cyberpunk style.

The PCBs in question were left over from [Jeremy]’s JC Pro Macro project, and each have four addressable RGB LEDs on board. These were easy enough to chain together with jumper wires, solder, and a decent amount of hot glue. Here’s a hot tip: you can use compressed air to rapidly cool hot glue if you turn the can upside down. Just don’t spray it on your fingers.

The brains of this operation is Adafruit Circuit Playground Express, which runs off of a lipstick battery and conveniently brings a microphone to the table. These two are united by a 3D print, which is hot-glued to the guitar strap along with all the boards. In the second video after the break, there’s a bonus easy-to-make version that uses an RGB LED strip in place of the repurposed PCBs. There’s no solder or even hot glue involved.

Want to really light up the night? Print yourself a sound-reactive LED guitar.

Continue reading “Cyberpunk Guitar Strap Lights Up With Repurposed PCBs”

RGB LED Disco Ball Reacts To Sound And Color

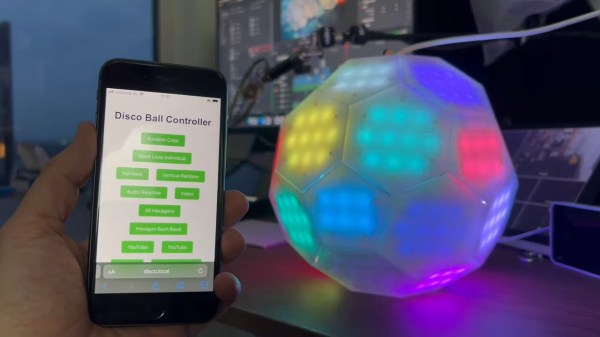
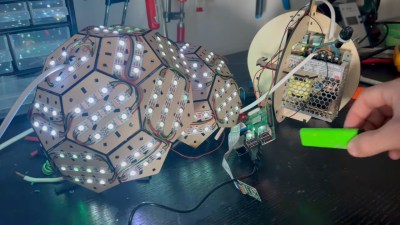
Although disco music and dancing may be long dead, the disco ball lives on as a staple of dance parties everywhere. [Tim van de Vathorst] spent a considerable amount of time reinventing the disco ball into something covered with RGB LEDs that reacts to sound and uses a color sensor to change hue based on whatever it’s presented with.

[Tim] started by modeling the disco ball after a soccer ball with a mixture of pentagons and hexagons. Then it was off to the laser cutter to cut it out of 3mm plywood sheets. Once assembled, [Tim] added LED strips across all the faces and wired them up. Then it was time to figure out how to hold the guts together inside of the ball. Back to the drawing board and laser cutter [Tim] went to design a simple two-piece skeleton to hold the Raspberry Pi and the power supply.

In order to do some of the really interesting effects, [Tim] had to make sure that the faces were divvied up correctly in code. That was difficult and involved a really big array, but the result looks worth the trouble. Finally, [Tim] covered the ball in white acrylic to diffuse the LEDs. As you will see in the build/demo video after the break, the ball turned out really well. The only real problem is that the camera doesn’t work very well without light, which is something good parties are usually short on. [Tim] might add a spotlight or something in the future.

Do you prefer the mirrored look of the standard disco ball? Peep the tiny one in this Disco Containment Unit.

Continue reading “RGB LED Disco Ball Reacts To Sound And Color”

1D Fireworks Are Nice And Quiet

Maybe you do it out of respect for the dogs and parents of young children in the neighborhood. Or maybe you do it because they’re harmful to the environment, or just because it’s too darn cold outside. Whatever your reasoning for not setting off fireworks, don’t fret — you can probably put together your own silent one-dimensional “fireworks” display from what you’ve got in the parts bin.

[Daniel Westhof]’s design is simple, requiring little more than a Wemos D1 Mini and a strip of WS2812 LEDs. Once activated, a red rocket shoots up from the ground and detonates, sending lights in both directions on the strip to imitate the bombs bursting in air. It’s controlled with a small push button switch, and there’s a deliciously large red LED indicator that shows the thing is ready for detonation.

You might be surprised to find that there’s a wide array of 1D gaming and animation projects out there, many of which made possible by the ubiquitous addressable RGB LED strip. We’ve seen a dungeon crawler, at least two different versions of the classic PONG, and even the makings of a simplified Wolfenstein.