Cardboard Hexapod Gets Around With Three Motors

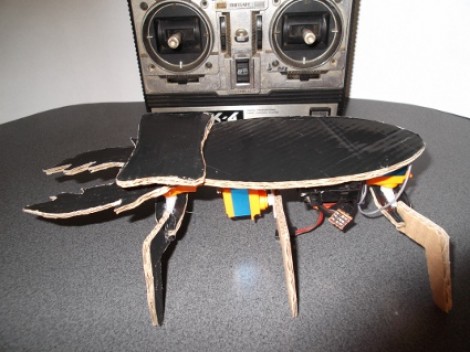
Here’s a lesson in doing a lot with very little. [Oldrobot] built this hexapod using cardboard for most of the pieces. He still had the box from his vacuum clear and it just happened to have a large black area the makes the top of the beetle look like it’s been painted.

The control board is from an old radio controlled airplane. Since RC airplanes used servos for flight control, it was a snap to hook up the three that make the bug go. One controls the set of middle legs which lift the body and change which of the propulsion legs are in contact with the ground. The other two servers move pairs of the front or back legs. It uses the same concept as this other RC controller hexapod, but much less time went into crafting the chassis and legs.

As you can see in the video after the break, the control scheme isn’t the most intuitive. But once you get a hang of which stick orientation affects each leg movement the bot ends up having fairly precise steering.

Continue reading “Cardboard Hexapod Gets Around With Three Motors”

A Locking Chest With A Musical Key

music-detecting-box

[Basil Shikin] was thinking about different types of locks, and was trying to come up with a locking solution that he had yet to see. It dawned on him that he had never come across a lock triggered by music, so he set off to construct one of his own.

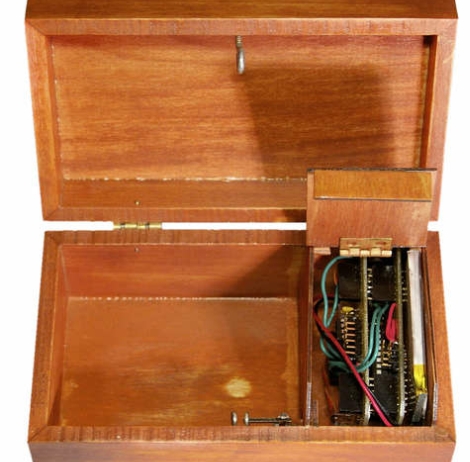
He ordered a wooden chest online, then proceeded to piece together the electronics required for the locking mechanism as well as the music detecting logic. Using an Atmega328P paired with an electret mic, his system listens for a particular tune (the Prelude of Light from the Ocarina of Time) to be played , which triggers a tiny servo to undo the latch. To do this, he implemented a version of the Goertzel Algorithm on the Arduino, allowing him to accurately detect the magical tune by frequency, regardless of what instrument it is played on.

Be sure to check out the video below to see his musical lock in action.

Continue reading “A Locking Chest With A Musical Key”

Adding An Electronic Lock To A DIY Book Safe

electronic-book-safe

DIY book safes are well and good, but if you give someone enough time to peruse your book collection, the 3-inch thick “Case study on Animal Husbandry Techniques during the 14th Century” is likely to stand out among your collection of hand-bound “Twilight” fan fiction. In an attempt to teach his friend a bit about microcontrollers and circuits, [Jonathan] spent some time adding a bit more security to your run of the mill book safe.

The pair started out with the time-consuming process of gluing the book’s pages together and creating enough hollow space for both storage and the electronics. With that out of the way, they installed a latch and servo motor inside the cavity, the latter of which is controlled using an Atmega328p with the Arduino bootloader. To gain access to the goodies stashed away inside, Jonathan hooks up a small PS/2 keypad and enters a passcode. This triggers the servo motor, opening the latch.

While the latch likely only adds a nominal bit of security to the book safe, it’s a fun enough learning exercise to justify the time spent putting it together.

Continue reading to see a short video of [Jonathan’s] electronic latching book safe in action.

Continue reading “Adding An Electronic Lock To A DIY Book Safe”

Reverse Engineering A Futaba SBUS Remote Control

In the world of model aircraft, Futaba’s SBUS system is a big deal. Instead of having one servo per channel, the SBUS system allows for 16 proportional controls and two digital channels for each receiver. Basically, if you’re building an awesome plane with retracts on the landing gear and bomb bay doors, this is what you want to use. [Michael] wanted to use a few SBUS servos for a project he’s working on, so of course he had to reverse engineer this proprietary protocol.

Each SBUS servo operates over a single 100kbps serial connection with a few interesting twists: the signal is transmitted as big endian, but the individual bytes are little endian, something [Michael] figured out after stumbling across this month old mbed post. [Michael] used a serial library written by [fat16lib] and was able to change the parity and stop bits along with a simple hex inverter. Everything worked perfectly when the servo was connected to a an Arduino Mini.

Even though the SBUS system requires special Futaba servos, we can easily see how useful [Michael]’s work would be to outrageously complex robots or cnc machines. Check out the video after the break for a quick demo of [Michael]’s breadboard controlling one of these SBUS servos.

Continue reading “Reverse Engineering A Futaba SBUS Remote Control”

Auto-locking Pet Door Ensures That Your Outdoor Kitty Obeys Its Curfew

auto-locking-pet-door

If you’ve got a pet that roams freely in and out of your house, you may find yourself wanting to more closely regulate how they come and go. [tareker] was looking to keep his cat indoors at night when dangerous animals might be lurking in the neighborhood, but he didn’t want it to become a hassle.

He already had locking pet door on hand, which he hacked to regulate the egress and ingress of his cat automatically. He installed a pair of reed switches to determine if the door had been opened outwards (cat leaving) or inwards (cat returning), keeping track of the state using an Arduino Nano. A servo motor attached to the door’s frame locks the door whenever it detects the cat is safely inside after nightfall.

While he also added an RGB LED to reflect the status of the door, he’s considering connecting it to the Internet so that he can control and check the door from wherever he might be at the moment.

Wireless Camera Mount Offers Pan And Tilt Functions

[Chris] put together a bunch of common components to create this wireless pan and tilt system for a security camera or a robot.

The motorized base is simple enough, using two servos to make up a mount for the digital camera. In this case he used a parts package which is designed to mount the servos perpendicular to each other. You could also 3D print, our build your own brackets quite easily. The control circuitry consists of a pair of PIC 18LF4520 microcontrollers and a set of Xbee modules. This is where the wireless connectivity comes in.

On the transmitter side, a pair of potentiometers are read by the microcontroller’s ADC and translated into position values. The receiver takes those values and drives the servo motors accordingly. In the clip after the break [Chris] is using micro trimpots which require a screw driver to adjust. You might want to hit the parts bin and see if you can get some that have a more user-friendly shaft or knob.

Unfortunately this system doesn’t transmit video. But WiFi webcams are getting quite affordable so that might be a good option in this case. Continue reading “Wireless Camera Mount Offers Pan And Tilt Functions”

Sentry Gun Controller-board Upgrade

This open source sentry gun controller board builds on a great concept by getting rid of the Arduino board. The previous version was an Arduino shield, but this upgrade keeps all of the cool features by rolling the necessary parts into one smaller footprint.

The image above doesn’t quite convey the scope of the project. Go take a look at the feature from last year which used the shield version of the controller. That build used a servo-mounted paintball gun in conjunction with a webcam. You can still build the same platform, but use the open-source files to include this board. It has outputs for three servo motors, and can also interface with airsoft or paintball guns which have their own electronic triggers and integrated batteries.

We always like to see the schematic for projects like this one. For your convenience we exported an image from the Eagle package. You can find it, along with the demo video, after the break.

Continue reading “Sentry Gun Controller-board Upgrade”