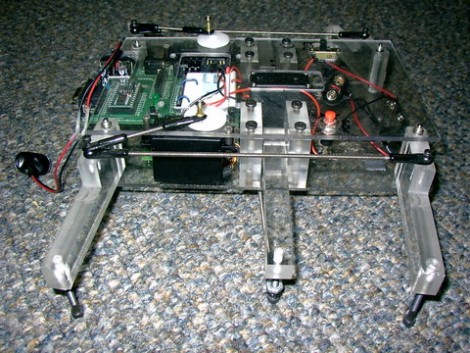
Meter Clock With Pleasing Design Considerations

[AndyO] embraced his inner geek by building this meter clock. It exhibits a lot of features that you’d want to see in a home-built timepiece, include over-complexity, abundant features, and RGB LEDs. We’re fascinated by the design he put into this. For instance, the two indicator LEDs on the clock face are not poking through the surface, but use brass tubes as light pipes. Also, the three buttons on the top are almost indistinguishable, and have an RGB back light that places a halo around each. The case itself was built by first making a form, then laminating thin sheets of wood (a difficult task due to the tight curves). The needles themselves are not actually meters, like the clock the inspired the build, but are attached to servo motors. This all comes together into a fascinating build, and a great writeup.

[Thanks Graham]

Developing An Animatronics Platform

This Predator costume has an animatronic element in the shoulder cannon. It tracks the movement of the mask, aiming wherever the Predator gazes. [Jerome Kelty] was asked by a friend to help develop the costume and he ended up with an animatronics platform which can be adapted for many different uses.

Starting with an Arduino Pro Mini [Jerome] designed a host board which would breakout the pins of the Arduino and make it easy to connect and drive multiple servo motors. The board is powered by a 3.3v Lithium Polymer battery with charging handled by a MAX1555 that was included in the design. Check out the video after the break which shows off the Predator suit. Looks like [Jerome] got it right, and he’s also put the platform to use with an Ironman suit that has an arm-mounted missle feature.

Need some inspiration for you next costume build? Take a look at this animatronic collection to get you started.

Continue reading “Developing An Animatronics Platform”

Pencil Balancer A Bit Noisy For Desk Use

Who wouldn’t want to install this little bot as your newest pencil holder? Place a pencil tip-down and it will keep it from falling using two motors. There is a Dynamic Vision Sensor for each axis that provides feedback, but it’s not the same as using a camera. These sensors pick up changes in pixel contrast, outputting a positive or negative number based on the direction the pencil is beginning to fall. An NXP2103 running at 64 MHz reads in the values and drives the pair of servo motors accordingly.

If you’re interested in the nitty-gritty the full paper is available from the page linked above. It goes into great detail about the algorithm used, and includes plots and histograms showing the data capture during a balancing session. Or you can skip the eggheaded exercises and watch the video after the break.

Continue reading “Pencil Balancer A Bit Noisy For Desk Use”

Interface Up To 12 Servos Using Arduino

[Brian] is using an Arduino to control multiple servo motors. This is nothing new and has been happening since the earliest days of Arduino. But rather than develop a project and share it, [Brian] did a fantastic job of making the code scalable, readable, and even explained how the different parts work.

His code listens for serial commands and manipulates the motors accordingly. He wrote a Python script using pyserial which talks to the Arduino. As an example, he uses a joystick to send data for X and Y axes as well as pitch and roll. Want to know how those serial communications work? He explains that in detail. He also outlines the process of scaling up from the 4 servo demo to 12 servos on a standard Arduino. Sounds like it might be time to build your own version of a mouse-controlled Lynxmotion arm using the tools [Brian] has put together.

Adding Pan And Tilt To A Webcam

[Brent] and his wife wanted a way to provide more family time for Grandparents that lived far away. They tried a webcam, but their daughter just didn’t oblige by staying in the frame. Instead of chasing her around the room with with the camera he added pan and tilt features to the device. He settled on IR control using a common television remote, similar to our USB remote control receiver tutorial except that it drives servo motors instead of forwarding signals over the serial connection. [Brent] used a Picaxe 08M, connecting two servos together as a base on top of the project box. If you try this yourself there’s a lot of room to grow. Once you’ve assembled the hardware it wouldn’t be too hard to make this web enabled so that Grandpa can click on a web interface to look around the room.

Japanese Micro Planes

Some very well engineered micro planes(translated) have been buzzing around the net. The goal here is ultra light weight. These suped-up paper planes have a remarkable target weight of around 10 grams (translated). The lighter the micro plane is the slower and more maneuverable it will be leading to some pretty interesting and scary applications. For controls it looks like many of the planes are using infrared receivers/transmitters (much like you would find in a TV remote hint hint). Getting the lightest plane possible has forced the designers to come up with some pretty ingenious tricks. For example, instead of using packaged servos they use a coil of wire wrapped around a rare earth magnet to control the flaps. You can see these home made “servos” in action after the break.

Some have taken a more classic approach and used rubber band power instead of a li-po/motor combo.

[via Make]

Continue reading “Japanese Micro Planes”

Add-on Panel Brings Automated Vents Flaps To A PC

[SXRguyinMA] built a replacement top bezel for his computer case. He wanted to add vents that would automatically open or close based on the cooling needs of the computer. With some careful measurements he modeled the parts in Sketchup and sent out for them to be cut from styrene with a water jet cutter. The parts came back looking great and the assembly of the shutters went swimmingly. The bezel also includes a lighted screen for temperature information, as well as the front USB ports, headphone and mic jacks, etc. Hidden underneath is an Arduino board and servo motor. The Arduino polls the temperature and drives the servo to adjust the fins accordingly. There’s even a supercap in the circuit that will close the vents when the PC powers down or when power is unexpectedly lost. See it in action after the break.

Continue reading “Add-on Panel Brings Automated Vents Flaps To A PC”