Two shots of a Thriller jacket with LED strips being worn by Louise Katzovitz, one from the front and the other from the back.

Thrills With An LED “Thriller” Jacket

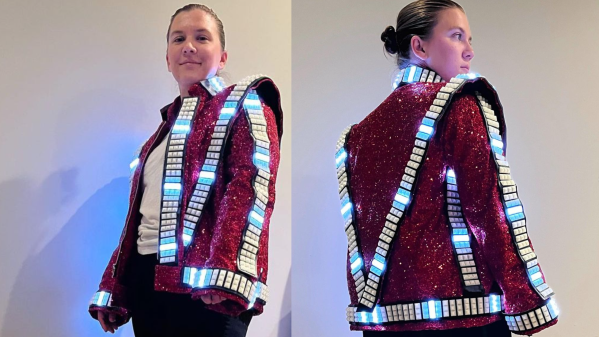
[Louise Katzovitz] has created a light-up jacket in the style of the jacket worn by Michael Jackson in the 1983 music video for “Thriller”. [Louise Katzovitz]’s Thriller jacket is the perfect example of combining sewing hacks and electronic hacks to make an awesome, wearable jacket.

A bomber jacket was used as the base form to layer on the sequins and LED strips. Instead of bands of metal studs, [Louise] used WS2812B 60 pixels/m LED strips. 3D-printed transparent PLA “gems” were placed on top of the LEDs to mimic the form of the metal studs in the original jacket and provide diffusion for the underlying LEDs.

Inside of the LED thriller jacket, with battery pack, arduino nano and wiring exposed

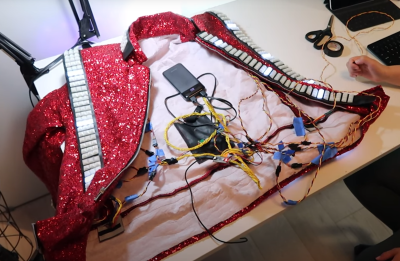
Each LED strip was laid out on a piece of vinyl strip. Then, a top layer of vinyl was cut to allow each of the LEDs to poke through, with the 3D printed gems super-glued on top. The assembled LED bands are attached to the jacket by Velcro with the wiring fed behind the lining material, which can be removed easily via small hooks. The whole thing is driven by an Arduino Nano and a 5 V power bank.

With the details and process worked out, [Louise] even made a tiny version of the jacket for her dog. We’ve featured LED wearables and fashion before and [Louise]’s jacket is a great addition. These projects are perfect for anyone who wants to wow their friends this upcoming Halloween season. Video after the break!

Continue reading “Thrills With An LED “Thriller” Jacket”

A Home Made Sewing Machine May Be The Only One

The sewing machine is a tool that many of us will have somewhere around our workshop. Concealed within it lies an intricate and fascinating mechanism. Some of us may have peered inside, but very few indeed of us will have gone to the effort of building our own. In case you had ever wondered whether it was possible, [Fraens] has done just that, with what he claims may be the only entirely homemade sewing machine on the Internet.

If you’ve ever studied the history of sewing machines you’ll notice that it bears a striking resemblance to some of the earliest commercial machines, with a relatively short reach and an entirely open construction. The main chassis appears to be laser-cut acrylic while all the fittings are 3D-printed, with machined brass bushes and aluminum rods for the other metal parts. The design utilizes a hand crank, but is also pictured with a DC motor. It makes for a fascinating illustration of how sewing machines work. Sadly we can’t see any design file links (Update: He’s contacted us to tell us they’re now on Thingiverse.), so you might have to be inventive if that’s the way you want to build your own. Take a look at it in the video below the break.

Fancy a sewing machine but don’t fancy making your own? We’ve got the guide for that, and for filling the rest of your textile bench.

Continue reading “A Home Made Sewing Machine May Be The Only One”

What You Should Know Before Buying An Industrial Sewing Machine

I’ve been sewing off and on since I was a kid, and I really started to get into it about ten years ago. Even though I technically outgrew my little 3/4 size domestic machine pretty quickly, I kept using it because it always did whatever I asked it to. I even made my first backpack on it before deciding it was time for something bigger. Don’t ask me how I managed to not kill that machine, because I have no idea.

Left: a 3/4 size Janome 11706. Right: a full-size Singer Heavy Duty 4452.

Last year, I got a so-called heavy duty Singer that claims to have 50% more power than a standard domestic machine. This bad boy will make purses and backpacks with ease, I thought. And it does. Well, most of the time.

I found its limits when I tried to make a bag out of thick upholstery material. And honestly, when it comes down to finishing most bags — sewing the thickest and most difficult seams — the machine often lifts up from the table on the end opposite the needle.

What I really need is an industrial sewing machine. Not to replace the Singer at all, but to complement it. I can totally justify this purchase. Let me tell you why.

Continue reading “What You Should Know Before Buying An Industrial Sewing Machine”

Curious Marc Takes On Sewing Machine Repair

Even the most talented engineers can be stymied by simple repair projects. In this case, repairing a broken sewing machine has [CuriousMarc] all tangled up.  [Marc] is probably best known as a part of the team who managed to restore and boot up an apollo guidance computer, but he’s worked with plenty of other vintage machines.

This problem hit much closer to home. [Marc’s] daughter wanted to sew a Halloween costume. The machine would boot up fine, but when attempting to sew, it would make a bit of noise, then beep and display “The safety device has been activated”. Not very helpful.

The sewing machine in question is called “Baby Lock Decorator’s Choice” and is manufactured by Brother for Juken. [Marc] of course dug in, and quickly found himself stymied by a clamshell case that just didn’t want to come apart. This is the point where many of us would apply just a little too much force when prying and be rewarded with a broken case.

[CuriuosMarc] is thankfully the more patient sort. Rather than become [FuriousMarc], he carefully persevered to find a hidden screw holding things together. The screw could only be accessed by inserting a screwdriver through a tiny access hole on the front chassis of the machine.
With the screw out, a couple of molded clips were all that held the case sides together. After popping them, [Marc] was finally able to fix the real problem: A toothed belt that had slipped off its cog. That’s it — just a loose belt. The cryptic error code most likely was due to the machine realizing it the motor was on, but the machine wasn’t moving – which would generally indicate something stuck or tangled in the thread path.

This type of repair would be much easier if service manuals were readily available. We did a quick search for this model but didn’t find anything freely available.

Have you gotten stuck by a simple repair? Tell us about it down in the comments.

Continue reading “Curious Marc Takes On Sewing Machine Repair”

How To Keep Your Head Warm With A Skirt

We’re not sure what we like better about this upcycled trapper hat — that [ellygibson] made it as a tribute to Holden Caulfield, the anti-hero of the classic teen angst novel The Catcher in the Rye, or the fact that she made it out of a skirt that cost a dollar from the thrift store. Oddly enough, one dollar is exactly what Holden paid for his hat in the book.

To make this hat, [elly] started by measuring the circumference of her head, then used math to figure out the radius of the circle for the top part. She made a prototype first to get the fit right, then cut the pieces from the skirt and the lining pieces from black flannel. We love that [elly] used the tiny pocket from the skirt in one of the ear flaps, because it will surely come in handy one day.

[elly] doesn’t provide pattern pieces, but that’s okay — between the explanation of how she arrived at the hat band circumference and the step-by-step instructions, it should be easy to make one of these for yourself from whatever fabric you’ve got.

Before you go cutting up an old coat, consider whether it could be fixed. Remember when [Ted Yapo] fixed the zipper box on his son’s winter coat by printing a replacement? Or how about the time [Gerrit Coetzee] cast his own pea coat buttons?

Arduino Bobbin Winding Machine Is Freaky Fast

One of the worst things about sewing is finding out that your bobbin — that’s the smaller spool that works together with the needle and the larger spool to make a complete stitch — ran out of thread several stitches ago. If you’re lucky, the machine has a viewing window on the bobbin so you can easily tell when it’s getting dangerously close to running out, but many machines (ours included) must be taken halfway apart and the bobbin removed before it can be checked.

Having spare bobbins ready to go is definitely the answer. We would venture to guess that most (if not all) machines have a built-in bobbin winder, but using them involves de-threading the machine and setting it up to wind bobbins instead of sew. If you have a whole lot of sewing to do and can afford it, an automatic bobbin winder is a godsend. If you’re [Mr. Innovative], you build one yourself out of acrylic, aluminium, and Arduinos.

Here’s how it works: load up the clever little acrylic slide with up to twelve empty bobbins, then dial in the speed percentage and press the start button. The bobbins load one at a time onto a drill chuck that’s on the output shaft of a beefy 775 DC motor. The motor spins ridiculously fast, loading up the bobbin in a few seconds. Then the bobbin falls down a ramp and into a rack, and the thread is severed by a piece of nichrome wire.

An important part of winding bobbins is making sure the thread stays in place at the start of the wind. We love the way [Mr. Innovative] handled this part of the problem — a little foam doughnut around a bearing holds the thread in place just long enough to get the winding started. The schematic, BOM, and CAD files are available if you’d like to make one of these amazing machines for yourself. In the meantime, check out the demo/build video after the break.

Still not convinced that sewing is cool enough to learn? Our own [Jenny List] may be able to convert you. If that doesn’t get you, you might like to know that some sewing machines are hackable — this old girl has a second life as a computerized embroidery machine. If those don’t do it, consider that sewing machines can give you a second life, too.

Continue reading “Arduino Bobbin Winding Machine Is Freaky Fast”

Dyeing Fabric To Create Sensors

Fabrics with electrical functionality have been around for several years, but are very rarely used in mainstream clothing. The fabrics are very expensive and the supply can be unreliable. Frustrated by this, [Counter Chemists] developed PolySense, simple open-source technology to make any fibrous material into a conductive material that can be used to sense pressure, stretch, capacitive touch, humidity, or temperature.

PolySense uses a process called in-situ polymerization, effectively dying a fabric to become piezoelectric. This is done by first soaking the fabric in a mixture of water and the organic compound pyrrole, and then adding iron chloride to trigger a reaction. The polymerization process that takes place wraps the individual fibers of the fabric in conductive polymer chains.

Instead of just uniformly coating a fabric, various masking techniques can be used to dye patterns onto the fabric for various use cases. The video after the break shows a range of these applications, including using polymerized gloves and leggings for motion capture, a zipper that acts like a linear potentiometer, and touch-sensitive fabric. The project page lists sources for the required chemicals in both Europe and the US, and we look forward to seeing what other applications the community can come up with.

The project is very well documented, with a number of scientific papers covering all the details. [Counter Chemists] will also be presenting PolySense at the 2020 Virtual Maker Faire.

This technology can also be used to make a fabric piano with a lot less effort. On the more mechanical side of things, you can also 3D print on pre-stretched fabric to make it pop into 3D shapes.

Continue reading “Dyeing Fabric To Create Sensors”