Arduino Bobbin Winding Machine Is Freaky Fast

One of the worst things about sewing is finding out that your bobbin — that’s the smaller spool that works together with the needle and the larger spool to make a complete stitch — ran out of thread several stitches ago. If you’re lucky, the machine has a viewing window on the bobbin so you can easily tell when it’s getting dangerously close to running out, but many machines (ours included) must be taken halfway apart and the bobbin removed before it can be checked.

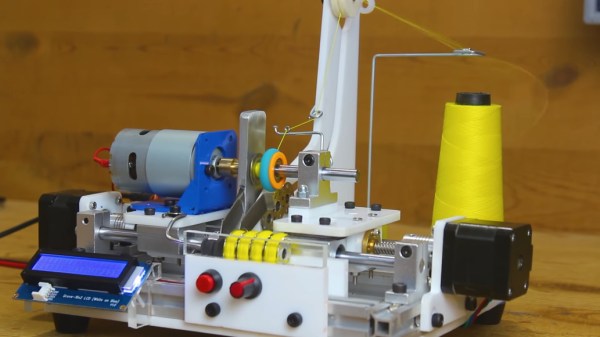
Having spare bobbins ready to go is definitely the answer. We would venture to guess that most (if not all) machines have a built-in bobbin winder, but using them involves de-threading the machine and setting it up to wind bobbins instead of sew. If you have a whole lot of sewing to do and can afford it, an automatic bobbin winder is a godsend. If you’re [Mr. Innovative], you build one yourself out of acrylic, aluminium, and Arduinos.

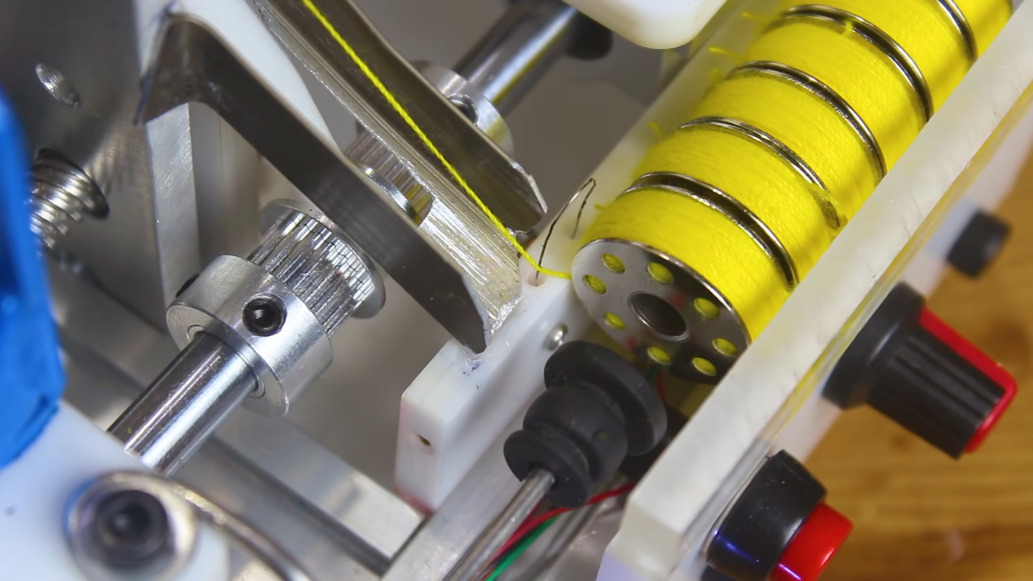
Here’s how it works: load up the clever little acrylic slide with up to twelve empty bobbins, then dial in the speed percentage and press the start button. The bobbins load one at a time onto a drill chuck that’s on the output shaft of a beefy 775 DC motor. The motor spins ridiculously fast, loading up the bobbin in a few seconds. Then the bobbin falls down a ramp and into a rack, and the thread is severed by a piece of nichrome wire.

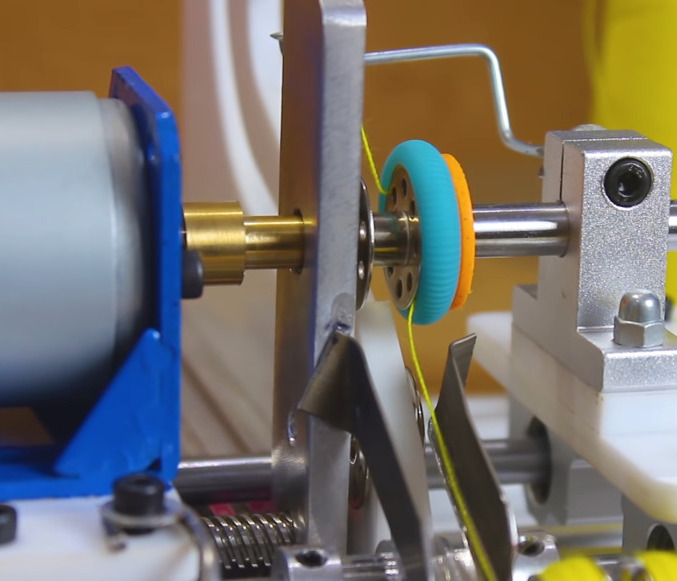
An important part of winding bobbins is making sure the thread stays in place at the start of the wind. We love the way [Mr. Innovative] handled this part of the problem — a little foam doughnut around a bearing holds the thread in place just long enough to get the winding started. The schematic, BOM, and CAD files are available if you’d like to make one of these amazing machines for yourself. In the meantime, check out the demo/build video after the break.

Still not convinced that sewing is cool enough to learn? Our own [Jenny List] may be able to convert you. If that doesn’t get you, you might like to know that some sewing machines are hackable — this old girl has a second life as a computerized embroidery machine. If those don’t do it, consider that sewing machines can give you a second life, too.

Continue reading “Arduino Bobbin Winding Machine Is Freaky Fast”

Dainty Delta Is About As Small As A Robot Can Be

There’s something mesmerizing about delta robots. Whether they are used at a stately pace for a 3D-printer or going so fast you can barely see them move in a pick and place machine, the way that three rotary actuators can work together to produce motion in three axes is always a treat to watch. Especially with a delta robot as small as this one.

[KarelK16] says this is one of those “just because I can” projects with no real application. And he appears to have been working on it for a while; the video below is from eight years ago. Regardless, the post is new, and it’s pretty interesting stuff. The tiny ball joints used in the arms are made from jewelry parts; small copper crank arms connect the three upper arms to micro-servos. The manipulator [KarelK16] attached is very clever, too – rather than load down the end of the arms with something heavy, a fourth servo opens an closes a flexible plastic grasper through a Bowden cable. It’s surprisingly nimble, and grasps small objects firmly.

There are certainly bigger deltas – much bigger – and more useful ones, too, but we really like this build. And who knows – perhaps model robotics will join model railroading as a hobby someday. If it does, [KarelK16]’s diminutive delta might be the shape of things to come.

Continue reading “Dainty Delta Is About As Small As A Robot Can Be”

Evolving The 3D Printed Linear Actuator

Our open source community invites anyone with an idea to build upon the works of those who came before. Many of us have encountered a need to control linear motion and adapted an inexpensive hobby servo for the task. [Michael Graham] evaluated existing designs and believed he has ideas to advance the state of the art. Our Hackaday Prize judges agreed, placing his 3D Printed Servo Linear Actuator as one of twenty winners of our Robotics Module Challenge.

[Michael]’s actuator follows in the footstep of other designs based on a rack-and-pinion gear such as this one featured on these pages, but he approached the design problem from the perspective of a mechanical engineer. The design incorporated several compliant features to be tolerant of variances between 3D printers (and slicer, and filament, etc.) Improving the odds of a successful print and therefore successful projects. Beginners learning to design for 3D printing (and even some veterans) would find his design tips document well worth the few minutes of reading time.

Another useful feature of his actuator design is the 20mm x 20mm screw mounting system. Visible on either end of the output slider, it allows mixing and matching from a set of accessories to be bolted on this actuator. He is already off and running down this path and is facing the challenge of having too many things to share while keeping them all organized and usable by everyone.

The flexible construction system allows him to realize different ideas within the modular system. He brought one item (a variant of his Mug-O-Matic) to the Hackaday + Tindie Meetup at Bay Area Maker Faire, and we’re sure there will be more. And given the thoughtful design and extensive documentation of his project, we expect to see his linear servos adopted by others and appear in other contexts as well.

This isn’t the only linear actuator we’ve come across. It isn’t even the only winning linear actuator of our Robotics Module Challenge, but the other one is focused on meeting different constraints like compactness. They are different tools for different needs – and all worthy additions to our toolbox of mechanical solutions.

A Micro RC Plane Builder Shares His Tricks

There are individuals who push tools, materials, and craftsmanship to the limit in the world of micro RC aircraft, and [Martin Newell] gives some insight into the kind of work that goes into making something like a 1:96 scale P-51 Mustang from scratch. The tiny plane is 100% flyable. It even includes working navigation lights and flashing cannons (both done with 0402 LEDs) and functional, retractable landing gear. It weighs an incredible 2.9 grams. Apart from the battery, everything in the plane was built or assembled from scratch. A video is embedded below.

Continue reading “A Micro RC Plane Builder Shares His Tricks”

El Cheapo Electric Screwdriver

If you have a few hobby servos lying around, here’s a hack that let’s you recycle them and put them to good use. [Kedar Nimbalkar] took a micro servo and converted it into an electric screwdriver. It is simple enough to deserve a short video showing how he did it.

He starts by opening up a 9G micro servo and removing the electronics. All that’s needed is the DC motor and the gears. The two motor wires go directly to the battery via a polarity reversal switch to allow the motor to turn in both directions. The servo horn is cut to size so that it is a tight fit inside the screwdriver socket. A liberal amount of glue is used to make sure it stays in place. The horn is then attached to the modified servo, ready to take interchangeable bits. One last mod before closing up the servo is to convert it to continuous rotation by cutting off the stopper in the drive gear.

He built the power supply from scratch, using a 18650 Li-Po battery, a 5V USB charger, a DPDT switch to allow direction control and a push button to actuate the screw driver. A pair of LED’s connected back to back serve as direction indicators as well as some local illumination.

There’s lot’s of scope to improvise and do everything differently, but the basic premise of using unused servos for a handy electric screwdriver is pretty neat.

Continue reading “El Cheapo Electric Screwdriver”