Cart Cruises Abandoned California Rail

Southern California is known for its nearly perfect year-round climate, excellent surf, and extremely high cost of living, but once you get away from the coast things are radically different. Rural California has huge tracts of land run by the Bureau of Land Management (BLM), which is publicly accessible to anyone willing to venture into the deserts. There’s not much in the way of infrastructure out there, but [Ryan] does have a unique way of traveling through it using abandoned railroad lines and this custom rail cart.

The frame of this cart is simple enough, it’s little more than 2×3 framing with a plywood deck. Some extra support is added for the motor mount and for the seating location. It uses slightly longer go-kart axles to accommodate the width of the railroad, and a small six horsepower gas engine with a single gear to power the rear axle. There are no brakes other than the riders’ shoes, and while this all seems straightforward enough the real hack here is [Ryan]’s custom wheels. He found that steel or cast wheels were not particularly comfortable on long journeys so after a few attempts he has come up with a home-built polyurethane wheel which is cast in a mold around a steel go-cart wheel and then trimmed on a lathe.

For pure exploration, there’s almost no better place to go than the American west thanks to all the public BLM land available. In this cart, you can explore long distances using an extremely low-cost method of transportation. We’ve added another video of [Ryan] exploring this area below the break to show the cart being used, too, but if you’d like a more multipurpose vehicle to use on abandoned rail near you, take a look at this bicycle which is converted to operate on the railroad.

Continue reading “Cart Cruises Abandoned California Rail”

Swiss Army Knife Of Power Tool Carts

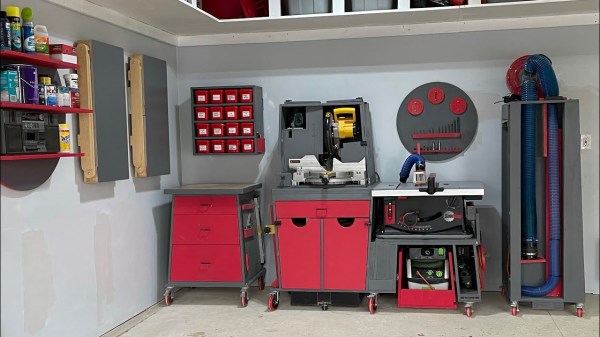
When you’re into woodworking in a serious way, you’re going to eventually want some power tools. With such efficiency of operation, things can go pear-shaped quickly, with wood dust getting absolutely everywhere. It’s not always practical (or desirable) to work outdoors, and many of us only have small workshops to do our making in. But woodworking tools eat space quickly. Centralized extraction is one solution, but all that fixed rigid ducting forces one to fix the tool locations, which isn’t always a good thing. Moveable tool carts are nothing new, we’ve seen many solutions over the years, but this build by [Peter Waldraff] is rather slick (video embedded below,) includes some really nice features in a very compact — and critically — moveable format.

By repurposing older cabinets, [Peter] demonstrates some real upcycling, with little going to waste and the end result looks great too! There is a centralized M-Class (we guess) dust extractor with a removable vacuum pipe which is easily removed to hook up to the smaller hand-held tools. These are hidden in a section near the flip-up planer, ready for action. An auto-start switch for the small dust extractor is wired-in to the smaller tools to add a little ease of use while reducing the likelihood of forgetting to switch it on. We’ve all done that.

For the semi-fixed larger tools, such as the miter and table saws, a separate, higher flow rate moveable dust extractor can be wheeled over and hooked up to the integrated plenum chamber, which grabs the higher volume of dust and chips produced.

A nice touch was to mount the miter saw section on sliding rails.  This allows the whole assembly to slide sideways a little, giving more available width at the table saw for ripping wider sheets. With another little tweak of some latches, the whole miter section can flip over, providing even more access to the table saw, or just a small workbench! Cracking stuff!

Need some help getting good with wood, [Eric Strebel] has some great tips for you! And if you’re needs are simpler and smaller, much much smaller, here’s a finger-sized plane for you.

Continue reading “Swiss Army Knife Of Power Tool Carts”

Custom 3D Printer Cart Hides Clever Features

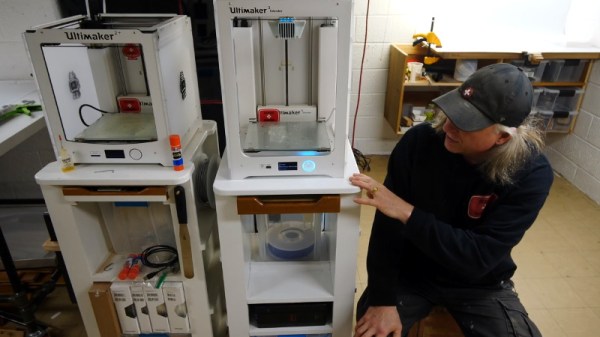
Even if you’ve got a decent sized workshop, there’s only so much stuff you can have sitting on the bench at one time. That’s why [Eric Strebel], ever the prolific maker, decided to build this slick cart for his fairly bulky Ultimaker 3 Extended printer. (Video, embedded below.) While the cart is obviously designed to match the aesthetics of the Ultimaker, the video below is sure to have some useful tips and tricks no matter which printer or tool you’re looking to cart around the shop in style.

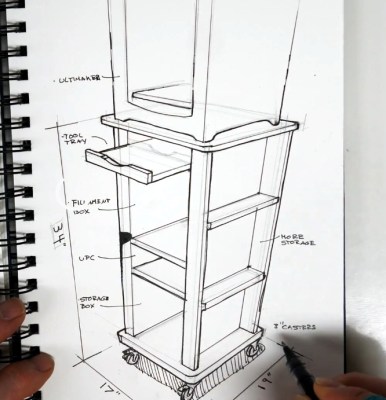
[Eric] made a second video on sketching out the design.
On the surface this might look like a pretty standard rolling cart, and admittedly, at least half of the video is a bit more New Yankee Workshop than something we’d usually be interested in here on Hackaday. But [Eric] has built a number of neat little details into the cart that we think are worth mentally filing away for future projects.

For example, we really liked his use of magnets to hold the plastic totes in place, especially his method of letting the magnets align themselves first before locking everything down with screws and hot glue. The integrated uninterruptible power supply is also a nice touch, as it not only helps protect your prints in the event of a power outage, but means you could even move the cart around (very carefully…) as the printer does its thing.

But perhaps the most interesting element of the cart is that [Eric] has relocated the Ultimaker’s NFC sensors from the back of the printer and into the cart itself. This allows the printer to still read the NFC chip built into the rolls of Ultimaker filament, even when they’re locked safely away from humidity in a sealed box.

Now all you’ve got to do is apply for the loan it will take to pay for all of the MDF you’ll need to build your own version. At this point, we wouldn’t be surprised if encasing your 3D printer in metal would end up being cheaper than using wood.

Continue reading “Custom 3D Printer Cart Hides Clever Features”

All The Games In One Cartridge

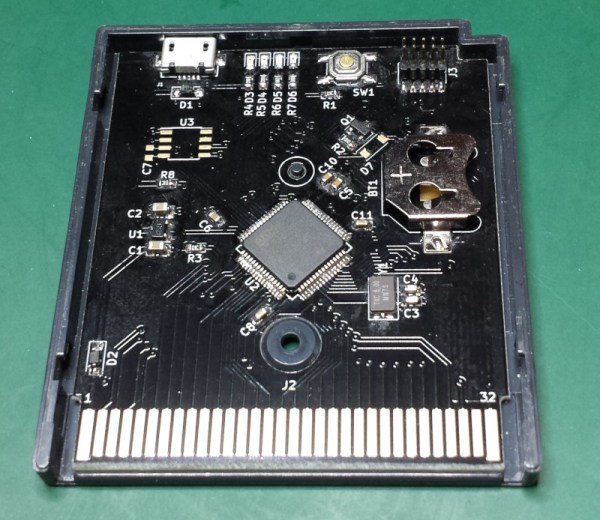
The original Game Boy was a smash success for Nintendo and has an amazing collection of games. You might relive some childhood nostalgia by booting up a Game Boy emulator, but to really get the full experience you’ll need the battery-draining green-tinted original hardware. Thanks to modern technology you can also load all of the games at one time on the original hardware with this STM32 cartridge that fits right in.

The device can load any Game Boy game (and homebrews) and ROMs can be sent to the cartridge via USB. There were are a lot of hurdles to getting this working properly, the largest of which is power management. A normal cartridge has a battery backup for save data, but using a small coin cell to run an STM32 would kill the battery quickly. To get around that, the cartridge writes the states to nonvolatile memory and then shuts itself off, although this has the side effect of crashing the Game Boy.

The creator of this project, [Emeryth], noted that we featured a similar project from [Dhole] a few years ago, also involving an STM32. [Emeryth] decided that it would be fun to build his own project anyway, and it’s certainly an interesting take on GameBoy hacking. He also has the files for this project available on his Git Hub page.

Inverted Pendulum For The Control Enthusiast

Once you step into the world of controls, you quickly realize that controlling even simple systems isn’t as easy as applying voltage to a servo. Before you start working on your own bipedal robot or scratch-built drone, though, you might want to get some practice with this intricate field of engineering. A classic problem in this area is the inverted pendulum, and [Philip] has created a great model of this which helps illustrate the basics of controls, with some AI mixed in.

Called the ZIPY, the project is a “Cart Pole” design that uses a movable cart on a trolley to balance a pendulum above. The pendulum is attached at one point to the cart. By moving the cart back and forth, the pendulum can be kept in a vertical position. The control uses the OpenAI Gym toolkit which is a way to easily use reinforcement learning algorithms in your own projects. With some Python, some 3D printed parts, and the toolkit, [Philip] was able to get his project to successfully balance the pendulum on the cart.

Of course, the OpenAI Gym toolkit is useful for many more projects where you might want some sort of machine learning to help out. If you want to play around with machine learning without having to build anything, though, you can also explore it in your browser.

Continue reading “Inverted Pendulum For The Control Enthusiast”

Scissor Lift Table From The Wood Shop, For The Wood Shop

The value of a mobile adjustable height cart in the shop can’t be overestimated. From moving tools around to installing heavy fixtures on walls and ceiling, a scissor-lift platform is a great tool. Commercial versions get a bit expensive, though, so a shop-built scissor lift table made of wood might be a nice project for the budget-minded to tackle.

Wood might not be your first choice for a fixture such as this, but it’s what [Marius Hornberger] is set up to use, and with proper species selection and careful engineering, it can make for an amazingly sturdy table. [Marius] chose ash for his parts, a wood with a long history of performing well under difficult conditions. The table is not all wood, of course; metal bushings and pins are used in the scissor mechanism, and the lift drive is a stout Acme-thread screw and nut. We’re impressed by [Marius]’ joinery skill, and with how sturdy the table proved to be.

Not a lot of woodworking projects seem to show up in our tip line for some reason, which is a shame. We love to feature wood builds, and like our own [John Baichtal] recently pointed out, the health of the wood shop is often a leading indicator of the health of a hackerspace.

Continue reading “Scissor Lift Table From The Wood Shop, For The Wood Shop”

Bulking Up A Lightweight Lathe With A Concrete Cart

When it comes to machine tools, a good rule of thumb is that heavier is better. A big South Bend lathe or Bridgeport mill might tip the scales at ludicrous weight, but all that mass goes to damping vibration and improving performance. So you’d figure a lathe made of soda cans could use all the help it could get; this cast concrete machine cart ought to fit the bill nicely

Perhaps you’ve caught our recent coverage of [Makercise]’s long and detailed vlog of his Gingery lathe build. If not, you might want to watch the 5-minute condensed video of the build, which shows the entire process from melting down scrap aluminum for castings to first chips. We love the build and the videos, but the lightweight lathe on that wooden bench never really worked for us, or for [Makercise], who notes that he was never able to crank the lathe up to full speed because of the vibrations. The cart attempts to fix that problem the old fashioned way – more mass.

There are a few “measure twice, cut once” moments in the video below, as well as a high pucker-factor slab lift that could have turned into a real disaster. We might have opted for a countertop-grade concrete mix that could be dyed and polished, but that would be just for looks. When all is said and done, the cart does exactly what it was built to do, and there’s even room on it for the shaper that’s next on the build list. We’re looking forward to that.

Continue reading “Bulking Up A Lightweight Lathe With A Concrete Cart”