[JohnAudioTech] noticed there was no bass on the TV at his parents’ house. That led to the discovery of a blown fuse and a corresponding repair. When he opened it up, he could smell that something had gone on in the amplifier. You can follow the repair in the video below.
His first theory was that some glue became conductive and shorted the power rails. We were skeptical, to be honest. When he fed power to it through a current limiter, he could hear a sizzling noise and even see a little glowing from the hot component.
Disassembly ensued. Removing the suspect components showed some seriously burned components and some charring under a switching transistor. The capacitors looked much worse for wear, and the PCB needed some wires to jumper burned conductors.
At the end, there was thumping, so it seems the surgery was a success. However, testing blew a fuse again, which made us nervous. Still, seems to work if you don’t drive it too hard.
We always enjoy watching a teardown, and if there’s a repair too, that’s even better.
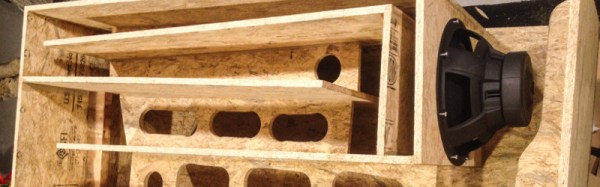
When you go to build a subwoofer box, wood is the most common choice. When it came to his project, though, [Startup Chuck] decided to go a different route entirely. Rather than the usual plywood or MDF, he decided to try Trex decking instead. Why? He had some lying around, and he suspected it might just sound good.
If you’re unfamiliar with it, Trex decking is a composite material made of recycled materials like reclaimed wood and plastic film. The best part, though? Trex decking is twice as dense as MDF. That makes it good for speaker box use because it flexes less and thus absorbs less energy from the subwoofer. [Chuck] walks us through cutting out the parts for the box and the subsequent assembly. Ultimately, it’s not dissimilar from building a speaker box out of wood; the material is simply not that different—just denser.
[Chuck] also puts his new sub through some quick little tests, demonstrating that minimal vibration is passed through to the enclosure itself. He reports that the final build has a “nice, deep sound.” Meanwhile, if you don’t like working with your hands, you could always 3D-print your speaker enclosures instead.
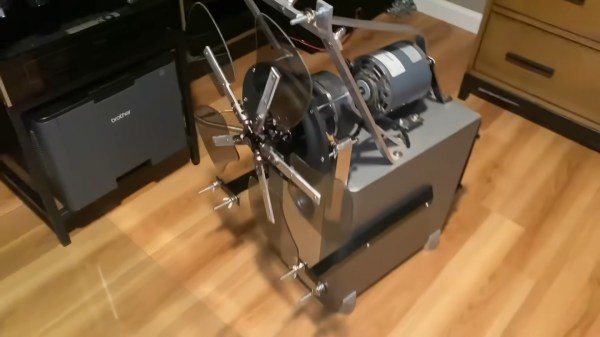
Many movies and songs use a lot of of bass to make it feel more real to the viewer or listener. Because of this, subwoofers are common in high-quality audio setups, often costing a substantial part of the budget. [Daniel Fajkis] takes the subwoofer to it’s logical extreme by building a rotary subwoofer on a $200 budget.
The principle of a rotary subwoofer is that a normal subwoofer physically moves the air, and so does a fan. If you could make a fan oscillate the air instead of only pushing it, you could turn it into such a subwoofer, which is exactly what [Daniel] did. [Daniel] mounts a large electric motor on the case of an ex-subwoofer to spin the fan. Then, he uses the rotor linkage of a model helicopter and a modified subwoofer speaker to pitch the fan blades, spinning around to create a truly impressive gust of air oscillating at as low as 1 Hz.
Is there anything more satisfying than building a useful machine from mostly junk? We think not. [ke4mcl] is a big fan of reusing and repurposing things before settling for the recycle bin, and was in the market for a vibratory parts tumbler to quickly clean off old, rusty bits and bobs in the course of repairing old electronics. For just $10, most of which went into a new tube of RTV silicone, [ke4mcl] built their own tumbler and came away with a reusable amplifier setup in the process.
We’ve all seen speaker cones dance, and they are definitely our favorite way to observe non-Newtonian fluids. This old woofer can still move, so it’s got a second life shaking sand and screws around until they’re somewhat shiny. The ideal woofer for this purpose has a rubber surround — that’s the ring that connects the speaker cone to the frame. [ke4mcl]’s foam-surrounded woofer works just as well, though it may not last as long.
After scrounging a container with a screw-top lid that fits the woofer perfectly, [ke4mcl] joined them together with a bead of RTV silicone. Since there weren’t any amplifiers lying around, [ke4mcl] spent a few bucks on a class D amplifier board and found a spare laptop brick to power it. An old phone with a tone generator app gets the sand churning with a friendly sine wave, which you can see in the videos after the break.
The Samsung PS-WTX500 subwoofer is designed to be used as part of a 5.1 channel home theater system, but not just any system. It contains the amplifiers for all the channels, but they’ll only function when the subwoofer is connected to the matching receiver. [Alejandro Zarate] figured there must be some way to unlock the system’s full functionality without being limited to the original receiver, he just needed to reverse engineer how the subwoofer worked.
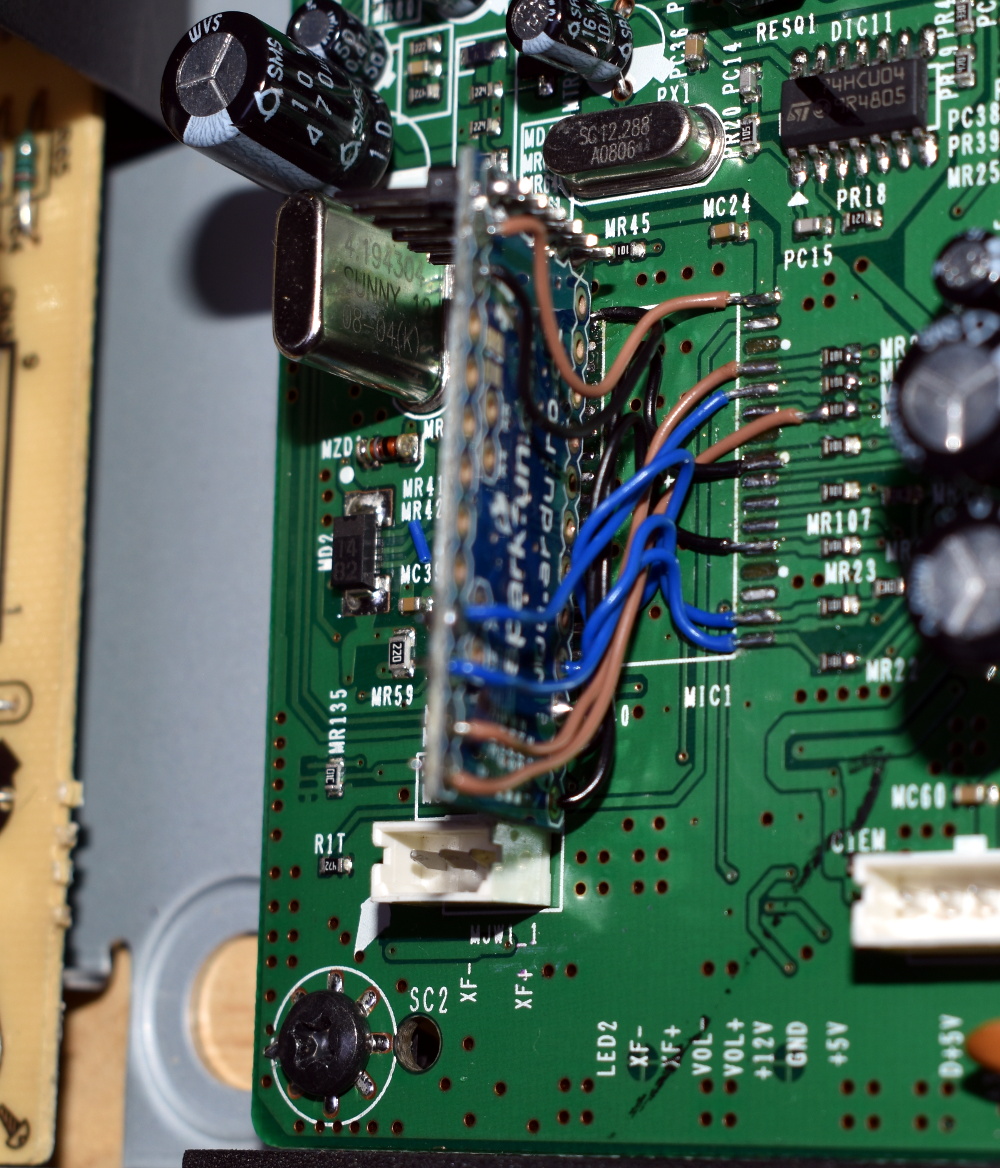
All the wires tuck underneath the Arduino
The result is a fantastically well documented write-up that covers the whole process, starting with how [Alejandro] identified and researched the Pulsus PS9829B Digital Audio Processor (DAP). Documentation for this particular chip seems hard to come by, but he was able to find a similar chip from the same manufacturer that was close enough to put him on the right track. From there, he started studying the SPI communications between the DAP and the subwoofer’s S3P70F4 microcontroller.
After analyzing the communication between the two chips, [Alejandro] pulled the S3P70F4 off the board and wired an Arduino Pro Mini 328 in its place. The Arduino was quite a bit larger than the original microcontroller, but with some careful wiring, he manged a very professional looking installation. Short of coming up with a custom PCB adapter, we don’t think it could look much better.
With some relatively straightforward code and a listing of the captured byte sequences, the Arduino was able to power up the PS-WTX500’s amplifiers and handle the incoming audio signal as a stand-alone device.
Like many of the stories you’ll find on these pages, this one starts with a user being annoyed about their device’s inability to perform a simple task. All [Jay Tavares] wanted was for his Bose Cinemate speakers to turn themselves on and off as needed. It seems like a reasonable enough request, and indeed, is exactly the point of HDMI’s Consumer Electronic Control (CEC) feature. But in this case, it would take a bit of custom hardware to get similar functionality.
Unfortunately, the speakers [Jay] has only support optical audio; so any interoperability with HDMI-CEC (hacked or otherwise) was immediately out the window. Still, he reasoned that he should be able to detect when the TOSLINK audio source is actually active or not, and give the speaker system the appropriate signal to either power on or shut down. You might think this would require some kind of separate stand-alone device, but as it turns out, all the necessary information was available by reverse engineering the connection between the receiver and the subwoofer.
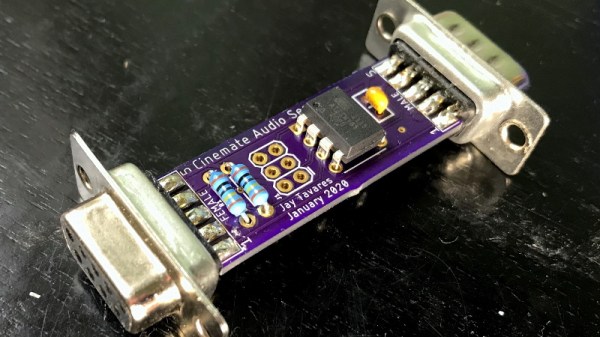
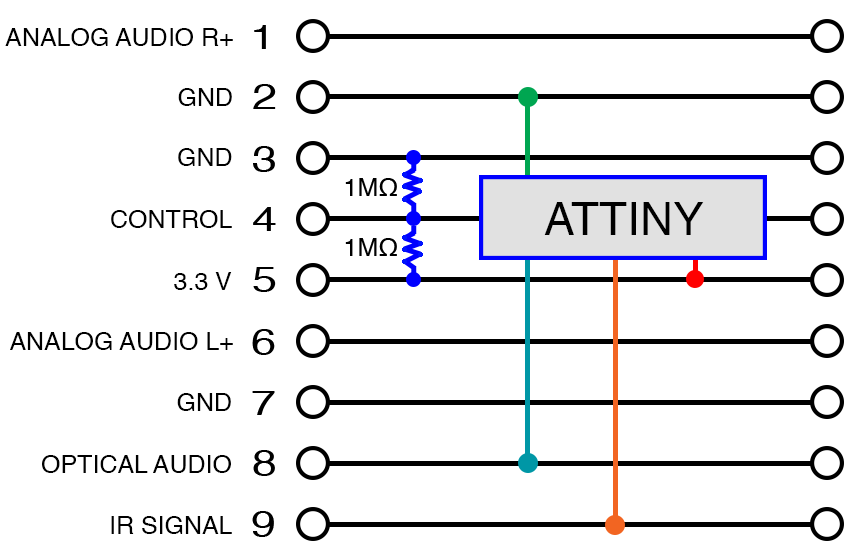
After some investigation, [Jay] found that not only was the content of the TOSLINK audio source being sent over this DB9 cable, but so were the control signals required to turn the system on and off. So he designed a simple pass-through device with an ATtiny85 and a couple passives that latches onto the relevant lines in the cable.
When audio is detected over the optical connection, the MCU will inject the appropriate signals on the control line to simulate the user pressing the “Power” button the remote. When the chip hasn’t detected audio after 10 seconds, it sends the signal to shut the speakers off.
While [Jay] notes he can’t guarantee this works on anything other than the particular Bose Cinemate GS Series II system he has, we’d be willing to bet the concept could be adapted to other models or even brands that use a similar cable to link their principle components. If all else fails, you could always add an ESP8266 to your sound system and control it over WiFi.
If you’re a fan of action movies or dance music, you’ll probably be familiar with sub-bass. The moment in those James Bond explosions that thuds through your chest in the movie theatre? That’s the product of a large subwoofer, a tuned pipe housing a speaker working somewhere just above the lower limit of human hearing, in the tens of Hz.
[Mike’s] TARDIS final buildBut what about sound below the range of human hearing, below 20Hz? You can’t directly hear infrasound, but its presence can have a significant effect on the experience of the listener. [Mike Michaud] was interested in this phenomenon for his home movie setup so built himself an infrasonic subwoofer tuned to 17Hz. Since the resulting cabinet was rather large he disguised it as a vintage UK police telephone box that you’d hardly notice in his basement theater.
A resonant 17Hz speaker horn is a rather inconvenient size for a home theatre, at about 25 feet long. Fortunately there is no need for the horm to be straight, it can be folded into a more convenient enclosure, and that is what [Mike] has done. He used a design published by [lilmike], which folds the horn three times into a more manageable size.
Speaker cabinet construction requires attention to the choice of materials as well as to the driver unit itself, so [Mike] goes into detail on the materials he rejected and his selection of a particular brand of subfloor ply.
He rates the resulting speaker as incredible. His driver is rated for 500 watts but he only has an amplifier capable of serving 100, even with that power he fears for his basement windows. He describes the noise made by the feet of the robots in War Of The Worlds as “little earthquakes” and the general effect as very menacing.
We’ve featured quite a few subwoofers on Hackaday over the years, though with the exception of this rotary device they have mostly been for more conventional sub-bass applications. Here for example is another folded horn. So if sub has become rather run-of-the-mill for you all, how about using it to be entertained by this vortex cannon?


![[Mike's] TARDIS final build](https://hackaday.com/wp-content/uploads/2016/03/infrasound-subwoofer-tardis.jpg)


