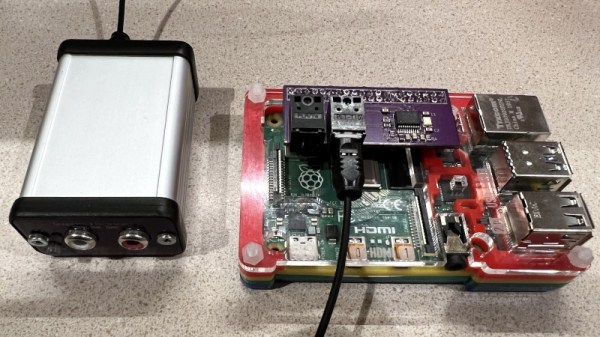
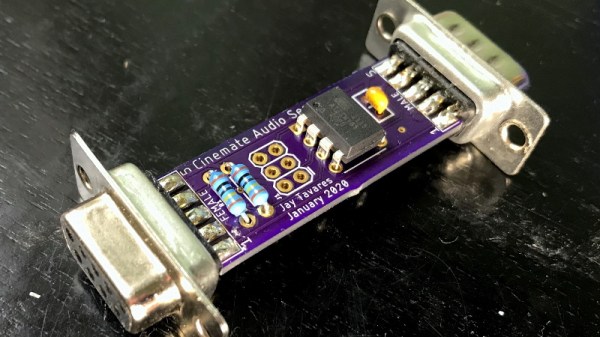
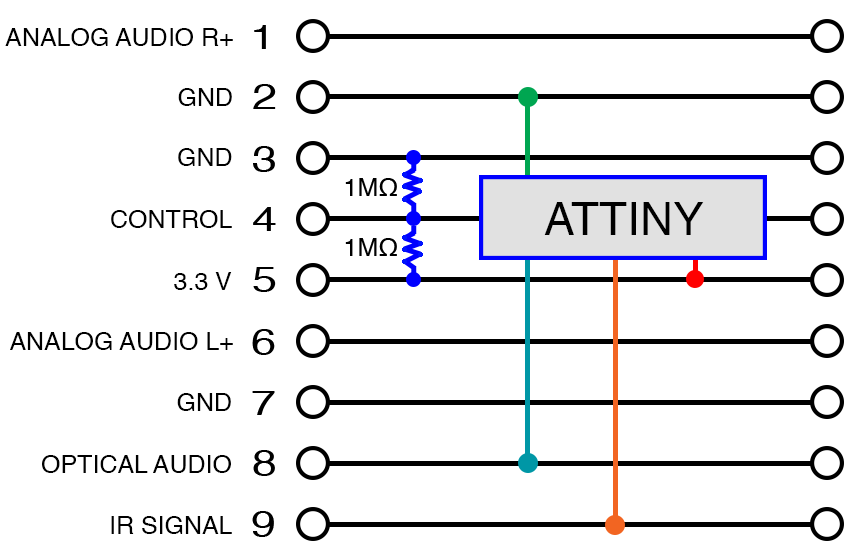
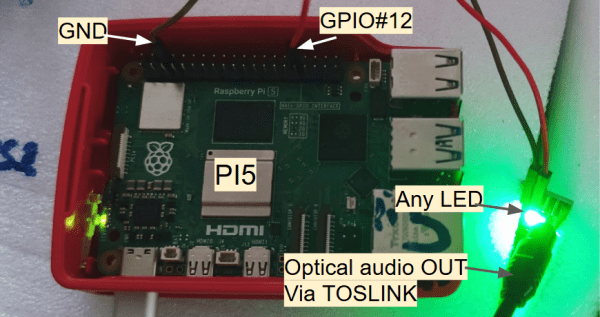
Adding Optical Audio To The Raspberry Pi With One Chip

In the home theater space most people would tell you the age of optical audio, known officially as TOSLINK, is over. While at one time they were the standard for surround sound systems, the fiber cables with their glowing red tips have now been largely supplanted by the all-in-one capabilities of HDMI on new TVs and audio receivers. But of course, that doesn’t mean all that TOSLINK-compatible hardware that’s in the field simply disappears.

If you’re looking to connect a Raspberry Pi to the optical port of your AV system, [Nick Sayer] has you covered. His “TOSLINK Transceiver Hat” utilizes a WM8804 chip from Cirrus Logic to go from the Pi’s I2S audio output to S/PDIF. From there the signal goes directly into the TOSLINK input and output modules, which have the appropriate fiber optic hardware and drivers built-in. All you have to do from a software standpoint is enable a boot overlay intended for a digital-to-analog converter (DAC) from HiFiBerry.

Continue reading “Adding Optical Audio To The Raspberry Pi With One Chip”

Sniffing Signals To Teach Old Speakers New Tricks

Like many of the stories you’ll find on these pages, this one starts with a user being annoyed about their device’s inability to perform a simple task. All [Jay Tavares] wanted was for his Bose Cinemate speakers to turn themselves on and off as needed. It seems like a reasonable enough request, and indeed, is exactly the point of HDMI’s Consumer Electronic Control (CEC) feature. But in this case, it would take a bit of custom hardware to get similar functionality.

Unfortunately, the speakers [Jay] has only support optical audio; so any interoperability with HDMI-CEC (hacked or otherwise) was immediately out the window. Still, he reasoned that he should be able to detect when the TOSLINK audio source is actually active or not, and give the speaker system the appropriate signal to either power on or shut down. You might think this would require some kind of separate stand-alone device, but as it turns out, all the necessary information was available by reverse engineering the connection between the receiver and the subwoofer.

After some investigation, [Jay] found that not only was the content of the TOSLINK audio source being sent over this DB9 cable, but so were the control signals required to turn the system on and off. So he designed a simple pass-through device with an ATtiny85 and a couple passives that latches onto the relevant lines in the cable.

When audio is detected over the optical connection, the MCU will inject the appropriate signals on the control line to simulate the user pressing the “Power” button the remote. When the chip hasn’t detected audio after 10 seconds, it sends the signal to shut the speakers off.

While [Jay] notes he can’t guarantee this works on anything other than the particular Bose Cinemate GS Series II system he has, we’d be willing to bet the concept could be adapted to other models or even brands that use a similar cable to link their principle components. If all else fails, you could always add an ESP8266 to your sound system and control it over WiFi.

Add Fiber-optic Control To Your CNC

CNC machines can be very noisy, and we’re not talking about the kind of noise problem that you can solve with earplugs. With all those stepper motors and drivers, potentially running at high-speed, electrical noise can often get to the point where it interferes with your control signals. This is especially true if your controller is separated from the machine by long cable runs.

But electrical noise won’t interfere with light beams! [Musti] and his fellow hackers at IRNAS decided to use commodity TOSLINK cables and transmitter / receiver gear to make a cheap and hackable fiber-optic setup. The basic idea is just to bridge between the controller board and the motor drivers with optical fiber. To make this happen, a couple of signals need to be transmitted: pulse and direction. They’ve set the system up so that it can be chained as well. Serializing the data, Manchester encoding it for transmission, and decoding it on reception is handled by CPLDs for speed and reliability.

The team has been working on this project for a while now. If you’d like some more background you can check out their original design ideas. Design files from this released version are up on GitHub. A proposed improvement is to incorporate bi-directional communications. Bi-directional comms would allow data like limit-switch status to be communicated back from the machine to the controller over fiber.

This optical interface is in service of an open-source plasma cutter design, which is pretty cool in itself. And if the IRNAS group sounds familiar to you, that may be because we recently ran a story on their ambitious gigabit ethernet-over-lightbeam project.

Teensy Adds S/PDIF To Library

With Arduino library support on an ARM Cortex M4 processor, it’s no surprise that we’re fans of the Teensy 3.1. And lately, [Paul Stoffregen] has been building out the Audio Library for this platform, making it even more appealing to the synth / audio geeks among us. And now, with just the addition of a highfalutin LED and some software, the Teensy can output digital audio over optical fiber.

S/PDIF, and more specifically optical TOSLINK, uses LED light sent down an optical fiber to encode audio data. The advantage of this over any voltage-level signals (like with regular wires) is that the source and destination devices aren’t electrically connected at all, which gets rid of the dreaded ground loop hum and any RF interference.

An S/PDIF audio data stream is a bit complex, but if you’re interested [Micah Scott] has a fantastic dissection of it up on her blog. Of course, you don’t have to know anything about any of that to simply use S/PDIF with the Teensy Audio Library.

We love open source hardware and software because of the collaborations that make ultra-rapid development of niche stuff like this possible. You can follow along with the development of the Teensy’s S/PDIF capabilities on the PJRC forum. Contributor [Frank B] modestly claims that “everything was already on the internet”, but that doesn’t make it any less cool that they got from zero to working library in a few weeks. (And note the clever use of a precomputed lookup table for speed.)

LED_TOSLINK2On the hardware side, [Paul] has posted up his adapter board for a cheap, but very professional looking, optical TOSLINK sender. But if you’re feeling ghetto, you can simply use a red LED pointed just right into the optical cable.

The end result? Lossless transmission of CD-quality audio from an Arduino-esque microcontroller, sent on a beam of light, for less than the cost of a latté.

FPGA Generated SPDIF Output

[Mike Field] just finished implementing SPDIF generation on an FPGA. SPDIF is an industry standard for transmitting digital audio signals; the acronym stands for Sony/Philips Digital Interconnect Format. It’s been around for more than a decade and since it’s found on most home-audio equipment, building an SPDIF output into your projects may be quite a desirable feature. [Mike] mentions several ideas for this functionality like building high-end test equipment, or providing a high-quality output for electronic instruments.

He first jumped into analyzing the specification in order to determine the hardware requirements. Due to some issues with jitter, he found it necessary to use a 100 MHz clock signal. This pushes the jitter down to +/- 5ns of jitter, which he concedes may raise the hackles of audio purists, but does satisfy the published standard. Output requires just one pin of the FPGA and the five components seen above. A hex inverter (74HC04) voltage divider, capacitor, and RCA connector transmit the 0.5V signal to your audio-receiver of choice. Of course, since TOSLINK fiber optic connectors use the same protocol, you could redesign the output and make this an optical connection.