Adding A Riving Knife For Table Saw Safety

What in the world is a riving knife? Just the one thing that might save you from a very bad day in the shop. But if your table saw doesn’t come with one, fret not — with a little wherewithal you can add a riving knife to almost any table saw.

For those who have never experienced kickback on a table saw, we can assure you that at a minimum it will set your heart pounding. At the worst, it will suck your hand into the spinning blade and send your fingers flying, or perhaps embed a piece of wood in your chest or forehead. Riving knives mitigate such catastrophes by preventing the stock from touching the blade as it rotates up out of the table. Contractor table saws like [Craft Andu]’s little Makita are often stripped of such niceties, so he set about adding one. The essential features of a proper riving knife are being the same width as the blade, wrapping closely around it, raising and lowering with the blade, and not extending past the top of the blade. [Craft Andu] hit all those points with his DIY knife, and the result is extra safety with no inconvenience.

It only takes a few milliseconds to suffer a life-altering injury, so be safe out there. Even if you’re building your own table saw, you owe it to yourself.

Continue reading “Adding A Riving Knife For Table Saw Safety”

Internet Of Things Woodworking

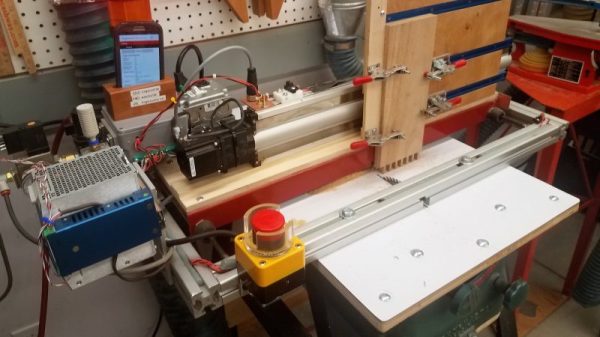
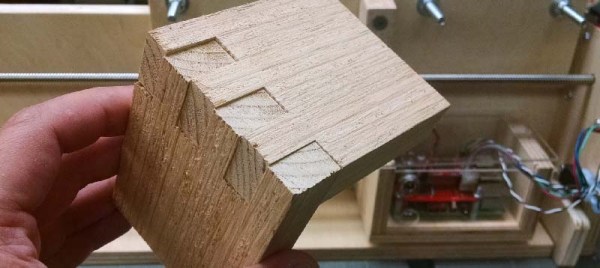
Woodworking is the fine art of building jigs. Even though we have Internet-connected toasters, thermostats, cars, and coffee makers, the Internet of Things hasn’t really appeared in the woodshop quite yet. That’s changing, though, and [Ben Brandt]’s Internet of Things box joint jig shows off exactly what cheap computers with a connection to the Internet can do. He’s fully automated the process of making box joints, all with the help of a stepper motor and a Raspberry Pi.

[Ben]’s electronic box joint jig is heavily inspired by [Matthias Wandel]’s fantastic screw advance box joint jig. [Matthias]’ build, which has become one of the ‘must build’ jigs in the modern woodshop, uses wooden gears to advance the carriage and stock across the kerf of a saw blade. It works fantastically, but to use this manual version correctly, you need to do a bit of math before hand, and in the worst-case scenario, cut another gear on the bandsaw.

[Ben]’s electronic box joint jig doesn’t use gears to move a piece of stock along a threaded rod. Stepper motors are cheap, after all, and with a Raspberry Pi, a stepper motor driver, a couple of limit switches, and a few LEDs, [Ben] built an Internet-enabled box joint jig that’s able to create perfect joints.

The build uses a Raspberry Pi 3 and Windows IoT Core to serve up a web page where different box joint profiles are stored. By lining the workpiece up with the blade and pressing start, this electronic box joint jig automatically advances the carriage to the next required cut. All [Ben] needs to do is watch the red and green LEDs and push the sled back and forth.

You can check out [Ben]’s video below. Thanks [Michael] for the tip.

Continue reading “Internet Of Things Woodworking”

That’s No Moon – That’s A Bamboo Death Star

At first glance, [Frank Howarth]’s turned bamboo Death Star seems like a straight woodworking project. No Arduino controlled lights, no Raspberry Pi for audio clips of an X-wing attack or escaping TIE fighter. In other words: where’s the hack?

It’s a freaking bamboo Death Star!

If that’s not enough for you, check out the pattern on the surface of the finished model. That’s not painted on – those are the layers of the laminated bamboo lumber used to create the rings [Frank] used to form the structure. After lots of turning, sanding and polishing, the characteristic vascular bundles of the bamboo create light and dark panels for a convincing effect of the Death Star’s surface detail. And although we like the natural finish, we can imagine a darker stain might have really made the details pop and made for an effect closer to the original.

Still not hackish enough? Then feast your eyes on [Frank]’s shop. It’s a cavernous space with high ceilings, tons of natural light, and seemingly every woodworking machine known to man. While the lathe and tablesaw do a lot of the work for this build, the drool-worthy CNC router sees important duty in the creation of the multiple jigs needed for the build, and for making the cutout for the superlaser, in what must have been a tense moment.

Bamboo is an incredible material, whether for fun builds like this or for more structural uses, like a bamboo bike. All this bamboo goodness puts us in the mood to call on [Gerrit Coetzee] for a new installment on his “Materials You Should Know” series.

Continue reading “That’s No Moon – That’s A Bamboo Death Star”

Hackaday Links: May Day, 2016

Humble Bundle is a great way to fill up your Steam library – just pay what you want, and get some indie video games. The Humble Bundle is much more than video games, because No Starch Press just put up a bundle of books on hacking. No, there are no books about wearing balaclavas and using laptops with one hand. I haven’t written that book yet. There’s some choice books in this bundle, including [Bunnie]’s Hacking the XboxAutomate the Boring Stuff with Python, and Practical Malware Analysis.

The Raspberry Pi camera – the $25 add-on webcam that plugs directly into the Pi – is getting an upgrade. The original camera was a five Megapixel sensor that was EOL’d at the end of 2014. The Raspberry Pi foundation bought up a lot of stock, but eventually there would be a replacement. The new sensor is a Sony IMX219 eight Megapixel deal, available at the same price. We assume a NoIR version without the IR filter will be released shortly.

Here’s a little hardware review that doesn’t quite merit a full post. The Raspberry Pi Zero is great, and will be even better once production ramps up again and stock lands in warehouses. One problem with the Zero is the lack of USB ports, leading to at least two Hackaday posts with the exact same headline, ‘Yet Another Pi Zero USB Hub‘. Obviously, there’s a market for an easy to use USB hub for the Zero, and this company is stepping up to fill the need. The killer feature here is the use of pogo pins to tap into the USB differential lines, power and ground pads on the bottom of the Pi Zero. The USB hub is based on the popular FE 1.1 4-port USB hub controller, giving the Pi Zero four USB 2.0 ports. Does it work? Yeah, and it’s only $10. A pretty neat little device that will be very useful when Pi Zeros flood workbenches the world over.

It was announced in 2014, released in 2015, but the STM32F7 hasn’t seen a lot of action around these parts. A shame, because this is the upgrade to the famously powerful STM32F4 microcontroller that’s already capable of driving high-resolution displays through VGA, being an engine control unit for a 96 Ford Aspire, and being a very complex brushless motor driver. The STM32F7 can do all of these and more, and now ST is cutting prices on the F7’s Discovery Board. If you’re looking for a high-power ARM micro and don’t need to run Linux, you won’t do better elsewhere.

Need to reflow a board, but don’t have a toaster oven? Use a blowtorch! By holding a MAPP blowtorch a foot away from a board, [whitequark] was able to successfully reflow a large buck converter. There’s a lot of water vapor that will condense on the board, so a good cleaning afterward is a good idea.

A few weeks ago, [Mr. LeMieux] built a 360 degree, all-metal hinge. He’s been up to something a little more dangerous since then: building piles of mini table saws. Small table saws are useful for miniatures, models, and the like. [Mr. LeMieux]’s table saw is a piece of CNC’d aluminum, with a bearing and saw arbor that attaches to an electric drill. Dangerous, you say? Not compared to the competition. Behold the worst forty dollars I’ve ever spent. This Horror Freight mini table saw is by far the worst tool I’ve ever used. The bed was caked with streaky layers of paint, uneven, the blade wasn’t set at 90 degrees, and the whole thing was horrifically underpowered. Trust me when I say the CNC electric drill version is safer.

Hackaday Links: March 6, 2016

There’s the R2 Builders Club, hundreds of people are building BB-8, but there are a few robots that don’t get enough love from the amateur propsmiths. [Kenneth] just finished up his build of Crow from MST3K. He built Tom Servo a year or so ago and K-9 from Doctor Who. The beautiful thing about building MST3K robots and Doctor Who props is that you’re probably working with a larger budget than the prop department had.

Heathkit’s new website is up. The two products we know about so far – an AM radio kit and a slim jim antenna – can only be described as, ‘meh.’ Still, there are a few upgrades for old kits available and the requisite amount of nostalgia.

On today’s issue of, ‘should not be attempted by anyone, ever, under any circumstance’ here’s how to build a table saw at home. Yes, it’s a table saw built from a piece of aluminum, styrofoam, hot glue, and a shoe box. The guy really botched it by not going for the zero clearance insert here, but at least the fence is only a few dozen degrees off parallel with the blade.

[Mathieu] is working on a Mooltipass Mini. It’s tiny and the scroll wheel thingy makes things fun.

March 18th through March 20th is the Midwest RepRap Festival in Goshen, Indiana. This is, by far, the best conference, meetup, or festival we go to year after year. We’ll have a few members of the Hackaday crew at the event, and rumor has it the Internet has made it to Indiana this year.

Adafruit got a writeup in the New Yorker. The article is technically about the art of PCB design, but as with most general interest pieces on electronics it is awash in non sequiturs and simply defining the terminology.

[Oscar] built a miniature replica of a blinkenlight computer last year for the Hackaday Prize. This was the PiDP-8/I. While it looks awesome, the PDP-8/I is inherently limited. [Oscar] has his design methodology down, and now he’s working on a miniature replica of the king of the PDPs. It’s the PiDP-11/27. It’s just a prototype and render now, but the finished project will have custom switches, a handsome bezel, and will be much more capable.

MAME is now FOSS. That’s great news, but think about the amount of work that went into making this happen. MAME is 19 years old, and  that means everyone who has contributed to the project over the years needed to sign off on this initiative.

Circular Saw + Innovative Fence = Unique DIY Table Saw

A table saw is often the first machine the aspiring woodworker wants for the shop. But even a lightweight contractor’s saw is not cheap, and a really good cabinet saw is both expensive and incredibly heavy. And any table saw is an intimidating machine that can liberate your fingers from your hand in a trice. Looking for a solution to all of these problems, [Seumas] has come up with a unique table saw conversion for a circular saw that improves safety and lowers the barrier to table saw ownership.

Flipping a low-cost circular saw upside down and attaching it to a table is old hat – we’ve seen plenty of examples of that before, including this recent post. Where [Seumas]’s idea shines is in the integration of the fence and the table. A typical fence needs to stay perfectly parallel to the blade while being dead square to the table, but still needs to be moved to adjust the width of cut. In [Seumas]’s design, the fence is fixed to the table, and the whole table slides left and right on high-pressure laminate rails. In theory, the fence will never go out of true, and the width of cut can be a lot wider than the typical table saw – an impressive 3 feet to the right of the blade.

As for safety, [Seumas] shows off quite a selection of DIY attachments in the video after the break. He builds his own Lexan blade guard, anti-kickback pawls, and stock hold-downs. Add in the little touches like shop-made clamps for locking the table, extending outfeed support, and built-in dust collection, and you can make yourself a pretty capable machine at the fraction of the cost of buying.

Continue reading “Circular Saw + Innovative Fence = Unique DIY Table Saw”

wood bowl cutting

Making A Wooden Bowl Without A Lathe

Typically, when creating a wooden bowl a crafts person would do so on a lathe. A chunk of wood would be bolted to the head stock and the bottom of the bowl turned to an appropriate shape. Then the half-bowl-shaped wood is flipped around on the lathe so that the material on the inside of the bowl can be removed. This traditional method of bowl turning requires a lathe, turning tools, and the serious technique and skill required for the task.

The master maker of weird wood working tools, [Izzy], decided to make a wooden bowl without the use of a lathe. He created a unique fixture to cut the shape of the bowl on a table saw, a piece of equipment that is a bit more common for the average DIYer to have. The fixture itself is made of wood and supports a standard hand drill in a vertical position. The soon-to-be bowl is bolted to the drill and hovers just above the table saw blade. The table saw is turned on and the fixture allows the work piece to rock back and forth creating the bowls outside shape. The drill rotates the piece so that the contours are consistent around the bowl.

The bowl is then flipped over and re-attached to the drill. This time to cut the inside of the bowl, the fixture is locked in the vertical position and the wood is dropped straight down on the spinning blade while being rotated. The saw blade cuts a perfectly hemispherical cavity in the wood. The final bowl looks great after a little sanding and an application of oil. Check out the video after the break.

This isn’t the first time [Izzy’s] projects have been here on Hackaday, check out his DIY Band Saw and Wooden Sphere Cutter.

Continue reading “Making A Wooden Bowl Without A Lathe”