Adding Optical Audio To The Raspberry Pi With One Chip

In the home theater space most people would tell you the age of optical audio, known officially as TOSLINK, is over. While at one time they were the standard for surround sound systems, the fiber cables with their glowing red tips have now been largely supplanted by the all-in-one capabilities of HDMI on new TVs and audio receivers. But of course, that doesn’t mean all that TOSLINK-compatible hardware that’s in the field simply disappears.

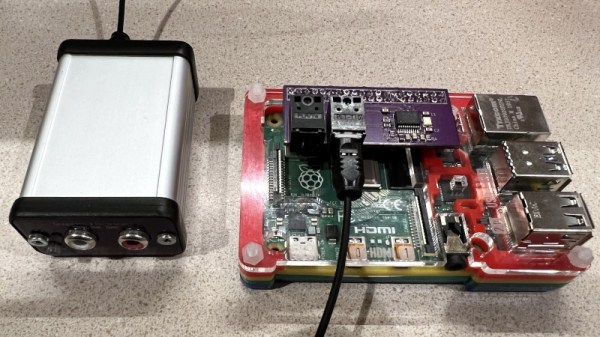
If you’re looking to connect a Raspberry Pi to the optical port of your AV system, [Nick Sayer] has you covered. His “TOSLINK Transceiver Hat” utilizes a WM8804 chip from Cirrus Logic to go from the Pi’s I2S audio output to S/PDIF. From there the signal goes directly into the TOSLINK input and output modules, which have the appropriate fiber optic hardware and drivers built-in. All you have to do from a software standpoint is enable a boot overlay intended for a digital-to-analog converter (DAC) from HiFiBerry.

Continue reading “Adding Optical Audio To The Raspberry Pi With One Chip”

My Major Is Gaming…

Times have changed. You can now take a university class in writing games. In fact, YOU can now take a university class about writing games because [Dave Churchill] of Memorial University has put all 22 of his lectures up for your enjoyment. [Dr. Churchill] isn’t planning on releasing the assignment files, but you can still get a lot from watching the videos. Apparently, the classes were also live streamed on Twitch.

The games build on SFML so the resulting games can be portable. The library abstracts input, graphics, sound, and networking.

Continue reading “My Major Is Gaming…”

Guitar Pickguard Adds MIDI Capabilities

For a standard that has been in use since the 1980s, MIDI is still one of the most dominant forces on the musical scene even today. It’s fast, flexible, and offers a standard recognized industry-wide over many different types of electronic instruments. Even things which aren’t instruments can be turned into musical devices like the infamous banana keyboard via the magic of MIDI, and it also allows augmentation of standard instruments with other capabilities like this guitar with a MIDI interface built into the pick guard.

[Ezra] is the creator of this unique musical instrument which adds quite a few capabilities to his guitar. The setup is fairly straightforward: twelve wires run to the pick guard which are set up as capacitive sensors and correspond with a note on the chromatic scale. Instead of using touchpads, using wires allows him to bend away the “notes” that he doesn’t need for any particular piece of music. The wires are tied back to an Adafruit Feather 32u4 microcontroller behind the neck of the guitar which also has a few selectors for changing the way that the device creates tones. He can set the interface to emit single notes or continuously play notes, change the style, can change their octave, and plenty of other features as well.

One of the goals of this project was to increase a guitar player’s versatility when doing live performances, and we would have to agree that this gives a musician a much wider range of abilities without otherwise needing a lot of complex or expensive equipment on stage. We’ve seen a few other MIDI-based builds focused on live performances lately, too, like this one which allows a band to stay in sync with each other.

Continue reading “Guitar Pickguard Adds MIDI Capabilities”

Cardboard Vs. Laser Shootout: A Tale Of Speed And Power Settings

You probably already know that cardboard is versatile, but that goes far beyond the corrugated stuff. There are many types of cardboard out there, some of which you may not even be aware of. In the video after the break, [Eric Strebel] goes through them all and pits each one against his 50 W water-cooled laser with air assist, making a nice reference for himself in the process.

The point of this shootout is to find the optimum speed and power settings for each of these materials using a free power versus speed file. [Eric] almost always runs the thing somewhere between 10% and 50% power, so that’s the range represented here. He’s looking for two things: the settings that leave the least amount of kerf (make the thinnest cut line) and make the cleanest cuts without producing a lot of residue.

[Eric] divided his contestants into three weight classes, the heavyweights being butter board, chip board, mat board, and illustration board All of these are thicker than 1mm. On the middleweight roster, you have railroad board, 4-ply Bristol board, and stencil board, and all of these are under 1mm thickness. Finally, we have the lightweights — yupo paper and 300 series Bristol board, both of which are less than ½ mm thick.

To test their model-making capabilities, [Eric] made a cube out of each material. Once the glue is dry, he peels off the painter’s tape and goes through the various pros and cons of them all. Be sure to check it out after the break.

Of course, you don’t have to hit up the art store to have fun with cardboard — just visit your recycling bin and mix up some cardboard pulp for sculpting and molding.

Continue reading “Cardboard Vs. Laser Shootout: A Tale Of Speed And Power Settings”

A home-made colorimeter

Classic Colorimeter Clone Calibrates Cuvettes’ Contents

For anyone dabbling in home chemistry, having access to accurate measurement equipment can mean the difference between success and failure. But with many instruments expensive and hard to find, what’s a home chemist to do? Build their own equipment, naturally. [Abizar] went ahead and built himself a colorimeter out of wood and spare electronic components.

A colorimeter (in a chemistry context) is an instrument that determines the concentration of a solution by measuring how much light of a certain wavelength is absorbed. [Abizar]’s design was inspired by the classic Klett-Summerson colorimeter from the 1950s, which uses a light bulb and color filters to select a wavelength, plus a photoresistor to measure the amount of light absorbed by the sample. Of course, a more modern solution would be to use LEDs of various colors, which is exactly what [Abizar] did, although he did give it a retro touch by using an analog meter as the readout device.

The body of the colorimeter is made from laser-cut pieces of wood, which form a rigid enclosure when stacked together. The color wheel holds eleven different LEDs and is made with a clever ratchet mechanism to keep it aligned to the cuvette, as well as a sliding contact to drive current into the selected LED. All parts are painted black to prevent stray reflections inside the instrument, but also make it look cool enough to fit in any evil genius’s lab. In the video embedded below, [Abizar] demonstrates the instrument and shows how it was put together.

While we haven’t seen anyone make their own colorimeter before, we have seen DIY spectrophotometers (which measure the entire absorption spectrum of a solution) and even building blocks to make a complete biochemistry lab.

Continue reading “Classic Colorimeter Clone Calibrates Cuvettes’ Contents”

Twin jet engines mounted on tank treads

Big Wind Is The Meanest Firefighting Tank You Ever Saw

As the Iraqi army retreated at the end of the first Gulf War, they took the term “scorched Earth policy” quite literally. Kuwaiti oil wells were set alight en masse, creating towering infernos that blackened the sky.

As it turns out, extinguishing a burning oil well is no easy feat. In the face of this environmental disaster, however, a firefighting team from Hungary made a name for themselves out on the desert sands, astride a jet-engined tank named Big Wind.

Continue reading “Big Wind Is The Meanest Firefighting Tank You Ever Saw”

A small touchscreen displaying the Runbox GUI

Touchscreen-Powered USB Hub Selectively Powers Down Devices

One of the most useful features of the Universal Serial Bus is its hot-plugging capability. You simply plug in your device, use it, and unplug it when you’re done. But what if you’ve got a huge number of USB devices? You might not want to use all of them all of the time, but repeatedly unplugging and re-plugging them is inconvenient and wears out the connectors. [Matt G] fixed this problem by building the RUNBOX: a USB hub that can be controlled through a touchscreen.

The USB hub part consists of a Yepkit YKUSH 3, which is a USB 3.1 hub that support software-controlled disconnecting of devices. [Matt] hooked up a Raspberry Pi to its ports so that it could switch devices on and off through a software command. To make it more user-friendly he added a touch screen controller and created an app using the Electron framework. This allowed him to enable or disable separate devices with a single touch: turn on the mic and webcam for video-conferencing, or fire up the VR headset and game controller for a gaming session.

A USB hub in a laser-cut wooden enclosure
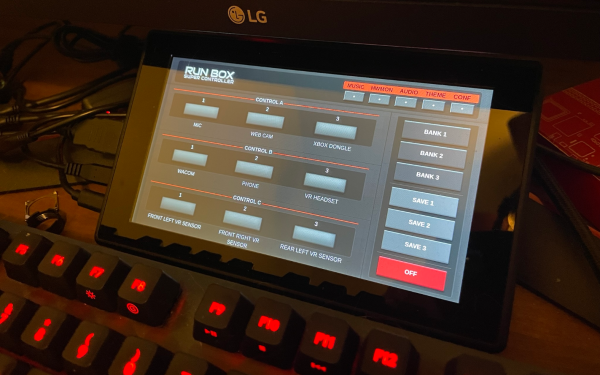
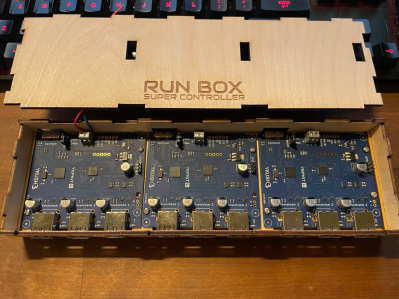
The modified USB hub is housed in a laser-cut enclosure with plenty of space to hook up a variety of USB devices. The touchscreen neatly fits just above [Matt]’s keyboard; this setup was inspired by head-down displays used in aircraft which similarly use a small additional screen for peripheral functions.

Although we’ve seen switchable USB hubs before, they usually require you to either press a manual switch or run dedicated software on your PC. We’ve also seen other sleek builds combining a Raspberry Pi with a USB hub.