USB And The Myth Of 500 Milliamps

If you’re designing a universal port, you will be expected to provide power. This was a lesson learned in the times of LPT and COM ports, where factory-made peripherals and DIY boards alike had to pull peculiar tricks to get a few milliamps, often tapping data lines. Do it wrong, and a port will burn up – in the best case, it’ll be your port, in worst case, ports of a number of your customers.

Want a single-cable device on a COM port? You might end up doing something like this.

Having a dedicated power rail on your connector simply solves this problem. We might’ve never gotten DB-11 and DB-27, but we did eventually get USB, with one of its four pins dedicated to a 5 V power rail. I vividly remember seeing my first USB port, on the side of a Thinkpad 390E that my dad bought in 2000s – I was eight years old at the time. It was merely USB 1.0, and yet, while I never got to properly make use of that port, it definitely marked the beginning of my USB adventures.

About six years later, I was sitting at my desk, trying to build a USB docking station for my EEE PC, as I was hoping, with tons of peripherals inside. Shorting out the USB port due to faulty connections or too many devices connected at once was a regular occurrence; thankfully, the laptop persevered as much as I did. Trying to do some research, one thing I kept stumbling upon was the 500 mA limit. That didn’t really help, since none of the devices I used even attempted to indicate their power consumption on the package – you would get a USB hub saying “100 mA” or a mouse saying “500 mA” with nary an elaboration.

Fifteen more years have passed, and I am here, having gone through hundreds of laptop schematics, investigated and learned from design decisions, harvested laptops for both parts and even ICs on their motherboards, designed and built laptop mods, nowadays I’m even designing my own laptop motherboards! If you ever read about the 500 mA limit and thought of it as a constraint for your project, worry not – it’s not as cut and dried as the specification might have you believe.
Continue reading “USB And The Myth Of 500 Milliamps”

DIY Power Station Puts Ryobi Batteries To Work

Anyone with a few cordless tools has probably amassed quite a collection of batteries for them. If you’re a professional contractor, having a fleet of batteries you can swap out during the day’s work is a necessity. But if you’re just doing the occasional DIY project, those batteries are probably going to sit unused more often than not.

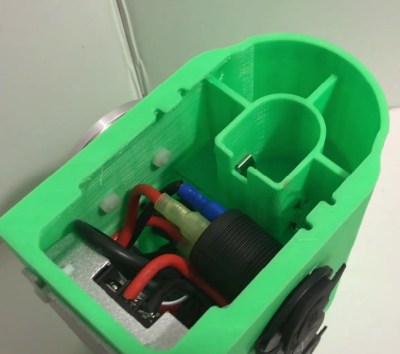
Looking to find alternative uses for his growing collection of Ryobi batteries, [Chris Nafis] has come up with a portable power station design that lets him put all that stored energy to use. With support for multiple charging standards and even an integrated work light, this device would be perfect to have around for power outages or to take with you on a camping trip.

Ryobi standardized on an 18 V battery a while back, so [Chris] is using a 10 A DC-DC buck converter to step that down to a more generally useful 12 V. From there he’s got a standard “cigarette lighter” automotive power connector which offers compatibility with a wide range of mobile devices such as small inverters or mobile radios. There’s also dual 2.4 USB “A” ports and a Quick Charge 3.0 compatible USB-C port for charging your mobile gadgets.

As an aside, this project is an excellent example of how powerful 3D printing can be when building your own hardware. Trying to make an interface for a Ryobi battery, without sacrificing a tool as a donor anyway, would be maddeningly difficult with traditional at-home manufacturing methods. But with a pair of calipers and a bit of time in your CAD package of choice, it’s possible to design and build an exact match that works like the real thing.

Which incidentally should make adapting the design to other battery types relatively easy, though editing STLs does pose its own set of unique challenges. A future improvement to this project could be making the battery interface a separate piece that can be swapped out instead of having to reprint the entire thing.

Continue reading “DIY Power Station Puts Ryobi Batteries To Work”

Self-Charging Jacket Eliminates Forgetfulness

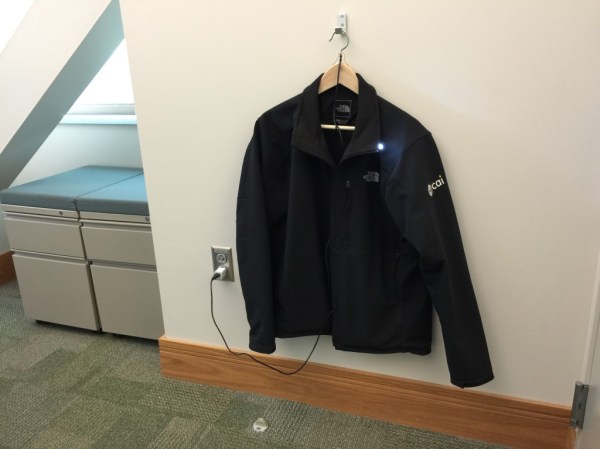
Certain parts of the Northern Hemisphere are very, very cold right now. For those of us living in these colder climates, [Aaron] has a simple yet effective hack for keeping your hands warm when you go out for a walk in the brisk cold. He’s wired his jacket up for USB charging so he can make sure his hand warmers are always working.

[Aaron] bought a set of handwarmers that conveniently charge over USB, but he always forgot to actually plug them in once he got home, ensuring that they were always dead. To make his forgetfulness a non-issue, he built the USB charger for the handwarmers into his jacket, but he didn’t just run a wire out of the pocket. The USB charging circuit runs through the coat hanger, using some conductive cloth and steel thread in the inside of the jacket’s shoulders. From there, the cloth makes contact with the metal arms of the hanger and runs out of the hanger to the wall outlet.

This is a great cold-weather hack that might help any forgetful people on the north side of the planet keep warm. You could even use this method to charge batteries used in other wearable electronics. This project is a great reminder that sometimes the best hacks are the simple ones that no one’s thought of yet!

Game Boy With Lithium Batteries And USB

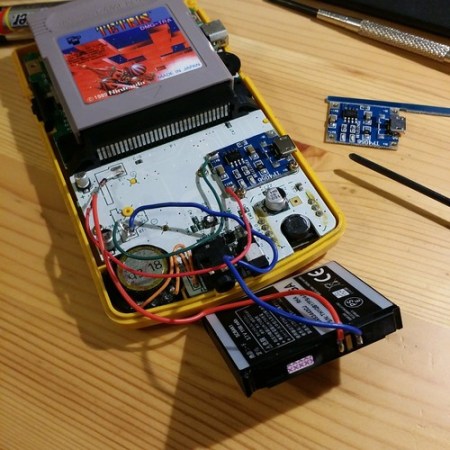
[Alan] procured a few Game Boys from a Yahoo auction with the intent of using them for some other projects, but one of the Game Boys was shipped with a very corroded battery which had eaten up one of the terminals. When [Alan] had repaired it, he was left with a Game Boy with no battery terminal at all, so he decided to splice in some lithium-ion batteries.

Not only does the Game Boy now have a new battery pack, but [Alan] was able to source a USB charger to handle the batteries’ charging needs. However, he realized that his battery pack was 3.7 volts, while the Game Boy only needed 3 volts. To lower the voltage of the battery pack to the required voltage, [Alan] grabbed a 1N4148 diode and put it in series with the battery pack, which also helps prevent any accidental reverse polarity.

This isn’t the most technically advanced Game Boy hack we’ve ever seen but it’s great to see new life breathed into these classic video game systems. Not to mention that [Alan] saved some lithium batteries from the landfill!