DIY TSA Backscatter Body Scanner

[Ben Krasnow] built his own version of the TSA’s body scanner. The device works by firing a beam of x-rays at at target. Some of the beam will go through the target, some will be absorbed by the target, and some will reflect back. These reflected x-rays are called ‘backscatter‘, and they are captured to create an image.

In [Ben]’s setup a rotating disk focuses x-rays into beams that travel in arcs across the X-axis. The disk is moved along the Y-axis to fill in the scan. On the disk assembly, there is a potentometer to measure the y-axis position of the beam, and an optical sensor to trigger an oscilloscope, aligning the left and right sides of the image. Using these two sensors, the scope can reconstruct an X-Y plot of the scan.

To detect the x-rays, a phosphorous screen turns the backscattered x-rays into visible light, and a photo-multiplier amplifies the light source. A simple amplifier circuit connects the photo-multiplier to a scope, controlling the brightness at each point.

The result is very similar to the TSA version, and [Ben] managed to learn a lot about the system from a patent. This isn’t the first body scanner we’ve seen though: [Jeri Ellsworth] built a microwave version a couple years ago.

The impressive build does a great job of teaching the fundamentals of backscatter imaging. [Ben] will be talking about the project at EHSM, which you should check out if you’re in Berlin from December 28th to the 30th. After the break, watch [Ben]’s machine scan a turkey in a Christmas sweater.

Continue reading “DIY TSA Backscatter Body Scanner”

Pulse Oximeter Displays Blood Oxygen Levels On A PC

The last time you were in the emergency room after a horrible accident involving a PVC pressure vessel, a nurse probably clipped a device called a pulse oximeter onto one of your remaining fingers. These small electronic devices detect both your pulse and blood oxygen level with a pair of LEDs and a photosensor. [Anders] sent in a great tutorial for building your own pulse oximeter using a fancy ARM dev board, but the theory behind the operation of this device can be transferred to just about any microcontroller platform.

The theory behind a pulse oximeter relies on the fact that hemoglobin absorbs red and infrared light differently based on its oxygenation levels. By shining a red and IR LED through a finger onto a photoresistor, it’s possible to determine a person’s blood oxygen level with just a tiny bit of math.

Of course a little bit of hardware needs to be thrown into the project; for this, [Anders] used an EMF32 Gecko starter kit, a great looking ARM dev board. After connecting the LEDs to a few transistors and opamps, [Anders] connected his sensor circuit to the ADC on the Gecko board. From here it was very easy to calculate his blood oxygen level and even display his pulse rate to a PC application.

Yes, for just the price of a dev board and a few LEDs, it’s possible to build your own medical device at a price far below what a commercial pulseox meter would cost. FDA approval not included.

Kickstarter Incurs The Wrath Of Arduino Creator

[Massimo], one of the creators of the Arduino, is a little perturbed over what passes for the truth over on Kickstarter.

While [Massimo] does recognize that Kickstarter can be a force of good launching garage-designed projects into the hands of willing consumers, he noticed something was a little fishy with the recent smARtDUINO kickstarter (notice the capital letters, by the way). Right near the top of the smARtDUINO’s kickstarter page is the phrase, “For years we manufactured the ARDUINO in Italy. Now we created a new Open System: modular, scalable, the world’s cheapest and smallest!”

Being at the top of the Arduino organization, you’d think [Massimo] would have heard of these former Arduino manufacturers. The name didn’t ring a bell to him, so he called up the factory. No one at the factory had heard of them, and after a long search it was finally revealed the head of the smARtDUINO project hired two factory workers who worked for a supplier the official Arduino manufacturer uses.

[Massimo] makes the comparison of, “if he hires two factory workers from Ford he can claim he used to manufacture Ford cars.” We’re thinking that’s a little generous. It’s more like hiring two people who used to restock the vending machines in a Foxconn plant and claiming you used to build Apple computers.

With a simple trademark infringement on his hands, [Massimo] contacted Kickstarter to see what could be done. Kickstarter replied:

Thanks for writing in and bringing this to our attention. This is a matter that must be taken up directly with the project creator. You can contact them by clicking “Contact me” on the project page.
Best,
Kickstarter

For [Massimo], and us, that’s just not a sufficient answer. We’re thinking Kickstarter has an obligation to vet their projects and make sure the creators of these projects are who they say they are.

But enough about what we think. What do you, the Hackaday reader, think about this situation?

[Prusa]’s Nozzle Prints Polycarbonate, PEEK, & Nylon

Oh, we’ve been sitting on this one for a while.

[Josef Prusa], brainchild behind what is probably the most popular 3D printer, has just unleashed a new hot end that is capable of printing objects in polycarbonate, PEEK, and nylon.

This new hot end is completely made out of stainless steel – there are no plastic parts made out PTFE or PEEK to keep the heat from transferring up to the extruder. Because the Prusa Nozzle can print these plastics, it’s also now possible to print parts for other hot ends such as the J Head and the Budaschnozzle.

We ran into [Prusa] at NYC Maker Faire a few months ago, and he was kind enough to go over the advancements in his new nozzle and new i3 printer. So far, it looks like the lack of a PEEK insulator isn’t doing the new hot end any harm – [Prusa] has left molten plastic in the nozzle for a few hours and nothing bad has come of it.

You can check out the interview below.

[youtube=www.youtube.com/watch?v=fzFpMZE366Q]

Again, thanks to [Prusa] for granting us an interview and providing some free advertising for Hackaday’s hosts for the NYC Maker Faire. Before you complain about the delay in getting this interview out to you, don’t worry; I slapped a few Makerbot stickers on the back of [Prusa]’s jacket. Everything’s cool.

Hola! From A Spanish Speaking Drawing Arm

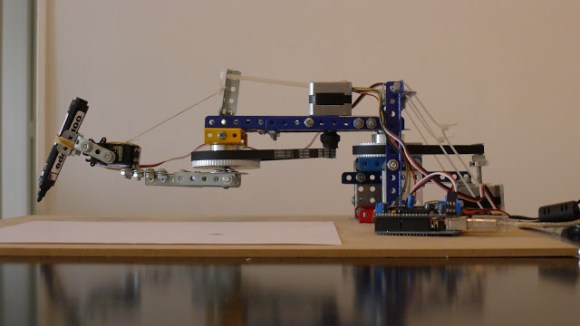
[Acorv] wrote in to tell us about his latest hack, a robotic arm that writes with a marker. In the video after the break, the arm is set to copy whatever someone writes in a touchpad. As you might guess from this video, the hack is written up in Spanish, but it’s nothing your favorite translator can’t handle if you don’t speak the language.

This robot it the result of improvements on his first drawing arm ‘bot featured here. The basic kinematics stayed the same in the arm’s second iteration, but the resolution was greatly improved by using belts to achieve a gear reduction. The second build also features mechanical reinforcement with an Erector-set style building set known as [Mekanex].

A simple hobby servo moves the marker up or down, and control is achieved through, you guessed it, an Arduino with a motor shield! Although from a different time, the way this arm is used is reminiscent of a mechanical writing automaton from long ago. Continue reading “Hola! From A Spanish Speaking Drawing Arm”

Electronically Augmented Foosball Brings Competition To The Office

This office has a Foosball league that automatically tallies and posts the standings for each employee. This is thanks to all of the extra electronics that were added to the Foosball table in the break room.

The system is connected to the internet via WiFi. This allows it to store the final results of each game for use on the leader board. Player first identify themselves to the system using the RFID tag embedded in their employee badge (normally used to open doors in the building). From there the game play proceeds much like you’d expect, but the scoring is handled automatically. Each goal has a laser pointed across it which is broken when the ball passes through. But there are a pair of arcade buttons in case of a scoring error.

Standings are listed at the webpage linked above. There’s even functionality for new employees to registers through this page. Don’t miss a glimpse of the build in the clip after the break.

Continue reading “Electronically Augmented Foosball Brings Competition To The Office”

LEGO LP Player

This LP player is made entirely out of LEGO parts. It plays the songs encoded on each record, but not by using a stylus in a groove. Instead, each LP has a color code on the bottom of it which is interpreted by the optical sensors underneath.

In addition to its functionality [Anika Vuurzoon] made sure that the build looked the part. The horn is a nice touch, but you’ll also appreciate the rotating mini-figures on the front side of the base. To the right there is a hidden door that provides access to the NXT brick which drives the system. New records are produced using a couple of different tools. First off, the song is written using Finale, a mature musical notation program. That is exported and run through a second program which produces the colored disc design which is applied to the records. You can hear the songs for yourself in the clip after the break.

If LP playing toys are right up your alley you’ll want to check out this 3D printed record hack for a Fisher Price toy.

Continue reading “LEGO LP Player”