Automatic Book Scanner To Bring Knowledge To Ethiopian Students

In 2013 the dean of an Ethiopian university addressed Maker Faire Hannover and outlined one of his concerns; that the high price of developed-world textbooks was holding back the cause of education for universities such as his own in developing countries. He was there to ask for help from the maker community to solve his problem, and a group of his audience took up the challenge to create an affordable and accessible automatic book scanner.

Their scanner builds on the work of Google engineer [Dany Qumsiyeh], whose open source linear book scanner turns pages by traversing the opened book over a triangular prismic former such that pages are turned by vacuum as they pass over carefully designed slots in its surface. Their modification replaces the vacuum with the Coandă effect, to more gently tease open each page and it is hoped reduce the chance of damaging the volumes being scanned.

The whole machine is controlled by a Raspberry Pi, and the scanning is performed by linear scanning optics, sensors, and electronics taken from flatbed scanners.

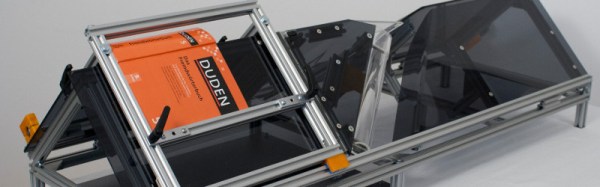
An important design goal of the project was to ensure that the scanner could be built without special tools or expertise that might be difficult to find in a developing country, as well as that it should be as inexpensive as possible. The frame of the machine is off-the-shelf extruded aluminium, and the body is acrylic sheet which can be cut to shape with a hand saw if necessary. It is estimated that the device will cost in the region of 500 Euros (about $568) to build.

More information can be found at the project’s web site (German language, Google translate link), including a selection of videos such as the one below the break showing the device in operation.

Writing from the perspective of having been peripherally involved in a professional book scanning operation at a large publisher the benefits of this machine are immediately apparent. Removing the binding and automatically scanning each page as an individual sheet produces a very fast and high quality result, but by its very nature damages the volume being scanned. This machine promises to deliver a solution to the problem of book scanning that is considerably less intrusive.

It is also worth noting that the project does not address any copyright issues that might arise from scanning commercially published textbooks, though this is more of a concern for the end user in terms of what they scan with it than it is for the maker.

Continue reading “Automatic Book Scanner To Bring Knowledge To Ethiopian Students”

Home Automation And Monitoring With Edison

[Tyler S.] has built a home automation and monitoring system dubbed ED-E, or Eddie. The name is an amalgam of its two main components, the Edison board from Intel, and some ESP8266 modules.

ED-E’s first job is to monitor the house for extraordinary situations. It does this with a small suite of sensors. It can detect flame, sound, gas, air quality, temperature, and humidity. With this array, it’s probably possible to capture every critical failure a house could experience, from burglars to water pipe leaks. It uploads all this data to Intel’s Analytics Cloud where we assume something magical happens to it.

ED-E can also sense the state of other things in the house, such as doors, with remote sensors. The door monitors, for example, are an ESP8266 and a momentary switch in a plastic case with a lithium ion battery. We’re not sure how long they’ll run, but presumably the Analytic Cloud will let us know if the battery is low via the aforementioned magic.

8728871444406519500_small
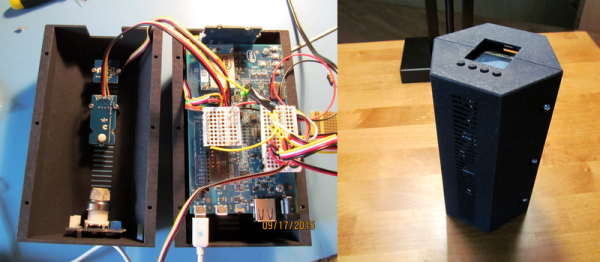
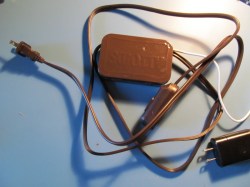
Lastly, ED-E, can turn things in the house on and off. This is accomplished in 100% Hackaday-approved (if not UL-approved) style with a device that appears to be a lamp cable fed into a spray painted Altoids tin.

ED-E wins some style points for its casing. It’s a very well executed hack, and we’d not previously considered just how many awful situations can be detected with off the shelf sensors.

Chromecast Vintage TV Is Magic

When [Dr. Moddnstine] saw a 1978 General Electric TV in the trash, he just had to save it. As it turned out, it still worked! An idea hatched — what if he could turn it into a vintage Chromecast TV?

He opened up the TV and started poking around inside. We should note that old TV’s are pretty dangerous to open up if you’re not familiar with the components inside — high-voltages that could kill you linger on some capacitors. [Dr. Moddnstine] didn’t go into too much detail, so do a little extra research before you open up a TV.

Part of his goal for this project was to keep everything self-contained within the TV so all you would have to do is plug it into the wall in order to use it. Since the TV is so old, it doesn’t even have an analog RCA connections for a video input — just a VHF input. Because of this he needed to use three separate connection adapters to get the video signal to the TV.

Continue reading “Chromecast Vintage TV Is Magic”

3D Printing Houses From Concrete

We’ve seen 3D-printed houses before, but most make use of prefabricated chunks. This hurricane and tornado resistant hotel suite in the Philippines was printed in one shot.

Sound familiar? This is the work of [Andrey Rudenko], who started by building a concrete 3D printer in his garage 2 years ago, moved on to 3D printing his kids a concrete castle in his backyard later that year and now appears to have a full-blown company offering commercial 3D printed houses. Way to go [Andrey]!

The building was designed in Sketchup no less, and the printer makes use of Pronterface for the control software. It’s absolutely fascinating to see this built at full-scale. We want one. Continue reading “3D Printing Houses From Concrete”

128 LEDs, 5 Buttons, IR Comm, And A Few Hours: What Could You Create?

When the second band had played its last encore, before the legendary DJ took the stage, a cadre of hardware hackers climbed three steps with a twinkle in their eyes and glowing electronics in their hands. I’m surprised and relieved that the nugget of excitement that first led me to twiddle a byte in a microcontroller is still alive, and this moment — this crossroads of hacker family — stirred that molten hot center of adventure in everyone.

The badge hacking demoscene is a welcoming one. No blinking pixel is too simple, and no half-implemented idea falls short of impressing everyone because they prove the creativity, effort, and courage of each who got up to share their creation. How could we ever get together as a community and not do this?

It was after midnight before we began the demoparty. I somehow managed to come to the Hackaday | Belgrade conference without a USB webcam to use as a top-down camera. I also didn’t line up someone to record with a camera until minutes before. Please forgive our technical difficulties — we first tried to use a laptop webcam to project to the bigscreen. When that failed, focusing on the badges because tough for our ad-hoc camera operator. This video is a hack, but I think it’s worth looking past its tech problems.

The crowd gathered as close to the stage as possible and there was electricity in the audience as the wiles of the day were explained. Join me after the break for a brief rundown of each demo, along with a timestamp to find it in the video.

Continue reading “128 LEDs, 5 Buttons, IR Comm, And A Few Hours: What Could You Create?”

Hackaday Dictionary: Ultrasonic Communications

Say you’ve got a neat gadget you are building. You need to send data to it, but you want to keep it simple. You could add a WiFi interface, but that sucks up power. Bluetooth Low Energy uses less power, but it can get complicated, and it’s overkill if you are just looking to send a small amount of data. If your device has a microphone, there is another way that you might not have considered: ultrasonic communications. Continue reading “Hackaday Dictionary: Ultrasonic Communications”

Mrs. Penny’s Driving School — Hardware Workshop In Dallas

In case you haven’t noticed, the Hackaday community is making more of an effort to be a community AFK. We’re at VCF East this weekend, have the Hackaday World Create Day quickly approaching, Hackaday | Belgrade a few days ago, and Hackaday Toronto next week just to name a few in close proximity to this post.

As promised, or threatened, depending on which end of the stick you’re on I will be teaching an electronics class at the Dallas Makerspace every 3rd Saturday of the month. The goal of these classes is to help you overcome the barrier between a hardware idea and having that hardware in your hand. I’m not an expert in PCB design or layout, but I’ve found more ways to do it wrong than I’d probably admit too and this is my way of sharing what I’ve painfully learned through trial and error. At the time of writing this article there are still a few spots available in the first class, follow the above link for tickets.

Images of my failed hopes and dreams wonderfully captured courtesy of [Krissy Heishman]

Class 1

In our first 6 hour session we’ll take a basic, high-level idea and work our way down. For example: our first project will be an AVR development board. This is something common enough that everyone will know what it is (an Arduino is an AVR development board, just in case my mom is reading this). We won’t be making an Arduino clone part-for-part but taking the Arduino idea and making it our own custom board. Maybe we add some terminal blocks instead of DuPont headers or perhaps we want a real time clock and a slide potentiometer on the board. We can do that if we want, you can’t stop us.

So class number 1 is a crash course in Eagle schematic capture and PCB layout. Since this is only 6 hours worth of class time and we need to have boards and parts ordered when we leave we won’t be getting too complicated with our design.

Class 2

By the time we meet for our second session we should have taken delivery of our shiny new PCBs and our parts order should have long since been delivered from the distributor (Mouser is more or less an hour drive from the Dallas Makerspace, not that we’ll pick the parts up at will-call for this project, but it’s nice to have the option). We will spend the second 6 hour session assembling and testing our boards. If we need to make changes to our boards we can talk about that as a part of the design process. Depending on how long assembly takes we can brainstorm some ideas for the next round of Mrs. Penny’s Driving School classes which will continue the following 3rd Saturday of the month.