Model Rocket Launcher Is So Serious, It Has A Briefcase

What could be more thrilling than launching a complex rocket that you built yourself? For starters, launching it with literally anything better than the stock ignition system would be a step in the right direction. How about a briefcase full of fantastically fun overkill?

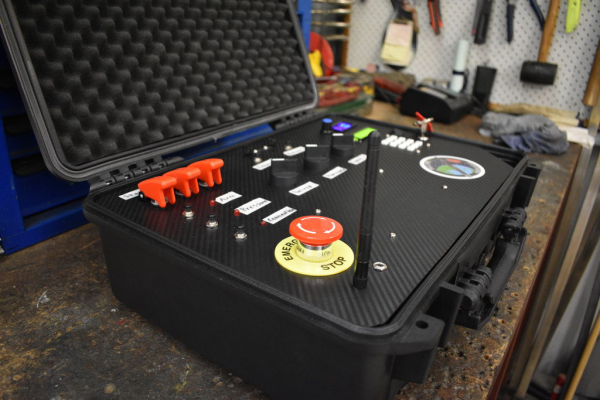
[FastEddy59] is in the middle of building a model rocket complete with a Thrust Vector Control (TVC) system to help with stabilization. Much to our delight, he’s designed an equally ambitious controller to spice up the launch sequence with security codes and a physical key. And what’s a launch controller without a giant emergency stop button to shut down everything? Incomplete, if you ask us.

Under the carbon fiber-wrapped acrylic hood, there’s an Arduino MEGA engine and an NRF24 LoRa module for transmission to the rocket. There’s even a DHT11 temperature sensor to verify that launch conditions are ideal. It’s still a work in progress with plenty of features to come, like fancier labels and plenty of launch-appropriate sound files for the hidden speaker. There’s a lot to this case, and [FastEddy59]’s video brief is ready and waiting on the pad after the break.

[FastEddy59] plans to hold the first launch in a few months, and we sincerely hope he outfits the rocket with a camera.

Continue reading “Model Rocket Launcher Is So Serious, It Has A Briefcase”

Z80 Computer Is Both Arduino And Shield

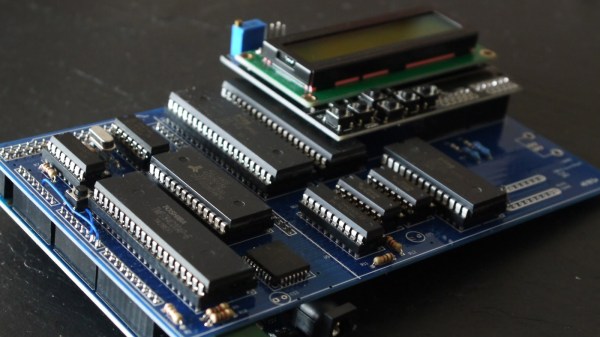
There have been plenty of Z80 computer builds here on Hackaday, but what sets them apart is what you do with them. [Andrew] writes in with his Z80 single-board computer made from scratch, using the Arduino standard headers for its I/O. In turn, since he needed an easy way to program the flash memory which holds the software to run on the Z80, he used an Arduino Mega as a debugger, making the SBC an Arduino shield itself.

Using such a common header pinout for the Z80 computer allows it to be used with a variety of readily-available Arduino shields. This compatibility is achieved with an analog-digital converter and a 3.3 V regulator, mimicking the pins found in an Arduino Uno. The code, available on GitHub, includes an extensive explanation and walkthrough over the process in which the Mega takes over the bus from the Z80 to function as a fully-featured debugger. Programs can be loaded through embedding an assembly listing into the Mega’s sketch, or, once the debugger is up you can also upload a compiled hex file through the serial connection.

This isn’t the first time [Andrew] has been featured here, and his past projects are just as interesting. If you need to translate a Soviet-era calculator’s buttons into English, hack a metallurgical microscope or even investigate what’s that Clacking Clanking Scraping Sound, he’s the one you should call.

Plucky Kalimba Plays Itself

[Gurpreet] fell in love with the peaceful, floaty theme from the Avatar series and bought a kalimba so he could hear it resonate through his fingertips. He soon realized that although it’s nice to play the kalimba, it would be a lot cooler if it played itself. Then he could relax and enjoy the music without wearing out his thumbs.

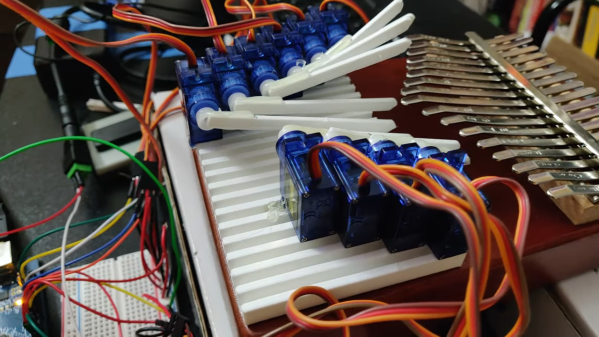
After doing a bit of experimentation with printing tine-plucking extensions for the servo horns, [Gurpreet] decided to start the design process by mounting the servos on a printed base. The servos are slotted into place by their mounting tabs and secured with hot glue. We think this was a good choice — it’s functional and it looks cool, like a heat sink.

[Gurpreet]’s future plans include more servos to pluck the rest of the tines, and figuring out how feed it MIDI and play it real time. For the demo after the break, [Gurpreet] says he lapel mic’d the kalimba from the back and cut out the servo noise with Audacity, but ultimately wants to figure out how to quiet them directly. He’s going to try lubing the gears and making a sound-dampening enclosure with foam, but if you have any other ideas, let him know down below.

We don’t see too many kalimba projects around here, but here’s one connected to a Teensy-based looper.

Continue reading “Plucky Kalimba Plays Itself”

Busy Box Beats Baby’s Boredom

We would love to be a fly on the wall Christmas morning to see [Wilksyonreddit]’s kid tear the paper off of this adult-level busy box. Can you imagine the unbridled glee? It should certainly make the arduous six-month build worth the trouble. Here’s hoping the walls are sturdy, because we predict they will be bounced off of.

This gift that keeps on giving has an Arduino MEGA clone inside and a couple of shift registers to deal with all those buttons and switches. In addition to all the buttons, switches, and the number pad, there are two 3D-printed touch sensor pads that can detect little fingers up to four inches away. Although he’s already built a few games and activities for it, [Wilksy] posted this in r/duino looking for more ideas. There’s a lot to work with here on baby’s first nuclear missile launch console, both input- and output-wise. We humbly suggest 4D Simon, though we must admit to fantasizing about MIDI controllers.

Hidden inside this Christmas present is an Easter egg we think you’ll appreciate. Enter the right code, and the box becomes a treasure trove of Back to the Future sound effects and audio clips. Video’s after the break, McFly.

This box would make a great Kerbal Space Program controller, too, like this one.

Continue reading “Busy Box Beats Baby’s Boredom”

Open-Source Arm Puts Robotics Within Reach

In November 2017, we showed you [Chris Annin]’s open-source 6-DOF robot arm. Since then he’s been improving the arm and making it more accessible for anyone who doesn’t get to play with industrial robots all day at work. The biggest improvement is that AR2 had a closed-loop control system, and AR3 is open-loop. If something bumps the arm or it crashes, the bot will recover its previous position automatically. It also auto-calibrates itself using limit switches.

AR3 is designed to be milled from aluminium or entirely 3D printed. The motors and encoders are controlled with a Teensy 3.5, while an Arduino Mega handles I/O, the grippers, and the servos. In the demo video after the break, [Chris] shows off AR3’s impressive control after a brief robotic ballet in which two AR3s move in hypnotizing unison.

[Chris] set up a site with the code, his control software, and all the STL files. He also has tutorial videos for programming and calibrating, and wrote an extremely detailed assembly manual. Between the site and the community already in place from AR2, anyone with enough time, money and determination could probably build one. Check out [Chris]’ playlist of AR2 builds — people are using them for photography, welding, and serving ice cream. Did you build an AR2? The good news is that AR3 is completely backward-compatible.

The AR3’s grippers work well, as you’ll see in the video. If you need a softer touch, try emulating an octopus tentacle.

Continue reading “Open-Source Arm Puts Robotics Within Reach”

Captivating Clock Tells Time With Tall Tubes

Time is probably our most important social construct. Our perception of passing time changes with everything we do, and when it comes down to it, time is all we really have. You can choose to use it wisely, or sit back and watch it go by. If you want to do both, build a clock like this one, and spectate in sleek, sophisticated style.

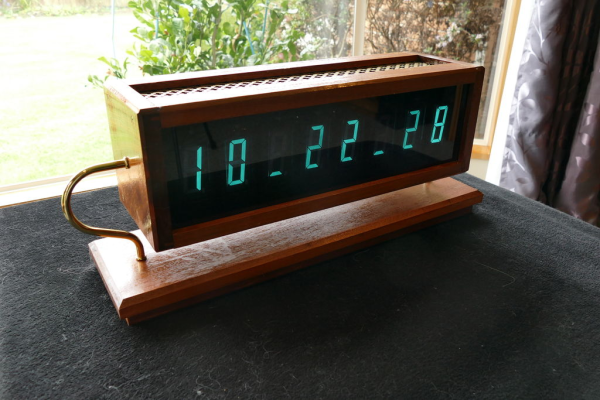
[ChristineNZ]’s mid-century-meets-steampunk clock uses eight ILC1-1/8Ls, which are quite possibly the largest VFD tubes ever produced (and still available as new-old stock). In addition to the time, it displays the date, relative humidity, and temperature in both Celsius and Fahrenheit. A delightful chime sounds every fifteen minutes to remind you that time’s a-wastin’.

The seconds slip by in HH/MM/SS format, each division separated by a tube dedicated to dancing the time away. The mesmerizing display is driven by an Arduino Mega and a MAX6921 VFD driver, and built into a mahogany frame. There isn’t a single PCB in sight except for the Mega — all the VFDs are mounted on wood and everything is wired point-to-point. Sweep past the break to see the progressive slideshow build video that ends with a demo of all the functions.

Those glowing blue-green displays aren’t limited to clocking time. They can replace LCDs, or be scrolling marquees.

Continue reading “Captivating Clock Tells Time With Tall Tubes”

Square Laser Harp Is Hip

You know, we hadn’t realized how tired we were of vertical laser harps until we saw [Jonathan Bumstead]’s entry into the 2019 Hackaday Prize. It’s all well and good to imitate the design of the inspiring instrument. But the neat thing about synths is that they aren’t confined to the physics of the acoustic instruments they mimic. This project elevates the laser harp into functional sculpture territory. It’s a piece of art that produces art.

And this art harp is entirely self-contained, with built-in MIDI, amplifier, and speakers. The brains of this beauty are an Arduino Mega and an Adafruit music maker shield, which give it twenty different instrument voices. Each of the six layers has two lasers, two mirrors, and two photo-resistors mounted in the corners of the plywood skeleton. The lasers and photo-resistors are mounted back to back in opposite corners, with mirrors in the other two corners to complete the paths. [Jonathan] cleverly diffused the laser light with milky slivers of film canister plastic.

This isn’t [Jonathan]’s first optical rodeo. Previous experience taught him the importance of being able to readjust the lasers on the fly, because every time he moved it, the laser modules would go out of alignment. This time, he built kinematic mounts that let him reposition the lasers using four screws that each push a corner.

There are a lot of nice touches here, especially the instrument selector wheel. [Jonathan] explains it and the rest of the harp in a fantastic demo/build video that’s just burning a hole in the space after the break.

Continue reading “Square Laser Harp Is Hip”