Improve CD Sound By Shaving?

We always enjoy the odd things that people do to try to get better audio reproduction. Exotic cables, special amplifiers, and higher resolution digitization come to mind.  Most of this is dubious, at best, but [Techmoan] brings up something we must have missed back in the day: shaving CDs with a gadget that was marketed as the “CD Sound Improver.” The theory is that bad CD reproduction comes from light scatter of the laser. The solution, according to the maker of this vintage equipment, is to cut a 36-degree bevel to act as a light trap. You can see the gadget in the video below.

The device claims it reduced vibration, improved audio, and even helped DVDs playback better video. As you might imagine, this has little hope of actually working. The box is essentially a motor-driven turntable, a razor blade, and a port for a vacuum cleaner to suck up the mess. You were told to color the edge with a marker, too.

Continue reading “Improve CD Sound By Shaving?”

CD Image Via Twitter: A Handcrafted Game Disc

Humans can turn anything into a competition. Someone always wants to be faster or drive a ball farther. Technical pursuits are no different, which is why a lot of people overclock or play regular expression golf. [Alok Menghrajani] sets himself some odd challenges. A few years ago, he hand-built a bootable floppy image that had a simple game onboard and managed to fit it in a Twitter message. Twitter has increased their number of characters, so — you guessed it — this time he’s back with a CDROM image.

His tweet is a command line that starts with perl. The text is base64-encoded binary and if you run the Tweet from a shell — which is an odd thing to do with a Tweet, we grant you, you’ll be rewarded with a file called cd.iso. You could burn that to a CDROM, but it is more likely you’ll just mount in a virtual machine and boot that. [Alok] says it does work in QEMU, VirtualBox, and — yes — even a real CD.

Continue reading “CD Image Via Twitter: A Handcrafted Game Disc”

The Raspberry Pi Becomes A SCSI Device

SCSI devices were found in hundreds of different models of computers from the 80s, from SUN boxes to cute little Macs. These hard drives and CDROMs are slowly dying, and with that goes an entire generation of technology down the drain. Currently, the best method of preserving these computers with SCSI drives is the SCSI2SD device designed by [Michael McMaster]. While this device does exactly what it says it’ll do — turn an SD card into a drive on a SCSI chain — it’s fairly expensive at $70.

[GIMONS] has a better, cheaper solution. It’s a SCSI device emulator for the Raspberry Pi (original link dead, here’s the new location of this writeup). It turns a Raspberry Pi into a SCSI hard drive, magneto-optical drive, CDROM, or an Ethernet adapter using only some glue logic and a bit of code.

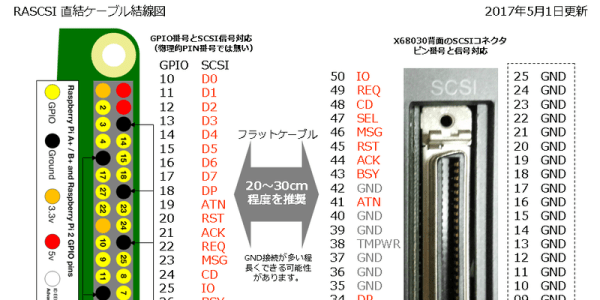
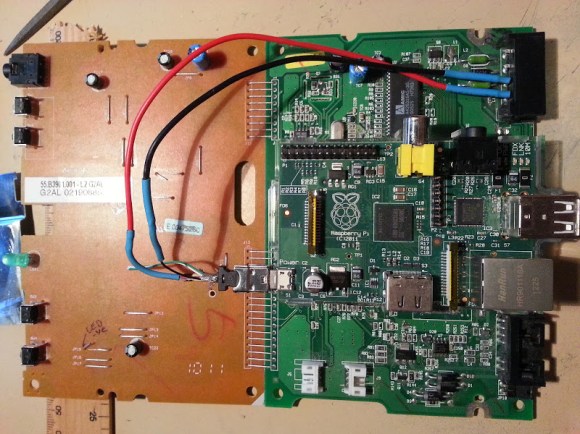
As far as the hardware goes, this is a pretty simple build. The 40-pin GPIO connector on the Pi is attached to the 50-pin SCSI connector through a few 74LS641 transceivers with a few resistor packs for pullups and pulldowns. The software allows for virtual disk devices – either a hard drive, magneto-optical drive, or a CDROM – to be presented from the Raspberry Pi. There’s also the option of putting Ethernet on the SCSI chain, a helpful addition since Ethernet to SCSI conversion devices are usually rare and expensive.

Officially, [GIMONS] built this SCSI hard drive emulator for the x68000 computer, developed by Sharp in the late 80s. While these are popular machines for retrocomputing aficionados in Japan, they’re exceptionally rare elsewhere — although [Dave Jones] got his mitts on one for a teardown. SCSI was extraordinarily popular for computers from the 70s through the 90s, though, and since SCSI was a standard this build should work with all of them.

If your retrocomputer doesn’t need a SCSI drive, and you’re feeling left out of the drive-emulation club, the good news is there’s a Raspberry Pi solution for that, too: this Hackaday Prize entry turns a Pi into an IDE hard drive.

Thanks [Gokhan] for the tip!

A Truly Classy Metal-Framed Mini CNC

We’ve seen a number of DVD- and CDROM-based small CNC machines here, but few are as simply beautiful as this one by [julioberaldi] over on Instructables (translated from Portuguese here).

fbis2gciv0ajsdxWe’ll cut to the chase; it’s the frame. Cut from steel sheet scraps with a hacksaw, and welded or soldered together with “bar solder”. It looks like a lot of sanding, painting, and polishing went on. The result is something we’d be proud to have on our desk.

For now, it simply draws with a pen. But watch the video, embedded below, and you’ll see that it runs exceptionally smoothly. If we’re reading the Instructable right, the next step is to turn this into a CNC cutter. We can’t wait to see where the project goes from here.

Continue reading “A Truly Classy Metal-Framed Mini CNC”

Laser PCB Exposer Built From CD-ROM Drives

[Neumi] has built a CNC Laser using CD-ROM drives as the X and Y motion platforms. The small 405nm laser can engrave light materials like wood and foam. The coolest use demonstrated in the video is exposing pre-coated photo-resist PCBs.

With $61 US Dollars (55 Euro) for the Arduino, stepper drivers, and a laser in the project, [Nuemi] got a pretty capable machine after adding a few parts from the junk bin. He wanted to avoid using existing software in order to learn the concepts behind a laser engraver. In the end, he has a working software package which can send raster scans to an Arduino mega. The mega then controls the sync between the stepper and laser firings. The code is available on GitHub.

The machine can do a 30x30mm PCB in 10 minutes. It’s not about to set a record, but it’s cool and not at all bad for the price. You can see the failed PCBs lined up in the video from the initial tuning, but the final one produced a board very equivalent to the toner transfer method. Video after the break.

Continue reading “Laser PCB Exposer Built From CD-ROM Drives”

A 3-Axis Paper Cutting Mini Laser

LaserCutter

Laser are awesome, and so are projects that use lasers. A recent Instructable by [kokpat] gives an overview of how to create a fully functional laser paper cutter using CDROM stepper motors and an Arduino.

What is special about this build, is that it showcases how easy it can be to build a 3-axis mechanical system used for laser cutters, CNC machines, and 3D printers. Using a stepper stage that consist of a motor screw with a nut slider based carriage, the mechanical system can be put together quite easily and cost effectively. Luckily, from an electronics and software perspective, everything is quite standardized with the proliferation of the RepRap and similar machines. Simply pick any three stepper drivers, find the most pertinent firmware, and voilà! You’re done! Well, almost. Don’t forget a 100mW violet laser!

We have seen a ton of really cool laser cutters before, but this has to be one of the cheapest. See the laser cutter in action after the break.

Continue reading “A 3-Axis Paper Cutting Mini Laser”

RasPi “Inception” CD-ROM Case Mod

raspiInception

At first glance, [John’s] CD-ROM RasPi case may not seem all that unique, but we like both the implementation as well as the end-result functionality it provides. His goal was to use the Pi as a torrent downloader, and to store the downloaded files on a shared network drive. The Pi drive would slide into a bay in the server’s case—hence the Inception reference: a computer in a computer—allowing downloads while putting another step between the server and the outside world keeping, as well as guaranteeing that the network share would be available, because the server and the Pi would use the same power source.

[John] gutted the CD-ROM’s internals to leave only the PCB, which he stripped of most everything save for the power connector in the back. He then used the base of his old RasPi case as a standoff, mounting it to the top of the CD-ROM’s PCB. He soldered the power lines to the ROM’s power connector and temporarily hooked up a 5V adapter until he gets the server running. The final step was to carve out the back of the case for access to the Ethernet and USB ports, which [John] accomplished with a dremel, a hacksaw and a file. The front of the case still looks like a stock CD-ROM drive, and [John] has plans for future mods: re-purposing the LED to show network activity and modifying the buttons to serve as a reset, pause, or start for torrent downloads.