Printed Upgrades Improve Cheap Digital Microscope

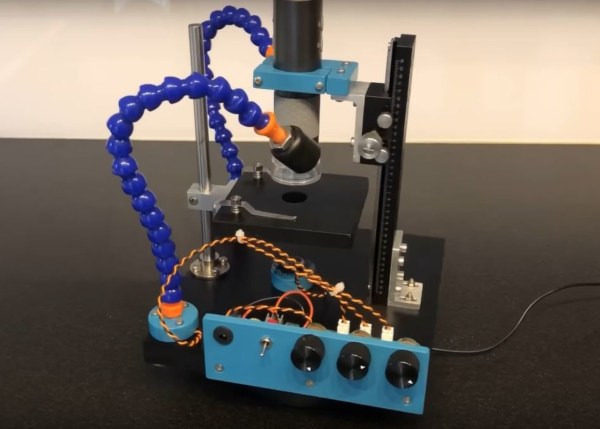
Digital microscopes used to be something that only labs or universities might have, but as image sensor technology has progressed, the prices have fallen to the point that any classroom or hobbyist can easily obtain a usable device. The only problem is that a lot of features and quality have been lost to make some of these digital microscopes more affordable. In an effort to add some of these creature comforts back into more inexpensive devices, [Marb’s lab] has created a special carriage for one of these microscopes.

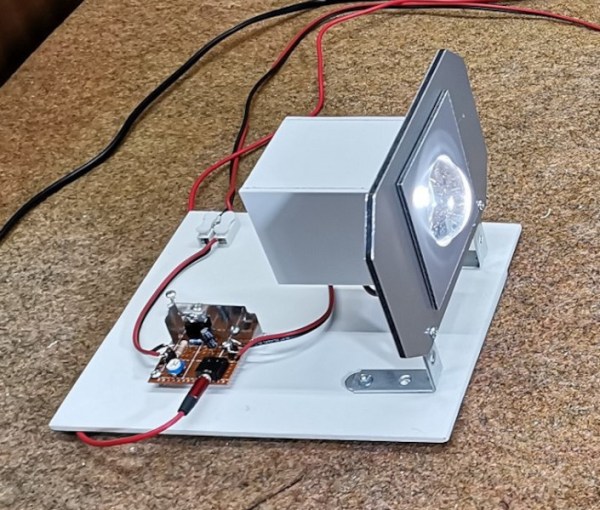
The first addition to the microscope is improved lighting. To accomplish this, three LEDs were built into custom housings and wired to a purpose-built LED driver board coupled with a voltage regulator. Two of the LED housings were attached to the end of adjustable arms, allowing them to be pointed in whichever direction is needed. The third is situated directly below the microscope underneath the stage. These are all mounted to a large, sturdy PVC base which also holds an adjustable carriage for the microscope itself. This allows much more fine-tuning of the distance between the sample and the microscope than it otherwise would have had.

For just a few dollars and a little bit of effort, the usability of a device like this is greatly improved. If you want to take the opposite approach and really go all-out for your microscope, though, take a look at these microscopes used for PCB circuit construction and troubleshooting or even this electron microscope for viewing things at a much higher magnification than any optical system would allow.

Continue reading “Printed Upgrades Improve Cheap Digital Microscope”

Backyard LED Sculpture Inspired By Las Vegas Sphere

The Las Vegas Sphere is a large building. It stands 112 meters high and 157 meters wide, and is covered in a full 54,000 square meters of LED displays. That’s a little difficult to recreate at home for the typical maker. A scaled-down version is altogether more achievable though, as demonstrated by [DrZzs & GrZzs].

The Pixelhead Megasphere, as it is known, is 1.98 meters high and 2.4 meters in diameter. That makes it altogether easier to fit in an average backyard, and it comes with a much smaller pricetag than the $2 billion used to build the Las Vegas Sphere. It runs 20,028 individual addressable LED pixels, and runs on four 12-volt 100-amp power supplies. As seen here, it’s only running at 15%, so it can go plenty brighter to really get those power supplies toasty. The sphere is controlled by Xlights, with the LEDs interfaced via Kulp controller boards. It’s able to run a variety of different animations at a good frame rate, with [DrZzs & GrZzs] busy whipping up different designs for Halloween. The eye of Sauron is a particularly nice example.

We’ve seen some other neat LED spheres before, too. Video after the break.

Continue reading “Backyard LED Sculpture Inspired By Las Vegas Sphere”

Minimalist LED Lamp Is Circular Beauty Incarnate

Lamps used to be things built to provide light with specific purpose, whether as reading lamps, desk lamps, or bedside table lamps. Now we just build them for the vibes, as with this minimalist LED lamp from [andrei.erdei].

The build uses a 3D-printed frame printed in opaque grey, with a diffuser element printed in a more translucent white. This is key to allowing the LED to nicely glow through the lamp without ugly distracting hotspots spoiling the effect. The lamp mounts 36 WS2812B LEDs in strip form. These are controlled from an Arduino Nano running the FastLED library for lightweight and easy control of the addressable LEDs. Smooth rainbow animations are made easy by the use of the HSV color space, which is more suitable for this job than the RGB color space you may otherwise be more familiar with.

[andrei.erdei] does a great job of explaining the build, including the assembly, electronics, and code aspects. The latter could serve as a particularly good resource if you’re just starting out on your own builds in the blinky, glowable space. Video after the break.

Continue reading “Minimalist LED Lamp Is Circular Beauty Incarnate”

Why Are We Only Just Now Hearing About LED Beaded Curtains

Beaded curtains are a pretty banal piece of home decor, unlikely to excite most interior design enthusiasts. Throw on some addressable LEDs, though, and you’ve got something eye-catching at the very least, as [Becky] demonstrates.

Joining the LED strands at the bottom made running the wiring easy but made walking through the blinds hard.

The project started with an existing beaded curtain as a base. A series of addressable LED strands were then carefully sewn to the beads using knots tied in plain sewing thread. The strands were configured as a single strand as far as the data lines were concerned, to make animation easy. Power was supplied to both ends of the strand to ensure nice and even brightness across the strands.

The brains of the system is a PixelBlaze controller, which makes it easy to wirelessly control the behavior of the strings. It’s the perfect tool for quickly whipping up fancy animations and pretty effects without hand-assembling a bunch of code yourself.

There was only a few problems with the project. [Becky] found a pretty passable LED beaded curtain from China midway through the project, which reduced her enthusiasm to finish the build. There were also issues walking through the curtain due to the wiring scheme she chose, where the bottom of one strand was connected to its neighbor.

Regardless, it’s a fun blinky build that brings some color to an otherwise drab doorway. It’s hard to complain about that! Video after the break.

Continue reading “Why Are We Only Just Now Hearing About LED Beaded Curtains”

Wireless Data Connections Through Light

When wired networking or data connections can’t be made, for reasons of distance or practicality, various wireless protocols are available to us. Wi-Fi is among the most common, at least as far as networking personal computers is concerned, but other methods such as LoRa or Zigbee are available when data rates are low and distances great. All of these methods share one thing in common, though: their use of radio waves to send data. Using other parts of the electromagnetic spectrum is not out of the question, though, and [mircemk] demonstrates using light as the medium instead of radio.

Although this isn’t a new technology (“Li-Fi” was first introduced in 2011) it’s not one that we see often. It does have a few benefits though, including high rates of data transmission. In this system, [mircemk] is using an LED to send the information and a solar cell as the receiver. The LED is connected to a simple analog modulator circuit, which takes an audio signal as its input and sends the data to the light. The solar cell sends its data, with the help of a capacitor, straight to the aux input on a radio which is used to convert the signal back to audio.

Some of the other perks of a system like this are seen here as well. The audio is clear even as the light source and solar cell are separated at a fairly significant distance, perhaps ten meters or so. This might not seem like a lot compared to Wi-Fi, but another perk shown is that this method can be used within existing lighting systems since the modulation is not detectable by the human eye. Outside of a home or office setting, systems like these can also be used to send data much greater distances as well, as long as the LED is replaced with a laser.

Continue reading “Wireless Data Connections Through Light”

Hackaday Prize 2023: Jumperless, The Jumperless Jumperboard

Jumperless is a jumperless breadboard with multicolored LED visualization of signals in real-time. Sounds like magic? This beautifully executed entry to the 2023 Hackaday Prize by [Kevin Santo Cappuccio] uses a boatload of CH446Q analog switch ICs to perform the interconnect between the Raspberry Pi Pico header and the jumper board (or breadboard if you prefer.)

This will add some significant resistance, but for low currents and digital logic levels, this should not be a major concern. Additionally, there are two DAC channels and four ADC channels to help break out of the digital world, which could make for some very interesting non-trivial applications.

The visualization of the Pico header signals is solved neatly with a tiny wishbone-shaped PCB that is reverse-mounted to the back of the main board to illuminate upwards. The masking of the labels is done by using copper to mask off the individual signals and solder mask to draw in the legends. This PCB-level hacking is simply wonderful to see. The PCBs are designed with KiCAD, the design files for which you can find here. It appears however that [Kevin] needed to have the spring clips for the jumper board custom-made, so you’d need to contact them if you needed to get some for a build.

On the software side of things, [Kevin] currently recommends using Wokwi, to run the Arduino stack applications and to perform the signal routing to the virtual jumper board. You can follow how it works internally here. A Python-based bridge application runs on the host computer, which takes care of programming the interconnects as they are constructed, which looking at the demo in the embedded video, appears to ‘just work.’

One word of caution though — the bridge app uses Python requests and Beautiful Soup to scrape the Wowki project page, which could potentially make it vulnerable to getting out-of-sync with updates, so hopefully [Kevin] will keep track of this and keep them in sync.

Need some breadboarding tips? We got you covered. Talking of bread, here’s an 8-bit TTL breadboard-based CPU in a breadbin.

Continue reading “Hackaday Prize 2023: Jumperless, The Jumperless Jumperboard”

Hackaday Prize 2023: Ubo Project: Building For Builders

The Ubo Pod by [Mehrdad Majzoobi] is a very highly polished extension pack and enclosure for the Raspberry Pi 4, which shows you how far you can go to turn a bare PCB into something that rivals the hardware offerings from Google and others. Gadgets like the Sonos speakers and Amazon or Google’s covert listening devices (aka Echo, Alexa, or whatever they’re branded as) are fun to play with. Still, the difficulty of hacking custom applications into them and god-forbid adding one’s own extension hardware, makes them fairly closed ecosystems. Add in the 
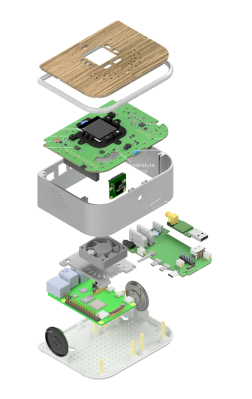
concerns of privacy and data security; they look less and less attractive the closer you look. Luckily the Raspberry Pi and its friends have improved the accessibility to the point where it’s positively easy to create whatever you want with whatever hardware you need, and to that end we think [Mehrdad] has done a splendid job.

The custom top PCB sits below the wooden top surface, hosting a central LCD display with push buttons located around it. Also sitting atop are some IR transmitters and receivers as well as RGB LEDs for the ring lighting. This top PCB acts as a RPi hat, and plugs into an RPi4 below, which then attaches to a side board via some PCB-mounted connectors, matching up with the USB and audio connectors. This board seems to act purely as an interconnect and form-factor adaptor allowing interfaces to be presented more conveniently without needing wires. This makes for a very clean construction. Extensive use of resin printing is shown, with lots of nice details of how to solve problems such as LED diffusion and bleeding. Overall, a very slick and well-executed project, that is giving us a few ideas for our own projects.

This type of project is commonplace on these fair pages, like this DIY smart speaker for example. With the supply of pi being still a little difficult to deal with, could you roll your own or get an alternative? What about just using your old mobile phone?