A Paper Printer For QR Code Menus

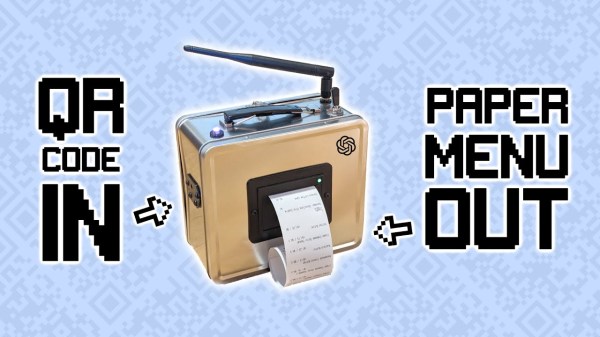
Do you miss the days of thumbing through a sticky, laminated booklet to order your food? Sick of restaurants and their frustrating electronic menus? Fear not, for [Guy Dupont] and his QR code menu printer are here to save the day.

Yes, that’s right — it’s a lunchbox-sized printer designed to spit out a paper version of a digital menu. Using a Tiny Code Reader from Useful Sensors, the device can scan a QR code at a restaurant to access its menu. A Seeed Studio XIAO ESP32 takes the link, and then passes it to a remote computer which accesses the menu online and screenshots it. The image is processed with TesseractOCR to extract food items and prices, and the data is then collated into a simple text-only format using ChatGPT. The simplified menu is finally sent to a thermal printer to be spat out on receipt paper for your casual perusal.

[Guy] was inspired to build the project after hating the experience of using QR code menus in restaurants and bars around town. It’s his latest project that solves an everyday problem, it makes a great sequel to his smart jeans that tell you when your fly is down.

Continue reading “A Paper Printer For QR Code Menus”

Coding A Dynamic Menu For Character LCDs On Arduino

These days, there’s a huge variety of screens on the market for use with microcontrollers. OLEDs and graphic LCDs abound, while e-ink devices tempt the user with their clean look and low energy consumption. However, for many purposes, the humble HD44780 character LCD does the job just fine. If you’re using such a device, you might want to implement a simple menu system, and in that case, [MyHomeThings] has you covered.

The menu code is simple to modify and implement. It allows the user to define a certain number of menu items, along with button labels and functions to be executed with button presses. By default, it’s set up to work with  left and right function buttons, with up and down buttons to toggle through the menu’s various entries. This suits the commonly available Arduino shields which combine a 16×2 character LCD with a set of four tactile buttons in a cross formation. However, modifying the code to use an alternate button scheme would be simple for those eager to tweak things to their liking.

For the absolute beginner to programming, it’s a great way to put together a simple interface for your microcontroller projects. It’s the sort of thing you might use if you’d built a do-everything Arduino handheld device, as we’ve seen built before. If you find text menus too archaic for your purposes, though, be sure to sound off with your favourite solutions in the comments.

Roll Your Own Rotary Encoders

[miroslavus] hasn’t had much luck with rotary encoders. The parts he has tested from the usual sources have all been problematic either mechanically or electrically, resulting in poor performance in his projects. Even attempts to deal with the deficiencies in software didn’t help, so he did what any red-blooded hacker would do — he built his own rotary encoder from microswitches and 3D-printed parts.

[miroslavus]’s “encoder” isn’t a quadrature encoder in the classic sense. It has two switches and only one of them fires when it turns a given direction, one for clockwise and one for counterclockwise. The knob has a ratchet wheel on the underside that engages with a small trip lever, and carefully located microswitches are actuated repeatedly as the ratchet wheel moves the trip lever. The action is smooth but satisfyingly clicky. Personally, we’d forsake the 3D-printed baseplate in favor of a custom PCB with debouncing circuitry, and perhaps relocate the switches so they’re under the knob for a more compact form factor. That and the addition of another switch on the shaft’s axis to register knob pushes, and you’ve got a perfectly respectable input device for navigating menus.

We think this is great, but perhaps your project really needs a legitimate rotary encoder. In that case, you’ll want to catch up on basics like Gray codes.

Continue reading “Roll Your Own Rotary Encoders”

Screensaver Hack

Bypassing The Windows Lock Screen

Most of us know that we should lock our computers when we step away from them. This will prevent any unauthorized users from gaining access to our files. Most companies have some sort of policy in regards to this, and many even automatically lock the screen after a set amount of time with no activity. In some cases, the computers are configured to lock and display a screen saver. In these cases, it may be possible for a local attacker to bypass the lock screen.

[Adrian] explains that the screen saver is configured via a registry key. The key contains the path to a .scr file, which will be played by the Adobe Flash Player when the screen saver is activated. When the victim locks their screen and steps away from the computer, an attacker can swoop in and defeat the lock screen with a few mouse clicks.

First the attacker will right-click anywhere on the screen. This opens a small menu. The attacker can then choose the “Global settings” menu option. From there, the attacker will click on “Advanced – Trusted Location Settings – Add – Add File”. This opens up the standard windows “Open” dialog that allows you to choose a file. All that is required at this point is to right-click on any folder and choose “Open in a new window”. This causes the folder to be opened in a normal Windows Explorer window, and from there it’s game over. This window can be used to open files and execute programs, all while the screen is still locked.

[Adrian] explains that the only remediation method he knows of is to modify the code in the .swf file to disable the right-click menu. The only other option is to completely disable the flash screen saver. This may be the safest option since the screen saver is most likely unnecessary.

Update: Thanks [Ryan] for pointing out some mistakes in our post. This exploit specifically targets screensavers that are flash-based, compiled into a .exe file, and then renamed with the .scr extension. The OP mentions these are most often used in corporate environments. The exploit doesn’t exist in the stock screensaver.

RGB Video Input Hack Is A Master Hack For CRT Televisions

What’s shown on the screen above is about half-way through the process of hacking RGB video into a CRT television that’s not supposed to have it. The lettering is acting a bit like a layer mask, showing bits of the Super Mario Bros. start screen which is being injected from an original Famicom. [Michael J. Moffitt] figured out that he could patch his signals into the multiplexer which is responsible for overlaying the TV’s menu system. Obviously you can’t get your Mario on with this view, but the next step was as simple as finding the blanking pin and tying it 5V. Brilliant.

This particular hack is worthy of recognition. But read through [Michael’s] write up and it’s obvious that he knows the driver circuitry beyond the realm of normal curiosity. If you ever get stuck while trying to do something custom, we’d recommend pinging him with your questions (sorry [Michael] but with great knowledge comes great responsibility).


Built-in Hex Editor Unlocks Plasma TV Features

[Nick] tipped us off about a guide to unlock extra features on Panasonic televisions. The hack works on the G10 models of plasma TVs and uses the service menu to gain access to the EEPROM memory. With a few quick steps you can change some data with a built in hex editor, unlocking several new settings menus, or bricking your entertainment centerpiece. We’ve seen some Samsung TV hacking in the past and hope that with increased processing power in today’s models we’ll someday see consumer TVs available with open-source firmware so that we can integrate of our favorite entertainment software.