VFD Wristwatch

The ChronodeVFD Wristwatch

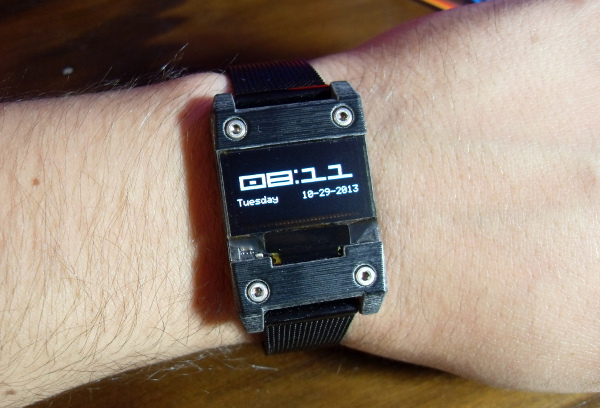
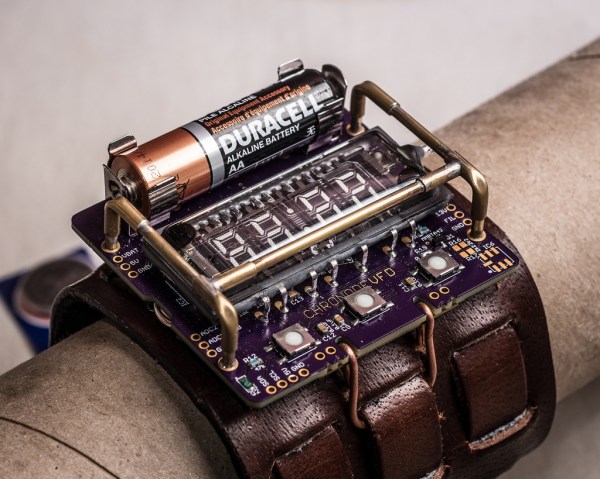
Not just another steampunk fashion statement, [Johngineer’s] ChronodeVFD wristwatch is as intricate as it is beautiful. Sure, we’ve seen our share of VFD builds (and if you want a crash course in vacuum fluorescent displays, check out Fran’s video from earlier this year) but we seldom see them as portable timepieces, much less ones this striking.

The ChronodeVFD uses a IVL2-7/5 display tube, which in addition to being small and low-current is also flat rather than rounded, and features a transparent backing. [Johngineer] made a custom board based around an AtMega88 and a Maxim DS3231 RTC (real time clock): the latter he admits is a bit expensive, but no one complains about left-overs that simplify your design.

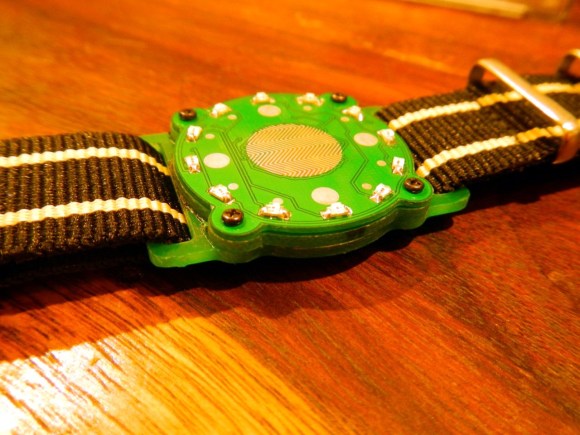
The VFD runs off a Maxim MAX6920 12-bit shift register and is powered by a single alkaline AA battery. A rechargable NiMH would have been preferable, but the lower nominal voltage meant lower efficiency for his boost converters and less current for the VFD. [Johngineer] won’t get much more than 6-10 hours of life, but ultimately the ChronodeVFD is a costume piece not meant for daily wear. Swing by his blog for a number of high-res photos and further details on how he built the brass tubing “roll cage” enclosure as well as the mounts for the leather strap.

Go Vintage! Learn To Repair And Restore Mechanical Pocket And Wrist Watches.

pw tear down 1

Until recently, watches have been entirely mechanical where each wheel, gear, and mechanism representing a milestone in our understanding of precision manufacturing and timekeeping.

One of the very first watches, created by a locksmith.

Today it is nearly impossible to find watchmakers to service or repair vintage mechanical pocket and wristwatches, so we have to do it ourselves. Learn to repair vintage mechanical watches. You can do this and we’ll show you how.

They tick, mechanical watches have a pulse. First created in the 16th century by locksmiths, these early watches could only resolve time down to the hour and for this reason displayed time with only one hour hand.

By the 18th century fusee technology enabled watches to achieve accuracies to within seconds.

Continue reading “Go Vintage! Learn To Repair And Restore Mechanical Pocket And Wrist Watches.”

Hackaday Links: April 6, 2014

hackaday-links-chain

Back in September we saw this awesomesauce wristwatch. Well, [Zak] is now kitting it up. Learn more about the current version, or order one. [Thanks Petr]

Home automation is from the future, right? Well at [boltzmann138’s] house it’s actually from The Next Generation. His home automation dashboard is based on the LCARS interface; he hit the mark perfectly! Anyone thinking what we’re thinking? This should be entered in the Hackaday Sci-Fi Contest, right? [via Adafruit]

PCB fab can vary greatly depending on board size, number of layers, number of copies, and turn time. PCBShopper will perform a meta-search and let you know what all of your options are. We ran a couple of tests and like what we saw. But we haven’t verified the information is all good so do leave a note about your own experience with the site in the comments below. [via Galactic Studios]

We recently mentioned our own woes about acquiring BeagleBone Black boards. It looks like an authorized clone board is poised to enter the market.

Speaking of the BBB, check out this wireless remote wireless sensor hack which [Chirag Nagpal] is interfacing with the BBB.

We haven’t tried to set up any long-range microwave communications systems. Neither has [Kenneth Finnegan] but that didn’t stop him from giving it a whirl. He’s using Nanobridge M5 hardware to help set up a system for a triathlon happening near him.

Stylish OLED Watch Uses Accelerometer Instead Of Buttons

A few days ago [Andrew] contacted us to offer his help for the design of the mooltipass project case. While introducing himself, he casually mentioned his OLED watch that you can see above.

The watch is based on the low-power MSP430F microcontroller from Texas Instruments. It can consume as little as 1.5uA while maintaining a real-time clock and monitoring interrupts. It also uses ferroelectric RAM, which doesn’t need any power to retain its memory contents. That means there’s no need to set the time again if you remove the CR2016 battery that powers the watch.

[Andrew] chose an 0.96″ OLED display that only consumes up to 7mA. He also included an accelerometer that allows him to interact with the watch through its single and double tap detecting feature. He modeled his PCB using EagleCAD and the whole assembly using Sketchup. Most of the components were soldered in his reflow (toaster) oven. The final result is a mere 8.8mm thick and looks very professional in our opinion.

Fabricating A Mechanical Wristwatch At Home

diy-mechanical-wristwatch

Our mouth is still agape after digging through [Tom’s] watchmaking blog. This gentleman spent several years designing and machining his own mechanical wristwatch. A dozen years ago or so [Tom] answered an ad for an apprentice watchmaker. He worked on watches and came across a book that detailed how timepieces are made. He was told that no-one does it like that anymore, which only fed his curiosity. What he came up with is, to his knowledge, the first timepiece every made in Australia.

It’s no secret that we have a thing for clocks. But we feature digital timepieces almost exclusively. We’ve love mechanical watches too but don’t see them as hobby projects very frequently. After looking at what goes into the mechanism it’s not hard to see why.

[Tom] was faced with a variety of challenges along the way. One of the biggest was having to come up with tools that would let him perform the precise milling work necessary to achieve success. You’ll want to read through his movement design and manufacture posts. He laid out the plan in CAD, but ended up using some hacked together milling tools to get the job done.

[Thanks Amit]

Wristwatch Made Of Sandwiched PCBs

wristwatch-from-sandwitched-pcbs

Here’s a wristwatch concept we haven’t seen before. Instead of trying to sandwich everything inside of a case it uses a stack of PCBs as the body of the watch.

[Mats Engstrom] wrote in to tip us off about his build. The design goes with LEDs which is nothing new. But unlike previous offerings [Mats] didn’t go with one LED for each minute. When the touch sensor in the middle of the watch is activated the twelve LEDs on the face will let you know the hour and the nearest five minutes. A video of this is embedded after the break.

The design uses three different circuit boards. The bottom board is the largest and provides slots through which the wrist bands can connect. It also serves as one of the two battery connectors. The second PCB is a spacer with a cutout for the coin cell that powers the device. The top board is where all the magic happens. It’s dual sided to host the LEDs and touch senor, with the PIC microcontroller and support circuitry on the other side.

Continue reading “Wristwatch Made Of Sandwiched PCBs”

OTM-02 Is A 3D Printed Wristwatch

3d-printed-wristwatch

We love looking at roll-your-own wristwatch projects. Getting a project small enough to carry around on your wrist is a real challenge. But we think the OTM-02 wristwatch really hit the form factor right on the mark.

OTM stands for Open source Time Machine. It’s the work of [Hairy Kiwi] and he managed to bring the guts of the watch in at a thickness between 6.5 and 7mm. That includes the LCD, PCB, piezo diaphragm, and the battery. The PCB itself is a four-layer board built on 1mm thick substrate. It’s running an EFM32 (ARM) microcontroller which comes with hardware USB support. The little door sitting open on the side of the 3D printed enclosure provides access to the micro USB connector which can be used to charge the 150 mAh battery inside. That may not sound like much juice, but if you set the display to show minutes only [Hairy] calculates a battery life approaching 175 days. If you just have to have the seconds displayed you can expect about two weeks between charges.

Like the name says, this project is Open Source.

[Thanks Liam]