Moving A Resistor For EvalBot Power When Programming

[Riley Porter] posted a picture of his EvalBot USB power hack. In the photo above we’ve put a box around D6 and D7. The development board ships with a 0 Ohm resistor in the D7 location, patching in power from the USB-B connector labeled USB DEVICE. He found that by moving that resistor to D6 he can power the board from the USB-B connector labeled ICDI.

That connector is the In-Circuit Debug Interface. TI sent us an EvalBot bundle so we pulled it out and tried it ourselves. If you plug in the ICDI it doesn’t power the board, and no USB devices register. Shorting the D6 pads changes this and the following USB device registers:

Bus 002 Device 062: ID 0403:bcd9 Future Technology Devices International, Ltd Stellaris Evaluation Board

So it looks like you need to have two USB connections or be using batteries in order to program the board via USB. The uC/OS-III hardcover book that ships with the EvalBot bundle includes board schematics. We took a look and were surprised to see that they show diodes installed on both pads. Rev A of the online schematics have been corrected, showing an omitted diode on D6 and the 0 Ohm resistor on D7. Images of both schematics are included after the break.

It would have been nice to see a selector switch installed here to give you a little more flexibility when prototyping.

Continue reading “Moving A Resistor For EvalBot Power When Programming”

Open Source Kinect Contest Has Been Won

Adafruit Technologies has announced the winner of the Open Source Kinect contest. [Hector], who we mentioned yesterday has won, providing both RGB and depth access to the device.  Some of you were asking at that time, why the contest was not over yet. Well, Adafruit had to verify. The image you see above are of another user[qdot], verifying the drivers on his machine.

What is interesting is how Adafruit has chosen to close this contest. Not only are they giving [Hector] his prize money, they are also donating an additional $2,000 to the EFF who fight for our right to legally hack and reverse engineer our own equipment.

[Hector] is being generous as well, using his prize money to help pay for gadgets to hack with some teams he is involved with, mainly the iPhone Dev Team and the Wii hacker team “Twiizers”

Japanese Micro Planes

Some very well engineered micro planes(translated) have been buzzing around the net. The goal here is ultra light weight. These suped-up paper planes have a remarkable target weight of around 10 grams (translated). The lighter the micro plane is the slower and more maneuverable it will be leading to some pretty interesting and scary applications. For controls it looks like many of the planes are using infrared receivers/transmitters (much like you would find in a TV remote hint hint). Getting the lightest plane possible has forced the designers to come up with some pretty ingenious tricks. For example, instead of using packaged servos they use a coil of wire wrapped around a rare earth magnet to control the flaps. You can see these home made “servos” in action after the break.

Some have taken a more classic approach and used rubber band power instead of a li-po/motor combo.

[via Make]

Continue reading “Japanese Micro Planes”

Fixing The Future

[iFixit] (who we’ve posted about many times before) has launched a passionate manifesto promoting the skills and knowledge of repair as a solution to technological consumerism and waste. They use powerful footage of electronic waste dumps in Ghana to make the point that we must collectively change the way we use and relate to our high technology–take a look after the break.

The manifesto rallies against the practice of withholding repair knowledge such as manuals, error codes and schematics–putting responsibility in the hands of manufacturers–but also makes it clear that it is up to every one of us to inform ourselves and to value functionality over novelty.

Considering the many-faceted resource crisis that we are headed towards, any efforts to push our behavior towards a sustainable and considerate way of life should be considered. As hackers we repair, reuse and rethink technology as part of our craft–but we are also privileged by our enthusiasm for technical challenges. The real battle is to disseminate the kind of knowledge and skills we possess into the general population. This is where the heart of [ifixit]’s message comes into play: the creation of an open, editable online repair manual for every electronic device. If you have something to teach, why not pop over and help expand their database?

Continue reading “Fixing The Future”

Carbon Fiber Part Fabrication Guide

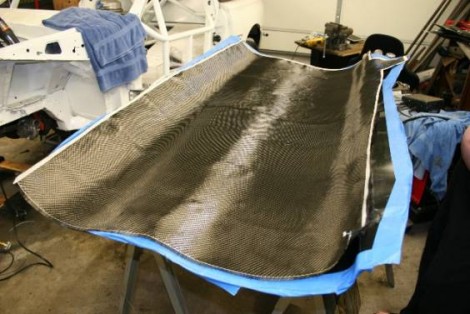
If you’re thinking of working with carbon fiber this guide should be a big help. The example is aimed at the automotive crowd but the principles transfer quite easily. Carbon fiber parts are constructed in a similar manner as fiberglass parts. A mold is covered in a release agent, the fibers are put in place and covered in epoxy. With fiberglass the fibers are often sprayed on but carbon fiber components use woven mats of the material to build up multiple layers. Vacuum bags are used to hold the layers together, removing air and impregnating the fibers with the epoxy. This guide even outlines the construction of a vacuum pump needed for that step.

The benefits of carbon fiber are many, including strength and weight reduction. This makes it a great material for adding parts to weight-sensitive hacks such as quadcopters. But the mesh also has an interesting look which is why it shows up in custom electronics cases. The one real drawback is that when this material fails it is a catastrophic failure, tending to crumble across the entire structure rather than limiting damage to a small area. That means that a rough landing might be the end of your new parts.

[Thanks MS3FGX]

Diving Deep Into The Game Boy LCD Protocol

[Craig] wanted to make the original Game Boy LCD screen do his bidding so he sniffed out the data protocol that it uses. We were amused when he mentions that there’s an army of people out there looking to build pointless crap as part of a hobby. Guilty. And he goes on to outline why this LCD screen is a great resource for hobbiests.

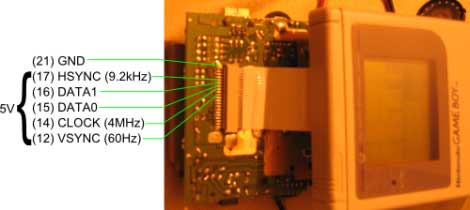
As you can see in the pinout above, it uses 5V logic, with a 4 MHz data clock. These traits are both very friendly to a wide range if inexpensive microcontrollers. If you know how to address the display it should be very easy to use. Furthermore, the low pin count is thanks the to a 4-shade grayscale screen, limiting the data pins to just two. [Craig] hooked up his Saleae Logic probe to capture communications and walks us through what he discovered. During this process he proved to himself that he had figured out the protocol by exporting captured data from the logic probe and reassembling it into an image on his computer.

Single-motor Walker For Santa-Pede Challenge Inspiration

This LEGO hexapod uses just one motor for motion. In the video after the break you can see that what [Valetnin Bauer] accomplished is almost magical, using just 210 parts. A central drive shaft uses worm gears to transfer motion to each of the legs. The limb mounting technique results in a sort of rowing motion that closely mimics what you’d expect to see from a biological hexapod.

We thought this might provide some inspiration for the Buy Break Build: Santa-pede challenge. Sure, using LEGO is a lot easier than reusing Santa parts. But a lot can be accomplished with a little creativity. Another point of inspiration might be this one-motor walker that should be a snap to adapt to the challenge. Better get going, just twenty days let until the project deadline!

Continue reading “Single-motor Walker For Santa-Pede Challenge Inspiration”