Repaired Microwave Keypad Looks As Good As New

microwave_keypad_repair

Instructables user [Rohit] had an out-of-warranty microwave with a broken membrane keypad. Much like our friend [Alexandre] from Brazil, he found the cost of replacement parts beyond reasonable, so he had to find a way to repair it instead.

He disassembled the front cover of his microwave to get at the main controller board. Once it was detached, he removed the keypad’s cover to get a closer look at the matrix underneath. While taking notes on how the matrix was wired, he found that some keypad traces connected to other traces rather than buttons. He says that they are likely used by the microwave to detect that the keypad is present, so he made sure to short those traces out on the controller board when he wired everything back together.

He replaced the aging keypad with microswitches, but rather than mount them on the front panel of the microwave, he drilled holes for each switch so that he could mount them inside the face plate. Once everything was wired and glued in place, he re-mounted the keypad’s cover. Now the microwave looks stock but has firm, reliable, user-serviceable buttons that are sure to last quite a while.

3 Axis Plotter Made From Spare Parts

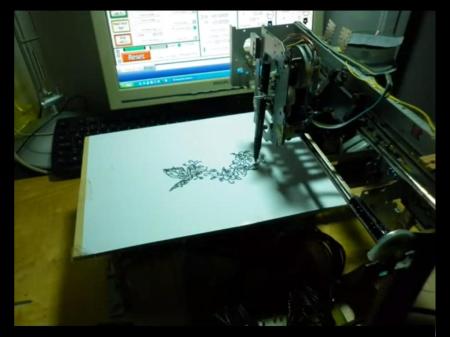
The plotter featured above was, according to the author, made almost entirely of salvaged parts. In addition to what he had accumulated, only $20 in parts was needed to complete this build. Pretty good considering the thousands of dollars that a new plotter goes for.

Control of all axes is accomplished using unipolar stepper motors.  In this case only one unipolar motor was available along with two bipolar motors. [Lovro] actually hacked these into a unipolar setup to save costs on the build.

Mach3 control software along with a parallel port is used to control the steppers. A similar “junk” setup could be used to power a CNC mill or laser engraver, so think twice before tossing that old printer in the trash!  Check out the video of this plotter in action after the break! Also, see this hack for a similar laser engraving machine using Mach3 control software. Continue reading “3 Axis Plotter Made From Spare Parts”

Tiny Morse Code Trainer

[Eric] wanted to teach his kids Morse code, so he built a tiny Morse code trainer.

[Eric] built the trainer around an ATtiny85, and the rest of the circuit follows this minimalist idea. After connecting a piezo beeper and 6-pin ISP header, the only thing left to do was write a little code and start teaching his kids Morse. The Morse trainer is programmed to repeat the message, “SOS the moon rover has broken down and I am stuck in the trash can in the garden shed,” [Eric] planted a Lego moon rover in his shed as a prize for learning Morse, making him one of the coolest dads ever.

Although learning Morse isn’t required for an amateur radio license anymore, it’s a requirement for continuous wave radio. We think this is a great way to learn Morse the right way – actually hearing the characters – instead of memorizing the Huffman tree of Morse characters.

Synapse Turns Your Kinect Into A Dubstep Theremin

kinect_dubstep_theremin

[Ryan Challinor] is part of a group constructing a display for this year’s Burning Man festival that includes the Kinect, Ableton Live, and Quartz Composer. As the programming guru of the project, he was tasked with creating a method for his partners to utilize all three products via an easy to use interface.

His application is called Synapse and was inspired by videos he saw online of people controlling individual Dubstep beats or sound effects with the Kinect. Synapse allows you to map multiple effects to each limb, sending joint positions, hit events, and image depth data to both Ableton and Quartz Composer via OSC. The user interface looks fairly easy to work with, enabling musicians and artists to create awesome audio/visual displays using their bodies as instruments, in a very short period of time.

Check out the pair of videos below to see a brief walkthrough of the software interface as well as a quick video demonstration of what Synapse is capable of.

[via KinectHacks]

Continue reading “Synapse Turns Your Kinect Into A Dubstep Theremin”

Puncture Resistant Bike Tires From Old Seatbelts

puncture_resistant_bike_tires

[Nicolás] often rides his bike in the city, and on more than one occasion has ended up with a flat tire. A flat tire might not sound like a big deal, but imagine if you are a few miles from your destination and running late – now your day has gone from bad to worse.

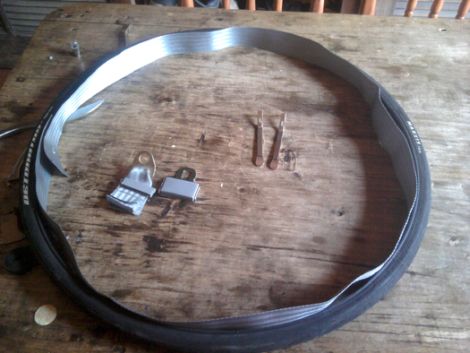
He was contemplating how he might protect his bike’s tires from being punctured by glass and other debris, when he came across some old car seat belts that used to serve as straps for various messenger bags. He pulled the tires off his bike and after removing the inner tubes, he unrolled the seat belts inside the wheels. The belts were cut to size, then the tubes were reinserted into the wheels and inflated as normal.

He hasn’t run into any glass shards just yet, but [Nicolás] is betting that the reinforced nylon mesh of the seat belts will keep his tubes safe whenever he does.

[via Make]

24 Cellphone Buttons Controlled With 6 Microcontroller Pins

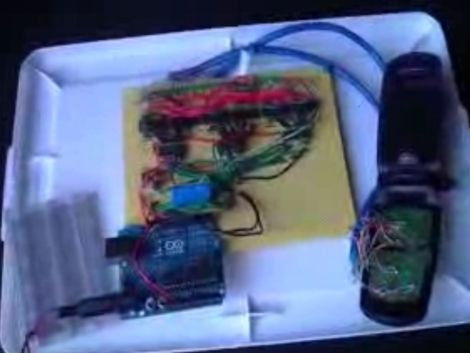
[J8g8j] has been playing around with an old cellphone. He wanted to control it using a microcontroller but since there’s 24 buttons he wasn’t thrilled about hooking up a couple dozen relays to do the switching. Instead, he managed to control all 24-buttons using just 6-pins of a microcontroller.

The proof-of-concept video that he posted on his site shows the phone responding to an arbitrary string of button presses. [J8g8j] spent the majority of his time reverse engineering how the phone’s keypad is wired. Once he figured out the rows and columns of the key matrix he soldered wires to access each of them. This turns out to be 14 connections. To these, he wired up a set of opto-isolators to handle the switching. These are in turn controlled by a set of three 74HC138A 3-8 bit decoders. what’s left are six input pins that leave plenty of room for him to hook up other items to the Arduino serving as the microcontroller.

Building DIY BlinkM Clones

ghetto_pixels

If you are planning on using more than a handful of BlinkMs in a project, you will likely find that their $15 price tag quickly adds up. Instructables user [jimthree] found himself in that position and opted to create his own homebrew version of a BlinkM instead. He calls his creations “Ghetto Pixels”, and while they might not look as professional as the real thing, they get the job done just the same.

He bought a batch of RGB LEDs online for under a dollar apiece, pairing them with ATTiny45s that he scored for about $1.50 each. [imthree] popped his uCs into a programmer, flashing them with an open-source BlinkM firmware clone called CYZ_RGB. He then prototyped his circuit on some breadboard, adding the appropriate resistors to the mix before testing out the LEDs. When he was confident everything was working correctly, he assembled Ghetto Pixels deadbug-style.

When everything was said and done, they came together in a pretty compact package comparable to that of the BlinkM. As you can see in the video below, they work great too!

Continue reading “Building DIY BlinkM Clones”