3-phase Jacob’s Ladder

Two sparks are better than one, a sentiment that was never more blindingly illustrated than with this three-conductor Jacob’s Ladder. The build centers around three-phase power, which uses a trio of alternating current sources sharing the same frequency, but offset by 1/3 from one another. If we’re reading the schematic correctly, [Jimmy Proton] is using normal mains as a power source, then connecting three transformers and a capacitor to set up the different phases. Two of the transformers, which were pulled from microwave ovens, are wired in antiparallel, with their cores connected to each other. The third transform is connected in series on one leg of the circuit.

The video after the break starts with the satisfying hum of power, only to be outdone by the wild sparks that traverse the air gap between conductors of the ladder. After seeing the first demonstration we kind of expected something to start on fire but it looks like all is well. We’ll probably stick to a less complicated version of Jacob’s Ladder.


Continue reading “3-phase Jacob’s Ladder”

Tactical Wifi Cantenna Needs Picatinny Rails

[Wes] built a cool looking Tactical Wifi Cantenna with some parts from a broken airsoft pistol. The antenna is a cookie can type with an added cone to increase performance, as seen in this tutorial. Once the antenna was built it was time to add some kind of handle, [Wes] just so happened to have such a thing on hand. After epoxy puddying the pistol’s grip to his cookie cantenna he observed that the magazine lock was still functioning. Quick thinking and the application of a  hammer in nut allows the whole rig to quickly attach to the tripod. The antenna also sports a plastic lid and textured paint finish for that ultimate tactical look and feel. A USB Alpha AWUSO36H Wifi dongle even mounts on the back of the rig. We wouldn’t go around outside pointing this at stuff attaching and detaching the tripod but the finish looks great, nicely done!

Check out some other various types of cantennas, even a rifle version if you crave more wifi goodness.

Full-featured Battery Tester Puts Them Through Their Paces

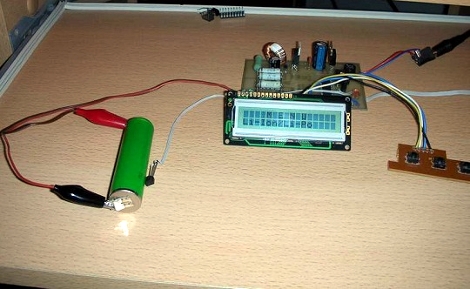
When working on battery-dependent projects you want accurate performance information where a datasheet may not be available. [E. Lelic] set out to build a device that would meter internal battery resistance but ended up with a bench tool that can do much more than that.

A PIC 16F88 microcontroller takes center stage on the meter, taking voltage level readings, monitoring a DS1820 temperature sensor, and controlling an LM2575 step-down regulator. The components provide functionality for measuring Lithium Ion, Lithium Polymer, Nickel Cadmium, Nickel Metal Hydride, and Alkaline batteries. It is capable of fully discharging and fully charging the batteries, measuring time and power consumption during this cycle, and monitoring temperature changes for the NiMH and NiCad versions.

Look for the little red ‘Download’ icon at the bottom of the post linked above. That archive includes a schematic (which we’ve also embedded after the break), board layout in .LAY format, and a HEX firmware file.

If you enjoyed this build you might want to look at this other battery capacity tester.

Continue reading “Full-featured Battery Tester Puts Them Through Their Paces”

Quick & Dirty USB Phone Charger

usb_phone_charger

Hackaday forum member [Dan Fruzzetti] wrote in to share a simple, yet useful hack he built just the other day. He and his wife both have Evo 4G smartphones and they were pretty disappointed in the lack of portable charging solutions available.

Instead of buying something and modifying it to his needs, [Dan] decided to build a quick and dirty charger instead. His ghetto-mintyboost was built into a cheap project box he found at Radio Shack, which is stocked with a set of four D-cell batteries. The batteries were wired in series and connected to a pair of salvaged USB ports mounted on a small piece of protoboard.

Knowing that most portable devices get 5.7v from their chargers already, he was not worried about hooking his phones straight into the 6v battery pack he built. He says that the phones actually charge pretty quickly, and that he estimates he should be able to get about 50 charges out of the box before he needs to swap the batteries.

This is not a complex hack by any means. It is quick & dirty, solves an annoying problem, and it’s dead simple to build. That’s exactly why we like it.

Reversible Relay-based Motor Controller

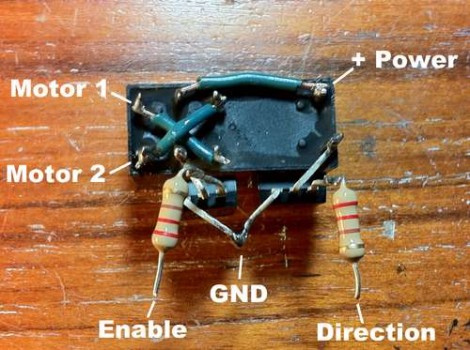
[Nothinglabs] built this motor controller as an alternative to using an H-bridge. They call it the RAT controller which stands for “Relay and Transistors”. You can see above that two Darlington transistors along with their base transistors allow logic signals to switch the relay on and off, driving the motor in one direction or the other based on the open or closed state of the relay. See it working in the video after the break.

It’s a nice little workaround with few parts, but because the relay is mechanical there will be a short lifespan when compared to solid-state motor controllers. That’s okay, because the motivation here was lack of parts on hand, rather than an increase in performance. It’s also worth mentioning that all of these parts can be purchased at your local Radio Shack when you don’t want to wait for component orders by mail. We certainly appreciate that it takes far few components than [David Cook’s] H-bridges. His designs are our favorite – we’ve used them in our own projects – but for quick and dirty you can’t beat five components and the short assembly time needed when using this type of dead-bug style soldering.

Continue reading “Reversible Relay-based Motor Controller”

Save Boatloads Of Cash By Building Your Own Laser Cutter

diy_laser_build

Have a bunch of time on your hands, and about $2,500 sitting around? Why not settle in and build yourself a laser cutter?

That’s exactly what Buildlog forum member [r691175002] did, and he told us about it in our comments just a few moments ago. Laser cutters can be pretty cost prohibitive depending on what you are thinking of picking up. The cheapest Epilog laser we could find costs $8,000, and you know what can happen when you try buying a cheap laser online.

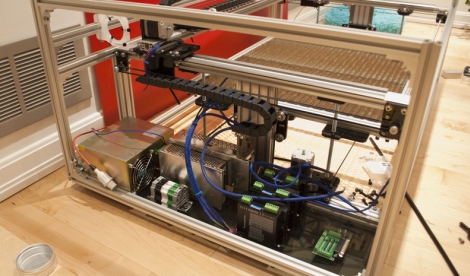
Instead of going for a ready-made cutter, he purchased an open-source kit from Buildlog, documenting the highlights of the build process online. The build log walks through a good portion of the construction starting with the frame and motor mounts, continuing through wiring up the electronics as well as some of the finishing touches. If you happen to head over to take a look around, you will find that there are plenty of pictures from various stages of the construction process to keep you busy for awhile.

With everything said and done, [Ryan] is quite happy with his laser. After going through the build process, he offers up some useful construction advice, as well as tips on sourcing cheaper hardware. He estimates that if he built the laser today, he could probably cut the costs nearly in half.

There’s no doubt about it – a $1300 laser cutter sounds pretty darn good to us.

OSHW Logo Announced

The results are in and the new Open Hardware logo has been selected! After tallying nearly 9,000 votes it has been decided that “Golden Orb” by Macklin Chaffe will now represent the OSHW definition v1.0.

Rest assured that despite earlier controversy regarding a few users that had submitted a very large number of duplicate votes (over 3,100 in all), the results have been cleaned up and validated prior to announcing the winner.

If you agree with the definition you can now go ahead and use the logo on your creations! Some creative individuals at this Open Hardware Summit forum have made it easy for you with logos of varying sizes, colors, and fill – perfect for application on any background. Here you will also find vector-based versions and even an Eagle parts library for inclusion on your next board’s silkscreen!

[Jason] at MrDecals.com has also generously offered 3 free decals of the new logo to anyone who asks – just pay for shipping. Please note that this is not a paid advertisement, [Jason] received permission from opensourcehardware.org to run the promotion and $1 for US shipping seems very reasonable. We are guessing from the responses to previous giveaways that many HackaDay readers might be interested!

We personally love the way that the new logo keeps with the feel of the Open Source Intiative logo and can’t wait to see what hardware it starts showing up on!