How To Build Your Own Cat Door

[Dino] continues his to satisfy his weekly hacking goal by building a cat door for his pets. He has a Habitat For Humanity resale store nearby that was doing a 50% off sale on doors. So he picked up a six-panel door and set to work.

The first step is drawing out the opening and cutting it with a jigsaw. Once he was done, there’s some reinforcement work to be done because this is a hollow-core door. Since he had already cut a bit of the bottom off of the door to fit his jamb opening, he had some wood stock that was already the right thickness. That bit was secured to the top and bottom of the opening with glue and some brads. The same was done on the sides with a different piece of scrap, then the door was hung in the opening to reach the point in the project seen above.

Here [Dino] prepares to add a flap to cover the opening. He used acrylic for the flap because it’s light-weight and clear. A piece of piano hinge makes it easy to swing in both directions. The final touch is a magnet which keeps the flap from swinging in the breeze using parts from a magnetic cabinet latch. No sooner does he have the flap in place than a brave kitty gives it a test run.

Hopefully he doesn’t have the kind of pests that caused other hackers to build facial recognition cat door locks.

Continue reading “How To Build Your Own Cat Door”

Robotic Arm Follows The Movements Of Your Own Limbs

[Alejandro] and his friends recently finished a first prototype of scratch-built robotic arm. They’ve got some nice electronics bench equipment for use with a project like this, but for the actual fabrication work it’s off to the kitchen.

As you can see in the video after the break, they’re using PVC as the stock material in this build. Flat sheets are produced by slitting a PVC pipe down the middle, warming it in oven until soft, then compressing it between two floor tiles with a big jug of water used as a weight for the makeshift press. Mounting holes for the servo motors that make up the joints are drilled with a hand drill, and the assembly was affixed to an old CD as a base.

Once assembled they wired it to the control circuitry and build a set of sensors that you wear on your arm. Now your elbow, wrist, and pointer finger are in control of the servos. A demonstration of this functionality starts around two minutes into the video.

We’ve seen other examples of robot arms built without the use of machine tools. This arm made out of ShapeLock plastic is one of the most interesting examples.

Continue reading “Robotic Arm Follows The Movements Of Your Own Limbs”

[Clement] Sees The Cargo Bike And Raises A Bicycle Cargo Trailer

[Clement] and his friends were going on a long bike tour and needed a way to carry their gear along with them. They set to work and managed to build this cargo trailer from mostly reused materials.

The only part of this trailer that is reused junk is the connection mechanism that lets you attach it to just about any bike. That was made (presumably in a machine shop) to act as a removable pipe clamp, making it pretty quick to swap between different bikes. It has a universal joint welded to it so that the angle of the seat post won’t affect how the trailer rides.

A goose neck keeps the trailer far enough back to avoid getting in the way of the rear wheel. The mesh basket was made from parts of an old industrial machine. The rear wheel is attached with a swing-arm that has what looks like a rubber bumper to act as a shock absorber. But if you want to make sure a big bump doesn’t send your luggage flying, [Clement] included a picture at the bottom of his post showing a much nicer spring shock on a different bike trailer.

If you’re confused by the title of this post you must have missed the cargo bike that was recently featured.

Page-turning Book Scanner Roundup

[Daniel] at diybookscanner.org posted a roundup of the best automatic book scanner builds to date. A lot of the comments on our last coverage of book scanners were summed up by [Spork] with, “No automatic page turning = no use.” Turning a page in a book with a robot is really hard, though, and these builds do a really amazing job at automating very tedious work.

First up is [jck57]’s servo actuated auto scanner. From the video, this build is very good and we caught it skipping only one page. Check out the video in action and the overview.

Next up is the Berlin Hackerspace c-base’s vacuum box scanner. The video shows a large diamond-shaped box with a vacuum cleaner hose attached to the top. The box is pressed down into the binding of the book where the vacuum picks up the next page. The build is a manual version of this very expensive machine, but does have the bonus of not poking a centuries-old book with robotic manipulators.

[dtic] was one of the first people to look into automatic page turning. His prototype (video here) uses servos, but has a very simple construction. The downside is that the book can only scan one side of the book at a time; to get other side, the user would have to turn the book upside down and scan it again.

Project Gado was an unsuccessful Kickstarter campaign whose goal was to develop a scanner to archive photos at Johns Hopkins University. The build used a vacuum-powered suction cup to lift pages onto a flatbed scanner. It’s a lot slower than some of the other builds, but we think there would be less of a risk of skipping a page.

As for processing the images captured by a digital camera, [Steve]’s book scan wizard handles a lot of the necessary post processing tasks. Converting everything to a PDF, changing the DPI, and putting all the pages in order can be done with [Steve]’s app. Download here.

Turning a page of a book is a very hard problem – books are designed for hands, not grippers. If you’ve got a book scanner build you’d like to show off, send it in on the tip line. We’ll be sure to put it up.

Star Wars Imperial March Played By Dual Floppy Drives

Although many have made some sort of music with improvised electronics, few sound as cool as this Imperial March from Star Wars played by two floppy drives. According to [Pawel], “It’s nothing new” and quite simple. This may be true as we’ve featured an Imperial March-playing floppy drive here before, but it was only one drive. Although it may not be the London Symphony Orchestra, the two drives together sound quite good!

According to him, the FDD has a fairly simple interface. To move the head, one simply needs to pull the DRVSB pin low and then activate the STEP pin on a falling edge.  This will make the head move one direction dependent on the DIR pin state. In this case, an ATMega microcontroller is moving everything. An explanation of the pins used in this hack can be found here.

Although it may look like an intimidating hack on the surface, something like this might be a neat project to try with some old hardware and an Arduino or other controller! [Pawel] did have the idea to hook up a 5 1/4″ and 8″ drive to make a full FDD orchestra, so we can’t wait to see what he comes up with! Continue reading “Star Wars Imperial March Played By Dual Floppy Drives”

Bread Head Makes AVR Programming A Snap

bread_head_quick_avr_programming_header

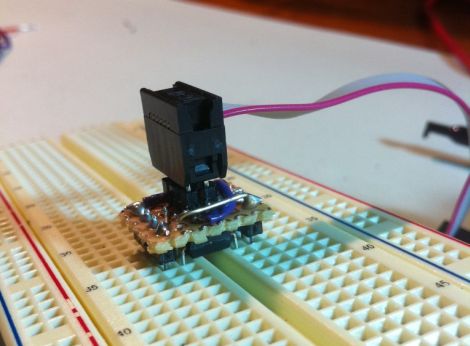
[Quinn] over at Blondihacks has been working with AVR microcontrollers a lot recently, and wanted a quick way to program the ATtiny13a (her current AVR of choice) while the chip is still seated in a breadboard.

To speed up code revision and testing, she built a small programming header that she calls the Bread Head. The device is wonderfully simplistic, consisting of little more than snappable header pins and a bit of upside-down protoboard.

She soldered six headers to the top (formerly the bottom) side of the board, while a set of eight oversized headers were soldered to the opposite side of the programmer. Small bits of wire were soldered in to connect all of the appropriate pins together before [Quinn] slipped the header snugly over the top of the ATtiny and gave it a quick test. Everything worked perfectly, so she slathered in in epoxy for sturdiness and called it a day.

She says that the programmer works so well that she’s likely to make a similar header for other common AVRs too.

Sustainability Hacks: Thin Client Server

It’s not environmentally friendly, but most of us run a small home server 24 hours a day. A small server is a useful tool to have that unfortunately wastes a lot of energy. [kekszumquadrat]’s thin client home server is actually a passable LAMP box that doesn’t draw a ton of power.

[kekszumquadrat] started looking at the SheevaPlug when beginning his quest but was a little concerned about the power supply failing. Looking for alternatives, he ran across a lot of cheap thin clients on eBay. The price was right and everything runs Linux, so a few days later he had an HP t5710 thin client on his doorstep.

This little computer came a copy of an embedded version of XP on a flash drive connected to the IDE port. Ditching that “operating system”, [kekszumquadrat] connected a USB hard drive and installed Arch Linux. After a few updates and package installations, he had a useful machine connected to the Internet.

Compared to the 7 Watts the SheevaPlug draws, the 15 W thin client is an energy hog. Compared to our improvised servers, [kekszumquadrat] is doing a remarkable job. Recycling old hardware never hurt anyone, either.