New BigDog Video Doesn’t Fail To Impress

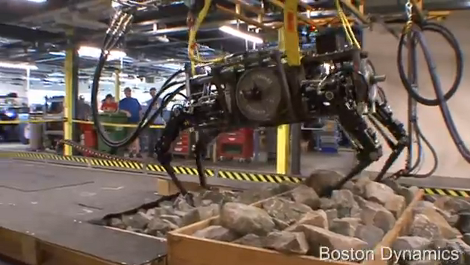
Those following the evolution of quadrupedal assist robots will recognize the specimen seen above as a relative of BigDog. This is AlphaDog, one of the latest prototypes in Boston Dynamics’ Legged Squadron Support Systems program. It’s designed to carry 400 pounds of payload, which explains the disc weights seen on either side of the torso. Like its diminutive sibling, LittleDog, it’s able to take on all kinds of terrain. Here it’s being tested with boxes full of rocks.

The robot is capable of picking itself up and getting under way again without intervention. The first video after the break shows test footage where the robot starts nearly upside-down and has no trouble righting itself again. When we looked in on a biped version back in 2009 we also linked to the BigDog prototype which showed developers trying to tip it over mid stride. This version has the same balance resiliency.

Also embedded after the break is a video showing the evolution of the design over about seven years of development.

Continue reading “New BigDog Video Doesn’t Fail To Impress”

Basic Micro ATOM Nano Giveaway

basic_micro_atom_nano_giveaway

UPDATE:
As several readers have already noted, these things sold out very quickly – in less than 15 minutes!  Big thanks to Basic Micro!

If you have been considering the purchase of a Basic ATOM Nano product, but you weren’t quite ready to lay down the cash for a dev board and Nano microcontroller, boy to we have a deal for you. The kind folks at Basic Micro informed us that they have 55 Basic ATOM Nano Development boards, complete with Nano 28 microcontrollers that they would like to give away to the Hack a Day community for the low, low cost of $0.

That’s right. Zero. Zip. Zilch.

The dev boards come complete with an LCD header, a small solderless breadboard, USB connectivity, a pair of servo connectors, and more! The Nano 28 is based on the PIC16F886 microcontroller, and features an 8MHz clock,  24 I/O pins, 14K of flash memory, 368 bytes of memory, and 256 bytes of EEPROM storage.

The total value of the package is just around $50, so this is an incredible deal! Basic Micro will even ship your kit to you for free via USPS.

Just add this item to your shopping cart on the Basic Micro site, and use the coupon code “freehack” at checkout – they’ll take care of the rest.

There are a few caveats to this giveaway, and they are as follows:

1) To participate, you must reside within the contiguous United States – i.e. anywhere in the lower 48 (Sorry readers from Alaska or Hawaii!)

2) The offer is limited to one kit per individual. Let’s not be greedy here, give your fellow hackers a chance at this deal as well.

3) Once these dev boards are sold out, they are gone for good. There are no rain checks or back orders available.

4) You must build something cool with your kit and share it with us in our forums or via the tip line*

*Not really, but it would be pretty cool if you did.

[Thanks to Dale at Basic Micro for putting this together for us!]

Get Digital Plastic Surgery Thanks To OpenFrameworks And Some Addons

[Kyle McDonald] is trying out a new look, at least in the digital world, with the help of some openFrameworks video plugins. He’s working with [Arturo Castro] to make real-time facial substitution as realistic as possible. You can see that [Arturo’s] own video has a different take on shading and color of the facial alterations that makes them a bit less realistic than what [Kyle] was able to accomplish (see that clip after the break).

The setup depends on some facial tracking software developed by [Jason Saragih]. That package is wrapped in ofxFaceTracker (already linked at the top of this article) which makes it play nicely with openFrameworks. From there, it’s just a matter of image processing. If you think you’re up to the challenge, grab your own copies of the source code and get to work. We’re shocked by how real this looks, even when [Kyle] grabs his cheeks and stretches them out. If someone can fix some of the artifacts around the edges of the sampled faces this would be ready to use when video-conferencing.

It kind of makes us think of technology seen in The Running Man.

Continue reading “Get Digital Plastic Surgery Thanks To OpenFrameworks And Some Addons”

Cocktail Machine Minces Words

For those living in a magical land of candy, with orange-faced helpers to do their bidding, the ability to taste your words is nothing new. But for the rest of us, the ability to taste what you type in cocktail form is a novelty. [Morskoiboy] took some back-of-the-envelope ideas and made them into a real device that uses syringes as keys, and facilitates the injection of twenty-six different flavorings into a baseline liquid. He figures that you can make each letter as creative as you want to, like representing different alcohols with a letter (T for tequila) or matching them to colors (R for red). Check out the video after the break to see an ‘Any Word’ cocktail being mixed.

This setup is entirely mechanical, and makes us wonder if [Morskoiboy] works in the medical equipment design industry. Each letter for the keyboard is affixed to the plunger on a syringe. When depressed, they cause the liquid in an external vessel (not seen above) to travel through tubing until it fills the proper cavities on a 15-segment display to match the letter pressed. From there the additive is flushed out by the gravity-fed base liquid into the drinking glass. We can’t imagine the time that went into designing all of the plumbing!

Continue reading “Cocktail Machine Minces Words”

Recreating The First PC

If you’re looking for a simple Ardunio project, why not replicate the first personal computer?

After discovering the Arduino, [Mark] realized recreating really old computers would be a fun project. An Altair 8800 was on the table, but the sheer number of blinkenlights, switches and the Intel 8080 CPU made that a fairly difficult project. After a bit of searching, [Mark] discovered the Kenbak-1, widely regarded as the first personal computer. The Kenbak also had the added bonus of having a very minimal I/O compliment and was built entirely with TTL components.

Since the Kenbak-1 is an extremely simple computer, [Mark]’s build ended up being fairly minimal. The schematic is only an ATmega328, a few shift registers and a real-time clock for a few added features the OG computer didn’t have. The completed build is programmed by pushing buttons to enter machine code into the mega’s RAM and then executed. [Mark] has a few programs already figured out – a program that counts in binary, a ‘Cylon eye’ and a BCD and binary clock. While the Kenbak-uno doesn’t have the awesome vintage case of the original, it’s still a remarkable build.

Check out the videos after the break for a walk through.

Continue reading “Recreating The First PC”

Using Polycarbonate Filament With A RepRap

[Rich] couldn’t find any instances where RepRap owners had used polycarbonate as a 3D printing source material. He’s filled that knowledge gap by running multiple polycarbonate printing tests. Polycarbonate is a plastic that is highly resistant to shattering yet it’s still rather soft. With enough effort it can be bent and stretched, but it’s fairly difficult to break the material.

The test spool of polycarbonate was special ordered for this project. [Rich] sourced 1.6mm filament since 3mm material would have been difficult to spool. It melts at a temperature range of 280-300 degrees Celsius, which he reaches with a hot-end extruder design. The printed material comes out a bit cloudy, which may be due to the heating process itself, or due to extruder reversals (he’s not quite sure what’s causing it). But as you can see above and in the video after the break, it’s certainly a viable printing medium.

Continue reading “Using Polycarbonate Filament With A RepRap”

Video: Soldering Our PIC Development Board

For those of you who followed along with our Eagle CAD series, here is the final payoff where we assemble the circuit board that was designed. In this video, [Jack] explains where things will go on the board and then shows you how to solder the parts. For the advanced folks out there who haven’t moved to solely surface mount parts when you can get away with it, he shows an easy way to solder the processor, which is a TQFP-44 part. This can seem like a daunting task but it really isn’t.

If you would like to make your own board like this, you can find the files here. Please note that although this board shouldn’t have any issues, we haven’t tested it ourselves yet. [Jack] is going to do some videos about a different topic for a few weeks but will pick back up with this board again when they are done.

Video is after the break. Continue reading “Video: Soldering Our PIC Development Board”