Mechanical Turing Machine Can Compute Anything…slowly

mechanical_turing_machine

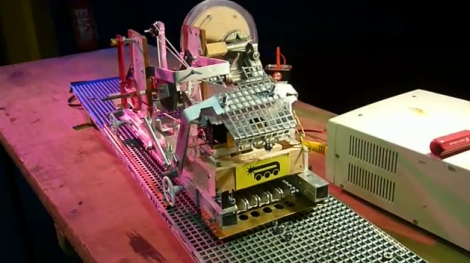
For several years, [Jim] has wanted to construct a fully-mechanical universal Turing machine. Without the help of any electronic circuits or electrical input, his goal was to build the machine using simple hand tools and scrap materials.

If you are not familiar with the concept of a Turing machine, they are devices that manipulate symbols or input from a strip of tape, according to a set table of rules. By definition, a Turing machine should be adaptable to simulate the logic of any computer algorithm, albeit in a much slower fashion than you would see from a computer.

He has replaced the strip of tape with a wire grid, and the symbols have been implemented in the form of ball bearings placed on the aforementioned grid. His hand-cranked machine uses magnets to lift the input symbols from the grid, processing them according to the rules table he routed out of a wood block.

The implementation is definitely clever, though [Jim] admits it is not without its problems. He took it to Maker Faire UK, and most people didn’t quite understand what they were seeing without a full explanation.  The machine is not quite as reliable as he would like it to be, and he would like to make it a bit more powerful as it currently would take months to add two numbers together.

Keep reading to see a brief video demo of his Turing machine in action, and check out his blog if you want to see more information on how the machine was built.

Interested in seeing more Turing machines? Check out these two machines we featured a while back.

Continue reading “Mechanical Turing Machine Can Compute Anything…slowly”

DARPA Needs Your Help! Design A Ground Combat Vehicle.

[Joe Schlesinger] of MakeIt Labs wrote in to let us know about an upcoming live chat session march 28th on IRC to discuss DARPA’s latest project, the Adaptive Vehicle Make.

DARPA, in the pursuit of innovative high-risk high-payoff tactical technology is looking to crowd-source the design and construction of the 3000-5000 parts that make up your run of the mill super advanced next generation military hardware. They are even going to distribute about a thousand 3D printers to schools, where students will compete to design some of the complex systems.  The project emphasizes “not traditional” vendors (IE: Hackerspaces) and monetary compensation will be involved in the parts production process.

If you like acronyms (and who doesn’t), or feel like wading through jargon, check out their site. We also found the Wikipedia entry to be helpful in understanding what they are carrying on about.  A briefing PDF (6mb) also contains a lot of information on DARPA’s plans, and pretty pictures.

As per usual DARPA plans on issuing several challenges to make up the entire project, all with huge cash prizes. The first two challenges last 9 months, starting with the Mobility/Drivetrain Challenge in the middle of 2012.   The Chassis/Integrated Survivability Challenge starts in 2013.  These first two also include a cash prize of  500 thousand to one million dollars. The third challenge, the Total Platform Challenge lasts 15 months and begins in late 2013 this carries a prize of one to two million.

[Joe]’s Hackerspace will be there, any chance we could help out?

Mame Cabinet Springs To Life From Ikea Furniture

[Jed] built a MAME cabinet into some flat pack furniture (translated). For the housing he chose an Ikea Ramvik side table. This is a perfect piece of furniture for the project for several reasons; it’s cheap, coming in at under $70, it’s a reasonable height to use while sitting on the sofa, it has a built-in drawer that will hide the guts of the system, and it was designed to use a piece of glass as the table surface.

The electronics are pretty straight forward. A notebook computer runs the MAME frontend, with an auxiliary screen which is framed nicely under the glass. Controls are standard coin-op type buttons soldered to the contacts on the PCB from a USB joystick. The brushed aluminum bezel added to the surface of the table keeps the modern finished look that one would want with a showpiece like this one.

We always like to keep our eyes open for hackable items when visiting Ikea. Make sure to check out their As-Is department (preferably as soon as they open) to find hackable furniture on the cheap.

Matchstick Model Rocketry

[Valentin] is the MacGyver of model rocketry, building a small rocket out of three items many people have hanging around the house. Cat litter, matchsticks, and a ballpoint pen are the raw materials that he rounded up before setting to work on the build.

The housing of the ballpoint pen will act as the body of the rocket. [Valentin] stuffed the tip of the pen with cat litter, creating the first part of the fuel chamber. Next, the heads of the matches were very carefully muddled into a fine powder which fills the bulk of the pen housing. Finish this off with another plug of cat litter and you’re almost done. The final step is to drill a hole through the plug layer at the tip of the pen, creating a nozzle to focus the force as the fuel burns.

From the videos we’d say there needs to be some work done as far as rocket guidance, but the solid state fuel certainly does work. Just remember to make your personal safety the first priority when working with combustibles like this!

Wondering how to launch something like this? Here’s a way to make your own igniters.

Antique Light Bulb Organ

Add a retro light show to any MIDI instrument with this Antique Light Bulb Organ, twelve 30 watt antique style light bulbs correspond with the 12 notes in an octave with a simple on or off action. The organ is also monitoring the pedals, so the lights will stay on as you use the sustain. Add in the natural slow reaction time of a light bulb and the effect is quite nice.

Along with MIDI instruments , you can also connect to a PC via USB allowing for remote control either with MIDI or OSC. On the hardware end there is a Atmega324P board that handles communication, user input and of course the lights. To switch the 120v AC current required by the lights twelve Sharp PR36MF22NSZF isolated solid state relays were wired up to some screw down light sockets also fitting the retro theme.

Lastly everything is placed in a nice fold up wooden cabinet, perfect for those long road trips to prevent breakage, but it also makes a nice place to put your keyboard while on stage.

Join us after the break for a quick music video that features this good looking light organ.

Continue reading “Antique Light Bulb Organ”

Bubble Display

As hackers we have come up with some pretty wild and unique ways to display data, but that never stops us from creating even wilder ways such as this Bubble Display. Inspired by a Hackaday article called Liquid Display the bubble display started out as a one column lexan tank so the team could check out different liquids, and build methods, which gave them the opportunity to test out their wet/dry vacuum in the basement as well.

After the leaks were solved in the prototype, different fluids were tried out to see what would work best,  glycerine (though the most expensive out of the 3 items tested) gave the best performance in how the bubbles rose to the top, and the uniformity of each individual bubble.

The final tank design features (24?) channels to keep bubbles from interacting with each other and are fitted with some Parker A005-C23-2P pneumatic valves hooked up to a standard air compressor. Electrically it’s pretty standard, with the solinoid driver stuff all run by a PIC18F4455 clocked at 48MHz.

Software wise the device has 3 modes, one mode allows users to enter text or simple bitmaps from a computer using a homebrew GUI written in Visual Basic, there is also a demo loop for when you still want to show it off, but there is not someone there to constantly bang data into it, and finally a live keyboard mode which acts as a bubble music visualizer when there is a keyboard connected via MIDI. Check all 3 out in a short video after the break.

Continue reading “Bubble Display”

Interactive Dice Game Pits Man Against Machine

dice_game

While most dice games are based on luck and chance more than anything else, [Mike] decided he wanted to create a dice game that took a little more skill to play. He built a replica of a game found in Ian Stewart’s “The Cow Maze”, a book of mathematical stories and puzzles.

The theory behind the game is as follows:

A number is randomly drawn and is considered the “heap”. Players take turns reducing the heap, using the die to represent the number they would like to remove. The only restrictions placed on moves are that you cannot re-use the same number chosen by your opponent in the preceding move, nor can you use the number on the die face opposite that number. The winner of the game is the individual reducing the heap to exactly zero, though you can also lose the game automatically if you reduce the heap to a negative number.

The game operates using a magnet-loaded wooden die and hall sensors built into the playing surface. The sensors relay the value of the die’s face to the ATmega chip he used to run the game. His code provides the logic for your computer opponent as well as for keeping score.

The whole project is wrapped up in a nice-looking wooden box that gives it a bit of old time-y charm, micro controller and LCD aside.

Be sure to check out the video below to see a few rounds of the game being played, and swing by his site for more details.

[via SparkFun]

Continue reading “Interactive Dice Game Pits Man Against Machine”