Watch A Rocket Engine Test Live This Afternoon

If you want to see something awesome this afternoon, watch SpaceX’s live broadcast of an engine test today at 3:00 pm EDT/12:00 pm PDT/7:00 pm GMT. You’ll see nine Merlin rocket engines power up to full thrust during a test for the upcoming launch of a Dragon space capsule to the ISS.

This is just a static test – hopefully the nine Merlin engines won’t go anywhere. To get an idea of the power behind these engines this is a test of just  Merlin engine being fired at the SpaceX open house in Texas a year or so ago. Today, nine engines will be fired at once.

Check out the videos after the break to see just how awesome the Falcon 9 is going to be.

via boingboing

Continue reading “Watch A Rocket Engine Test Live This Afternoon”

Adding A Remote Shutter To A Cheap Digital Camera

[Luo] sent in a very easy way to add a remote shutter to just about any Canon Powershot. Even though it’s just a button, battery, and USB cable, we’re sure this would be a great project to teach the younglings about the power of soldering.

Some Canon Powershot digicams are impressive beasts with the ability to take time-lapse, long exposure, and high-speed photos. These cameras are generally crippled by their firmware, but by installing CHDK these features can be enabled.

[Luo] read the CHDK wiki and found the firmware has the ability to snap a picture whenever a button is pressed. All he had to do is send 5V down a USB cable. After whipping up shutter button housed in a tin of Eclipse gum and attaching a cable, [Luo] had a functional shutter.

With the CHDK firmware, you can do a lot of really interesting stuff with the old Canon camera sitting on your shelf: we’ve seen a lot of intervalometers and even a few book scanners that use a similar setup. Nice work, [Luo].

Getting A Textured 3D Scan From Just A Webcam

Here’s an oldie but a goodie that passed us up the first time it went around the Internet. [Qi Pan], (former) PhD student at Cambridge, made a 3D modeling program using only a simple webcam. Not only does this make very fast work of building 3D models, the real texture is also rendered on the virtual object.

The project is called ProFORMA, and to get some idea of exactly how fast it is, the model of a church seen above was captured and rendered in a little over a minute. To get the incredible speed of ProFORMA, [Qi] had his webcam take a series of keyframes. When the model is rotated about 10°, another keyframe is taken and the corners are triangulated with some very fancy math.

Even though [Qi]’s project is from 2009, it seems like it would be better than the ReconstructMe, the Kinect-able 3D scanning we saw a while ago. There’s a great video of [Qi] modeling a papercraft church after the break, but check out the actual paper for a better idea of how ProFORMA works.

Continue reading “Getting A Textured 3D Scan From Just A Webcam”

Multitouch Table Uses A Kinect For A 3D Display

[Bastian] sent in a coffee table he built. This isn’t a place to set your drinks and copies of Make, though: it’s a multitouch table with a 3D display. Since no description can do this table justice, take a look at the video.

The build was inspired by the subject of this Hackaday post where [programming4fun] was able to build a ‘holographic display’ using a regular 2D projector and a Kinect. Both builds work on the principle of redrawing the 3D space in relation to the user’s head – as [Bastian] moves his head around the coffee table, the Kinect tracks his location and moves the 3 dimensional grid of boxes in the opposite direction. It’s extremely clever, and looks to be a promising user interface.

In addition to a Kinect, the coffee table uses a Microsoft Surface-like display; four infrared lasers are placed at the corner and detected with a camera next to the projector in the base.

After the break you can see the demo video and a gallery of the images [Bastion] put up on the NUI group forum.

Continue reading “Multitouch Table Uses A Kinect For A 3D Display”

Etching Your Own Boards Really, Really Fast

Sometimes the planets align and the Hackaday tip line gets two posts that are begging to be used together. Here’s two hacks to etch your own boards at home in just a few minutes.

Toner transfer PCBs on the quick

One way of putting an etch mask on a PCB is with the toner transfer method: print your circuit on a piece of inkjet photo paper using a laser printer, lay that circuit face down on a sheet of copper, and go at it with a clothes iron. This takes a heck of a lot of time and effort, but [Dustin] found another way. He used parchment paper instead of inkjet photo paper. Once the paper was on the board, he rolled it through a laminator. The results are awesome. It’s a very fast process as well – you don’t need to soak your board in water to get the photo paper off.

Etching that’s like wiping the copper away

[Royce] wrote in from the Milwaukee Makerspace to tell us about [Tom]’s etching process that is like wiping the copper off the board.  He used Muratic (Hydrochloric) acid and Hydrogen Peroxide with a sponge to wipe that copper away. The trick in this, we think, comes from the 30% H202 [Tom] picked up at a chemical supply company, but we’re pretty sure similar strengths can be purchased from beauty supply stores. Check out the video after the break to see [Tom] etch a 1 oz. board in just a few seconds.

Continue reading “Etching Your Own Boards Really, Really Fast”

Bitbanging Super Smash Bros.

[Kyle] and an a few of his classmates are wrapping up a microcontroller interfacing class at Purdue and thought it best to send in the results of their efforts. It’s a version of Super Smash Bros. made by just bitbanging pins on a microcontroller.

The hardware for the project is based around a Freescale 9S12c32, an updated version of the 30-year-old M68HC11 microcontroller. For the controls, the guys used a Playstation 2 joystick and buttons housed in an Altoids box, and the actual console is made out of strips of wood stapled together to look like a crate from Super Smash Bros.

There are nine playable characters:  Pikachu, Captain Falcon, Yoshi, Donkey Kong, Mario, Luigi, Link, Kirby, and Fox. Despite these characters being only four pixels high, the game looks extremely playable (at least when two players don’t choose the same character). After the break is the video demo of Super Smash Bros: Bitbang edition, along with a gallery of pics showing the console and gameplay. All the code is up on GitHub for your perusal.

Continue reading “Bitbanging Super Smash Bros.”

A Novel Binary Clock From Hackaday’s Own

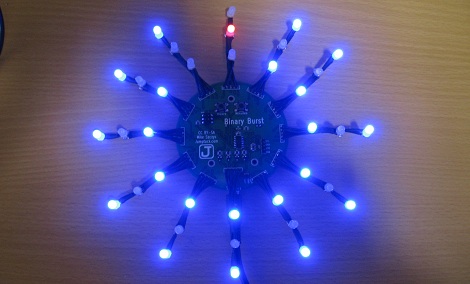
Hackaday’s very own [Mike Szczys] just shared an awesome binary clock he’s been working on. Unlike a normal binary clock that is only readable by self-admitted geeks and nerds, [Mike]’s clock is nearly comprehensible by the general population.

There are 12 lines of three LEDs around the face of [Mike]’s clock. These LEDs represent the time in minutes in binary – the inner LED is 1, the middle LED is 2, and the outer LED is 4. Adding up each of the LEDs around the clock face gives the number of minutes passed since the top of the hour.

To display the hour, [Mike] used a red/blue bi-color LED in the center of each line of LEDs. For example, at 1:03 the one ‘o clock hand will have a blue LED in the first position and a purple LED in the second position. A minute later at 1:04, this changes to blue, red, blue.

If that is a little confusing, there’s a wonderful video demonstrating the pattern of LEDs throughout the hour.

For such an interesting clock, the build is fairly simple – just an ATtiny44 with an STP16CP05 LED driver. Time is kept with a battery-backed MCP7940 real-time clock, and power is provided by a simple USB port.

[Mike] had enough boards manufactured for several dozen clocks, but only had enough parts (and patience) to solder up four clocks. You can check out the time-lapse of him going to town with a soldering iron on one of these boards after the break. As with all good builds, the code and schematics are provided on GitHub if you’d like to make your own.

Continue reading “A Novel Binary Clock From Hackaday’s Own”