Shooting Ping Pong Balls At Mach 1.2

Ping%20pong%20gun

Next time you’re in a Nerf gun battle, you better hope you’ve got this absurdly powerful ping pong ball gun. It shoots common celluloid spheres at over 400 meters per second, or Mach 1.2.

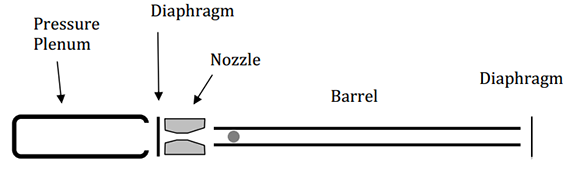
This ping pong gun is the work of [Mark French], [Craig Zehrung], and [Jim Stratton] at Purdue University. As you would expect, the gun is powered by compressed air housed in a length of 3 inch schedule 80 PVC pipe. One end of the pressure vessel is sealed with a PVC end cap, while the other is closed off with a doubled up piece of duct tape to contain the pressure.

The interesting bit of the build is a de Laval nozzle between the pressure vessel and the barrel. Just like a rocket engine nozzle, this bit of machined PVC compresses the air coming through the burst duct tape seal and allows it to expand again, propelling the muzzle-loaded ping pong ball at supersonic speeds.

The guys have written a report on their gun, you can grab that over on arxiv.

Finding 1s And 0s With A Microscope And Computer Vision

ROM

One day, [Adam] was asked if he would like to take part in a little project. A mad scientist come engineer at [Adam]’s job had just removed the plastic casing from a IC, and wanted a little help decoding the information on a masked ROM. These ROMs are basically just data etched directly into silicon, so the only way to actually read the data is with some nitric acid and a microscope. [Adam] was more than up for the challenge, but not wanting to count out thousands of 1s and 0s etched into a chip, he figured out a way to let a computer do it with some clever programming and computer vision.

[Adam] has used OpenCV before, but the macro image of the masked ROM had a lot of extraneous information; there were gaps in the columns of bits, and letting a computer do all the work would result in crap data. His solution was to semi-automate the process of counting 1s and 0s by selecting a grid by hand and letting image processing software do the rest of the work.

This work resulted in rompar, a tool to decode the data on de-packaged ROMs. It works very well – [Adam] was able to successfully decode the ROM and netted the machine codes for the object of his reverse engineering.

Elemental Display Is Also A LED Wall

elements

[Dan] is an element collector, someone who gets his socks knocked off by bismuth crystals and the orange vapor of bromine. Of course every element collector needs a proper display case, and since the periodic table table idea is cliché, [Dan] decided to build an elemental display that’s also a really awesome LED wall.

The build started off as most do with a few sheets of plywood and 120 acrylic shelves for each item in [Dan]’s collection. The real magic happened when [Dan]’s buddy [Bill] was called in to make the display a little more interesting.

Behind each acrylic shelf is a three-LED section of a LED strip, each part of the periodic table having a different color. The 120 individual shelving units are broken down into 16-shelf groups, each driven by a custom LED driver board. These driver boards are connected to a master Arduino with phone cables and make wonderful use of a very neat TCL5940 Arduino library.

The elemental display has a few options; all-on, twinkling, an Apple ‘breathing’ mode, and a graphic eq, as shown in the video after the break.

Continue reading “Elemental Display Is Also A LED Wall”

DIY Solder Stencils From Soda Cans

smd_stencil_done_w

Even if you’ve overcome your fear diddling about with tiny SMD components, applying solder paste – especially if you’re populating more than one board at a time – is still a chore. The pros use very expensive laser cut stainless steel solder paste stencils, something still a bit out of reach to the casual hobbyist. [Felix] solved this problem by making his own solder paste stencils very cheaply using empty soda cans.

The process begins just like any other home etching tutorial by lightly sanding the un-bent aluminum can and applying the etch resist via the toner transfer method. Etching is done with off-the-shelf HCl and hydrogen peroxide, resulting in an amazingly clean stencil comparable in quality with a professional stencil.

Sure, going through a dozen-step process to make a solder paste stencil may not be as convienent as [Cnlohr]’s toothpick and tweezers method, but [Felix]’ method is just about up to par with extraordinarily expensive laser cut stainless steel stencils. Not bad for something that came from the recycling bin.

Making High Concentrations Of Hydrogen Peroxide At Home

Hydrogen peroxide – the same stuff you can pick up from a drug store or beauty supply store – is one of those very interesting chemicals that belongs on every maker’s cabinet. At concentrations of about 30%, it’s perfect for etching PCB boards, and at even higher concentrations – about 70% – it can be used as rocket fuel. Unfortunately for the home hacker, it’s very difficult and expensive to obtain peroxide in concentrations above 3% or so. That’s alright with [Charlie], though, because he’s come up with a way to concentrate peroxide and measure the concentration once he’s done.

There are a few YouTube videos of kitchen chemists concentrating peroxide by heating it on a stove to just under 100°C. Because hydrogen peroxide boils at 150°C, they’re simply boiling off the water and increasing the concentration of peroxide. This is a qualitative method, and you’ll never know what concentration you’re getting. [Charlie] rigged up a small-scale with a pipette to measure the weight of his concentrated peroxide per unit of volume, giving him the density of his concoction and thus the concentration.

We have to note that concentrated peroxide is dangerous stuff, but the results of [Charlie]’s lab work aren’t much more dangerous than what hair stylists work with every day. If you’re going for high-test peroxide, good job, that’s awesome, but do be aware of the risks.

The Universal Geospatial Light Switch

project rita

Home automation has existed in one form or another for quite some time, but we thought this take on controlling lights was quite interesting.  Instead of having a menu of lights that you can turn on and off, this Android app lets you point your phone at the device and turn it on or of. Undoubtedly similar to how [Darth Vader] controls his lights at home.

Although the really technical details of this project aren’t listed, this setup reads the compass and GPS output of the Android device to figure out where it’s pointed in space. Combined with a script that understands the layout of the room, and an [X10] automation controller, it’s able to control lights accurately.

Be sure to check out the video of this device in action, or check out [Mike]’s [Project Rita] blog to see the other interesting projects that he’s working on!

Continue reading “The Universal Geospatial Light Switch”

Ammo Box PSU

PAB-PSU-1

Sometimes you need a power supply that can be thrown into the back of a car and taken into the field. [BadWolf] didn’t want to take his bench supply, so he whipped up this very portable power supply made from a computer PSU. To ruggedize his build a little, he put it in a 50 caliber ammo can making it more than able to handle the roughest field work.

While not a proper adjustable power supply, this ammo can is more than capable of delivering a whole lot of current in a number of different voltages. There are a few bells and whistles – a ‘plugged in’ and ‘on’ light, as well as a few very cool looking toggle switches that are sure to arouse the suspicions of unsuspecting bystanders.

[BadWolf] kept all the safety features built-in to the computer PSU, so this ammo box power supply is still protected from short circuits, and over-current, making it much safer than its appearance belies. It’s also a great example of what can be done if you don’t have a proper bench supply, so we’ve got to tip our hat to [BadWolf] for that.